Scale 1/48th, A-4G Skyhawk, RAN V805 Sqn

Ad: This forum contains affiliate links to products on Amazon and eBay. More information in Terms and rules

Thanks Dan, that information is so helpful.

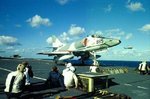
The photo in 1981 sort of gives it away in my opinion. Taken in 1981, it is a photo of an A4 immediately after the Indian Ocean deployment. The USMC guy if I recall was Capt Chuck Smith. The bearded one ringer is Eamon Lines. I would swear that the short guy next to Smith (on the left) is Dave Baddams, but as I have wrongly said before I thought he was killed.

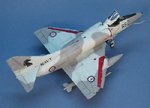
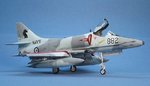
The photo suggests the standard US style, grey on white scheme, the olive drab schem over white/blue was added later, I am almost certain, plus i note the chequered tail disappears from the tail art, consistent with what you say happens to US
A-4s (from about 1982???) .


I'm actually thinking of trying to track Dave down. Its obvious that something has gone wrong in my memory so I am inclined to want to "solve the mystery" so to speak.

I was never aircrew....I was not accepted after I graduated. In the first half of 1980 I was a seaman officer, completing my "task book", essentially spending time in every part of the ship. Later I was working on the Bridge and in the ops room. Returned and spent six months at HMAS Watson at the Tactical warfare school. That was very cool, learning basic tactics and weapons capabilities, basically playing wargames on a giant screen. There were even sims for A4s ...set up in little rooms oif their own.

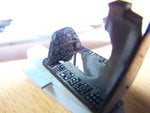
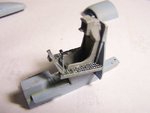
You have a knowledge and memory of the colour schemes that greatly exceeds my own. I am very thankful for your help. I will do my best to make this model the best that I can.
 
Graeme

thanks for the colour scheme, very much appreciated, but I agree with Dan. The picture he has of an 805 skyhawk in singapre harbour in 81 shows the older grey and white scheme with red checked tail emblem as still in use

I will give the FAA museum at HMAS Albatross (NAS Nowra) a call tomorrow, and see if they can provide any closure on this issue
 
Hmmm, we now have 2 pics of 885 with the 2 tone camo job....

Could there actually be more than one 885??? This is a tough one...

Interesting shot here, not sure of the year...
DS_N13_154906.jpg


I think we've got a stalemate.... Lookin at the evidence, Im gonna change my opinion on this and say it had the 2 tone grey/light grey camo jobber... 2 pics showing it with, and many pics showing other aircraft with the white/grey...

Now, could they have possibly changed BACK from the grey/grey to the white/grey???

Hmmmmmmmmmmmmmmmmm....
 
Hi Les and Parsifal. Yeah, I can't fully explain the 1981 photo of 876 in the old colours. All I can think of is the word "most"...


Maybe not all the Skyhawks (including 876) were painted in the wraparound scheme? Here's a late 1979 shot on Melbourne. You can just make out Parisifal's 885 in the wraparound, but the foreground and background Skyhawks remain in the white scheme...


Would they have repainted back to the old colours?

Here's how 885 looked in 1975...


I will give the FAA museum at HMAS Albatross (NAS Nowra) a call tomorrow, and see if they can provide any closure on this issue

Good idea and good luck Parsifal.
 
Last edited:
I think so too now. I rang the museum, even though it was a sunday. They say that some aircraft retained the original USN style two tone light grey and white camo until well into 1982. others, like my bird, 885, adopted the olive green/blue grey finish that you see. You can also see from Gremes photo that there were a mix of camo schemes even then, but 885 has the more modern green/ grey scheme.

I am going to go for the olive green and grey scheme I think. Will confirm tomorrow, but its almost certain now for me..

Time to start the cockpit I guess.

Two things I have to fess up on Dan. I already have painted the parts with primer, I actually think it helps a bit, and had done it before your advice.

Second thing is I already have a gun, cost me nothing, works fine, and I will give it a go I think. If I screw up I screw up.
 
Okay, just to really p*ss you guys off, here are two renditions of the scheme I am going to aime for....so is it more an olive green, or a USN dark grey that I am looking at. Is the photography playing tricks here???.
 

Attachments

  • 1982 scheme 1.jpg
    1982 scheme 1.jpg
    50 KB · Views: 98
  • 1982 scheme 2.jpg
    1982 scheme 2.jpg
    37.8 KB · Views: 113
  • Final scheme.jpg
    Final scheme.jpg
    82.8 KB · Views: 111
Okay, just to really p*ss you guys off, here are two renditions of the scheme I am going to aime for....so is it more an olive green, or a USN dark grey that I am looking at. Is the photography playing tricks here???.

That's interesting Parsifal. I thought it was a sort of dark 'bluey-grey', if I had to describe it, but that top photo certainly looks a 'greeny' colour. The same colour seems to be repeated in a painting by Mitch Lovett, but darker...

 
Progress so far

I think I will use the Light Admiralty grey (BS381 697 as the base coat, which you will see the first coats of in the following progress shots. Subject to confirmation I am inclined to apply the blue grey BS381693 as the top coat, if only because I can replicate that colour fairly accurately. The greeny colour changes from photo to photo, so I am at a bit of a loss as to how to replicate a colour that changes like a Chameleon....


I messed about today with the gun, and relaized I did not have the skills to apply that to the model with any sort of proficiency. I got better reults withy a diluted wash of base colour applied with a brush. Because the paint is heavily diluted, I am having to apply a lot of coats, and this tends to hide the brush marks, without having an obviously thick layer of paint over the model. At least, thats what I think. Any advice or correction to my warped thinking would be resptfully appreciated.

In my next post, I have also attached one or two pictures of how I would like my model to look. I am a long way short of that, obviously. But how does he get the exquisite detail to his cockpit. Mine by coomparison looks like a dogs breakfast. Again, any advice would be welcome.
 

Attachments

  • Picture 024.jpg
    Picture 024.jpg
    48.2 KB · Views: 112
  • Picture 029.jpg
    Picture 029.jpg
    36.4 KB · Views: 124
  • Picture 019.jpg
    Picture 019.jpg
    30.1 KB · Views: 115
  • Picture 015.jpg
    Picture 015.jpg
    36.7 KB · Views: 120
  • Picture 009.jpg
    Picture 009.jpg
    50.9 KB · Views: 111
How I would like it to look
 

Attachments

  • Image Opposition 4.jpg
    Image Opposition 4.jpg
    46.7 KB · Views: 106
  • Image Opposition 1.jpg
    Image Opposition 1.jpg
    38.8 KB · Views: 97
  • Image Opposition 2.jpg
    Image Opposition 2.jpg
    46 KB · Views: 103
  • Image Opposition 3.jpg
    Image Opposition 3.jpg
    40.2 KB · Views: 109
Isn't modeling educational say? Love to research for a model, even if it sometimes can give headaches and grey hair! Great stuff fellas! Looking forward to see more mate! :thumbright:
 
Guys, before i call it a day, I have another question. Now that I have learnt how to apply decals (doh) I realized I would need an aftermarket decal kit to finish the model as I would like. I can find wuite a few sheets for the different tail art, but none with the aircraft number "885". There are just none to be found.

I was thinking the solution for this might be to cut a template using paintshop, which will help me get the right font and size. I can then print this image onto plastic sheet, cut the numbers out of the sheet, and then use that sheet with the numbers cut out as a stencil with which I can brand the numbers onto the model.......

Or is this the most dumbassed of ideas..... ,
 
It would probably work. I tried that on my B-10, but I needed to REALLY small so it didn't work out very well.

You can buy clear decal paper and print the number on it directly from you computer (unless you need it in white). Then just cut it out and apply like a regular decal. The downside to that is I paid $8 for 3 large sheets.
 
Alternatively, look around for decal sheets for letters and numbers only - there are many available, in various styles, colours and sizes. It might mean having to use a different scale to get the sizes you want, for example 1/72nd scale 'bomber' size numbers, or similar, but you should be able to find some. Most of the major modelling outlet web-sites will list decals, so they should be easy to find.
 
Alternatively, look around for decal sheets for letters and numbers only - there are many available, in various styles, colours and sizes. It might mean having to use a different scale to get the sizes you want, for example 1/72nd scale 'bomber' size numbers, or similar, but you should be able to find some. Most of the major modelling outlet web-sites will list decals, so they should be easy to find.

Hi airframes

I did try that, but so far, incredibly perhaps, I have had no luck in Australia.

I have ordered the clear decals, should arrive tommorrow. In the meantime I have started the extemporised artwork in paint shop...Here is the progress so far
 

Attachments

  • DECALS for ac 885 post version.jpg
    DECALS for ac 885 post version.jpg
    7.7 KB · Views: 99
Looking good! what size lettering is the '885' ? ,I've got a 1/48 sheet of numbers and serials so if they're the right size I could send some your way
 

Users who are viewing this thread

Back