Super detailing Guillow's P-51D Mustang (1 Viewer)

Ad: This forum contains affiliate links to products on Amazon and eBay. More information in Terms and rules

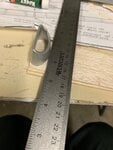
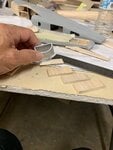
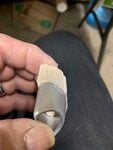
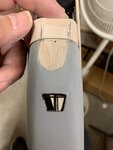
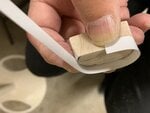
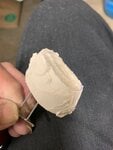
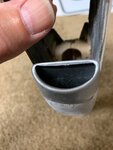
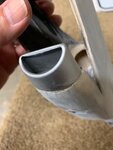
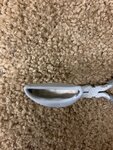
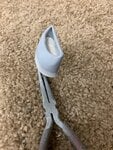
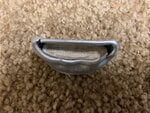
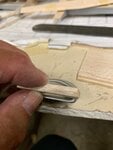
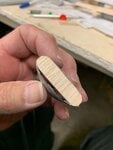
I then made up a series of laminations of balsa sheets to help me determine the ideal "thickness" or opening of the inlet. Initially it was too thin, then it was too thick and finally, like a child's story of the Goldilocks and the Three Bears, I found a thickness of lamination to be "about right" for the inlet.

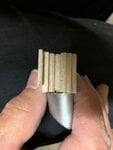
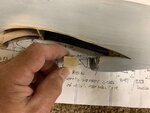
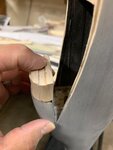
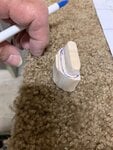
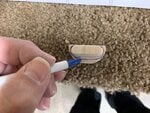
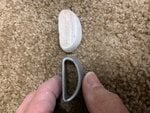
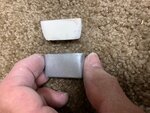
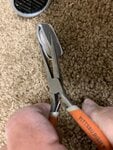
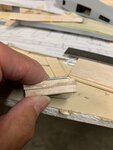
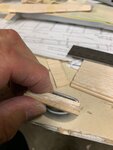
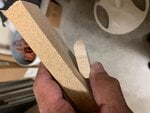
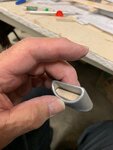
From there, I sanded and rounded the laminated balsa into a reasonable shape of the inlet that also would match the size of the inlet to be used on the model. The last picture is obviously staged for the camera.
 

Attachments

  • P-51 belly scoop -model # 54.jpg
    P-51 belly scoop -model # 54.jpg
    300.9 KB · Views: 61
  • P-51 belly scoop -model # 55.jpg
    P-51 belly scoop -model # 55.jpg
    260.3 KB · Views: 60
  • P-51 belly scoop -model # 51.jpg
    P-51 belly scoop -model # 51.jpg
    249.2 KB · Views: 52
  • P-51 belly scoop -model # 52.jpg
    P-51 belly scoop -model # 52.jpg
    339 KB · Views: 67
From there, I used the plastic cowl from the kit as a basis for helping me to determine the ideal size and shape of the inlet.

The first photo shows me holding the back of the plastic scoop with the balsa "inlet" as pushed inside.

The second photo shows the same balsa "inlet" from the front of the plastic scoop to help give me an idea of what I needed to do to "push" this carved balsa "inlet" into place. It was from here that I used both the base and inlet as a pattern to help me carve a master belly scoop that would also serve as an inlet.
 

Attachments

  • P-51 belly scoop -model # 47.jpg
    P-51 belly scoop -model # 47.jpg
    288.2 KB · Views: 48
  • P-51 belly scoop -model # 48.jpg
    P-51 belly scoop -model # 48.jpg
    357.2 KB · Views: 49
Taking a break here. So sorry guys. Will get back at another time. Tried to delete this message without success. Therefore, I'll simply update to let you know I've posted a few more. Thank you
 
Last edited:
Wurger, Airframes, Gnomey: Thank you gentlemen for your inputs. Much appreciated. I believe you'll see I did the best I could and came away with some good compromises. All comments are welcomed.
 
Using the plastic scoop as reference, I measured the width and length of the intended carving.
Next, I cut out several small sections from scrap balsa.
Then they were all lined up next to the plastic scoop to compare overall thickness as well as length and width. From there, they were glued together to form a block roughly the same size of the scoop allowing for carving and sanding.
 

Attachments

  • P-51 belly scoop -model # 92.jpg
    P-51 belly scoop -model # 92.jpg
    447.5 KB · Views: 47
  • P-51 belly scoop -model # 93.jpg
    P-51 belly scoop -model # 93.jpg
    369.2 KB · Views: 42
  • P-51 belly scoop -model # 94.jpg
    P-51 belly scoop -model # 94.jpg
    328.3 KB · Views: 51
Then the balsa block was then placed next to the body of the belly scoop area of the model to verify fit.
The rough cutting commences.
I repeatedly verified fit with the model
 

Attachments

  • P-51 belly scoop -model # 87.jpg
    P-51 belly scoop -model # 87.jpg
    289.2 KB · Views: 44
  • P-51 belly scoop -model # 89.jpg
    P-51 belly scoop -model # 89.jpg
    349.1 KB · Views: 41
  • P-51 belly scoop -model # 90.jpg
    P-51 belly scoop -model # 90.jpg
    345.9 KB · Views: 52
I then used the balsa inlet for reference on the block to help me finalize the shape.
Verified one more time before adding the "lip" to the inlet.
 

Attachments

  • P-51 belly scoop -model # 83.jpg
    P-51 belly scoop -model # 83.jpg
    519.5 KB · Views: 42
  • P-51 belly scoop -model # 82.jpg
    P-51 belly scoop -model # 82.jpg
    443.7 KB · Views: 41
  • P-51 belly scoop -model # 77.jpg
    P-51 belly scoop -model # 77.jpg
    298.1 KB · Views: 46
I then used the balsa wood from the back of the plastic scoop as my base.
I carefully sanded the block down to fit snugly within the plastic scoop to maintain close tolerance.
 

Attachments

  • P-51 belly scoop -model # 60.jpg
    P-51 belly scoop -model # 60.jpg
    585.8 KB · Views: 43
  • P-51 belly scoop -model # 61.jpg
    P-51 belly scoop -model # 61.jpg
    545 KB · Views: 45
I knew I could not form a "lip" using only balsa wood. It requires a very thin lip and wood just doesn't have the properties to pull it off. So I cut out a thin strip from plastic and wrapped it around the block to help form the lip.
After the glue dried, I added Spackling filler to help blend in the "lip" with the block.
 

Attachments

  • P-51 belly scoop -model # 78.jpg
    P-51 belly scoop -model # 78.jpg
    431.2 KB · Views: 44
  • P-51 belly scoop -model # 79.jpg
    P-51 belly scoop -model # 79.jpg
    230.7 KB · Views: 50
  • P-51 belly scoop -model # 80.jpg
    P-51 belly scoop -model # 80.jpg
    451.7 KB · Views: 46
I'm sorry I didn't take a picture of the results. Needless to say it did not work out. The inlet was much too wide and deep to even come close to resembling the desired shape. The balsa block had to conform to the thick and rounded model belly and from there, the transition to a thin inlet was too drastic to be even considered. Ah well, lessons learned. Still..... (there's that word again). I haven't given up. Stay tuned.
 
Humm.. looking at your hard work I still can't grasp what you try to get. Is that the better outer and inner shape of the air intake?
 
Wurger,
Thank you for your reply. I was hoping to achieve a "lip" by wrapping thin plastic around the balsa block. Then I would paint the interior black or cover it with black paper to hide the balsa block. Unfortunately, the "lip" and the block did not turn out very good. The extreme curvature of the block going from almost totally round at the base to almost totally flat at the inlet did not allow much room for "flatness" without making the whole thing look distorted. The last picture showing the Spackling compound over the plastic "lip" for the inlet and the base was sanded as close as possible to accept the roundness of the rear to meet the fuselage and at the same time, maintain a thin inlet shape. But it was too extreme. I'll try to find the block and take another picture if it's still around.

Not giving up. I went ahead and did a number of steps that I think best represented a compromise of the sorts.
 
I see now. If I were you I would take a solid block of plastic of dimensions that would cover the entire air intake shape. Of course a little bit larger than the shape in order to have something to sand down for the correct shape. Then, firstly I would drill hole for the inner shape of the intake and with a file and sandpaper I would shape it correctly. Having the inner area made I would make the outer shape of the entire air intake..

intake1.jpg
 
I'm going to jump ahead of myself and show four pictures. The first two reveal "before" my efforts and the second set of photos show the "after' results of my efforts. It's not nearly a perfect replication of the inlet but in my opinion after all the work involving trial and errors I think represents the best compromise and certainly is less conspicuous than its original shape.

As mentioned in my previous posts, among many limitations, I do not have access to a large heat source that will not jeopardize safety. The only alternate heat source was a hair dryer. I tried to manipulate the plastic part to make it more "square" in representing the inlet of the full sized Mustang, but I lacked the proper tools and did not have anyone to help me which would have made a real difference. If you can imagine holding a hair dryer with one hand and trying to shape the plastic with the other without having anyone else assisting my efforts, was a challenge.

I was granted access to the gardener's shed on the condition that I do not allow other people inside. His job was "on the line" just by giving me the keys. The gardener's shed had already been broken into several times in the past. Thus, my having a "third hand" was not to be.

I had envisioned several options of which one after the other for various reasons did not work out. I even thought of using some squared hardwood pieces that were slightly rounded at the corners, placed inside the plastic inlet to help give it more of a rectangular shape during the heat treatment. But the manipulations of the plastic inlet with the wooden pieces proved problematic with the plastic melting and the wooden pieces moving around within the inlet. All of this being done with just one hand.

I tried affixing the hair dryer to a vice and giving myself two hands to work with. Unfortunately, the vice in the gardener's shed was mounted such that it faces away from the table's edge.

I trust that this "compromise" will pass muster. Your opinions will be greatly appreciated.
 

Attachments

  • P-51 belly scoop -model # 44.jpg
    P-51 belly scoop -model # 44.jpg
    271.2 KB · Views: 46
  • P-51 belly scoop -model # 45.jpg
    P-51 belly scoop -model # 45.jpg
    314 KB · Views: 40
  • P-51 belly scoop -model # 72.jpg
    P-51 belly scoop -model # 72.jpg
    952.1 KB · Views: 48
  • P-51 belly scoop -model # 73.jpg
    P-51 belly scoop -model # 73.jpg
    622.3 KB · Views: 41
The first picture is staged to show the hair dryer and the plastic part being subjected to heat. I left the balsa "inlet" inside to help keep the plastic from collapsing within itself and was hoping that it would help me retain the inlet shape. Unfortunately, it wasn't meant to be.

The second picture shows the result of several attempts to heat-treat the plastic into shape with the balsa inside. The left side of the inlet is slightly cracked.
 

Attachments

  • P-51 belly scoop -model # 62.jpg
    P-51 belly scoop -model # 62.jpg
    492.5 KB · Views: 45
  • P-51 belly scoop -model # 63.jpg
    P-51 belly scoop -model # 63.jpg
    505.8 KB · Views: 45

Users who are viewing this thread

Back