Navigation
Install the app
How to install the app on iOS
Follow along with the video below to see how to install our site as a web app on your home screen.
Note: This feature may not be available in some browsers.
More options
You are using an out of date browser. It may not display this or other websites correctly.
You should upgrade or use an alternative browser.
You should upgrade or use an alternative browser.
Super detailing Guillow's P-51D Mustang
- Thread starter Skyediamonds
- Start date
Ad: This forum contains affiliate links to products on Amazon and eBay. More information in Terms and rules
More options
Who Replied?
Airframes
Benevolens Magister
The "tubular" stubs on the rear plate of the gun body are the buffer housings, where the return spring butts up to, which forces the working parts forward, same as on the Browning .303.
The solenoids are the "silver - coloured "boxes" on the side of the receiver body.
The solenoids are the "silver - coloured "boxes" on the side of the receiver body.
- Thread starter
- #503
Skyediamonds
Staff Sergeant
- 1,362
- May 26, 2018
Wurger:
Thank you, sir for your support. Really means a lot & greatly appreciated. Much is taking place in my life that is pulling me in all directions. I wish I could say more.....
Airframes:
Your insight to the working parts of the machine guns really helped out.
Thank you
Thank you, sir for your support. Really means a lot & greatly appreciated. Much is taking place in my life that is pulling me in all directions. I wish I could say more.....
Airframes:
Your insight to the working parts of the machine guns really helped out.
Thank you
- Thread starter
- #504
Skyediamonds
Staff Sergeant
- 1,362
- May 26, 2018
Good afternoon everyone. I trust this post finds all in good health and in good spirits during these difficult times.
Just to bring everyone up to date: I finished fabricating all the bullets and then went shopping for a resin/molding kit.
I'll be posting the details of what I have achieved on the bullets and the chutes in just a short time. Suffice to say, the time was well spent since I was self-quarantining as much as possible.
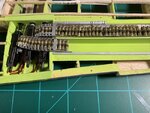
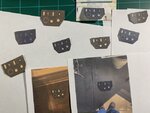
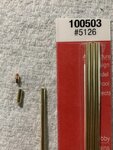
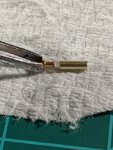
Enclosed, you'll find the completed results of the bullets and chutes. I used thin plastic for the chutes, ball point pens and brass tubing.
Just to bring everyone up to date: I finished fabricating all the bullets and then went shopping for a resin/molding kit.
I'll be posting the details of what I have achieved on the bullets and the chutes in just a short time. Suffice to say, the time was well spent since I was self-quarantining as much as possible.
Enclosed, you'll find the completed results of the bullets and chutes. I used thin plastic for the chutes, ball point pens and brass tubing.
Attachments
- Thread starter
- #505
Skyediamonds
Staff Sergeant
- 1,362
- May 26, 2018
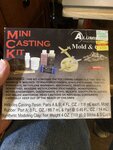
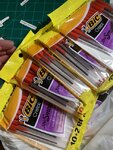
This is the resin casting kit I recently purchased at the local arts and crafts store. When the time comes, I'll be practicing on the use of casting and molding. It'll be my first time so I expect to make a few mistakes. At least I'll learn something new.
Thank you, Wurger for showing me the way.
Thank you, Wurger for showing me the way.
Attachments
syscom3
Pacific Historian
Ball point pens for ?Good afternoon everyone. I trust this post finds all in good health and in good spirits during these difficult times.
Just to bring everyone up to date: I finished fabricating all the bullets and then went shopping for a resin/molding kit.
I'll be posting the details of what I have achieved on the bullets and the chutes in just a short time. Suffice to say, the time was well spent since I was self-quarantining as much as possible.
Enclosed, you'll find the completed results of the bullets and chutes. I used thin plastic for the chutes, ball point pens and brass tubing.
- Thread starter
- #507
Skyediamonds
Staff Sergeant
- 1,362
- May 26, 2018
Gentlemen,
I've finally arrived at the point where I believe I can move forward on the cockpit detailing. As everyone knows from my previous postings, I've been holding myself back in effort to find a means of fabricating decals of my homemade stencils and data plates. With the decal option out, I decided to fall back on my Plan B, which is to use old fashion colored prints. I would take pictures of the stencils or instruments and then cut out the images, glue them to the appropriate areas.
My journey wasn't all that easy. Lots of trial and error took place. At first, I thought I could simply take a picture using the cell phone's camera, load the images into my antique laptop and then have the printer produce the results. This idea worked, but not without limitations. The laptop and printer sometimes did not alway "speak" to each other. When they did, the images were grainy and the small details were difficult to see.
I next used my old film camera. The results were much better, but the colors were somewhat bleached or were somewhat faded in comparison to what would be expected of a clear decal. I also had to take several shots at varying distances to get the size of the image desired. The commercial outlets did. not offer much in the way of customized sizes. They only offered standard print sizes that were spit out of their machine.
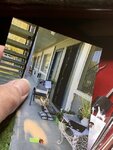
I've posted a few samples to illustrate:
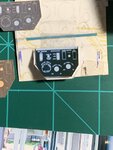
The first picture shows the sub panel that is under the main instrument panel that is typical of the Mustang series. The small photo off to the upper left, is from the printer. As you can see, the image is grainy and the colors need a lot to be appreciated.
The image over the sub panel cut out was cut out from a colored print made from a film camera. As can easily be seen, the image from the film print is much better in color and in fine detail. Still, the fine detail is. bit fuzzy. I wanted to try once more a different approach.
I've finally arrived at the point where I believe I can move forward on the cockpit detailing. As everyone knows from my previous postings, I've been holding myself back in effort to find a means of fabricating decals of my homemade stencils and data plates. With the decal option out, I decided to fall back on my Plan B, which is to use old fashion colored prints. I would take pictures of the stencils or instruments and then cut out the images, glue them to the appropriate areas.
My journey wasn't all that easy. Lots of trial and error took place. At first, I thought I could simply take a picture using the cell phone's camera, load the images into my antique laptop and then have the printer produce the results. This idea worked, but not without limitations. The laptop and printer sometimes did not alway "speak" to each other. When they did, the images were grainy and the small details were difficult to see.
I next used my old film camera. The results were much better, but the colors were somewhat bleached or were somewhat faded in comparison to what would be expected of a clear decal. I also had to take several shots at varying distances to get the size of the image desired. The commercial outlets did. not offer much in the way of customized sizes. They only offered standard print sizes that were spit out of their machine.
I've posted a few samples to illustrate:
The first picture shows the sub panel that is under the main instrument panel that is typical of the Mustang series. The small photo off to the upper left, is from the printer. As you can see, the image is grainy and the colors need a lot to be appreciated.
The image over the sub panel cut out was cut out from a colored print made from a film camera. As can easily be seen, the image from the film print is much better in color and in fine detail. Still, the fine detail is. bit fuzzy. I wanted to try once more a different approach.
Attachments
- Thread starter
- #508
Skyediamonds
Staff Sergeant
- 1,362
- May 26, 2018
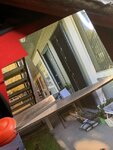
Here, is the final result. As can be compared with the printout on the upper left and the colored film print on the right, the cell phone print offered the best solution. The fine detail, whereas not perfect, is certainly much better than before.
Attachments
- Thread starter
- #509
Skyediamonds
Staff Sergeant
- 1,362
- May 26, 2018
Here, you can see just a sampling of the amount of work, trial and error that went into my efforts to achieve something close to a small decal of fine stencils.
Attachments
- Thread starter
- #510
Skyediamonds
Staff Sergeant
- 1,362
- May 26, 2018
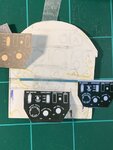
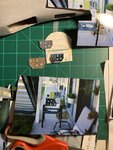
Here, I taped up my colored paper representing all sorts of stencils and plates, including the throttle quadrant. They were all taken at different distances to make them either larger or smaller. This way, I could maximize the use of each picture. Sort of like chasing a rabbit down a hole in that famous story of Alice and Wonderland.
In this picture, I would pick out the image best suited for the task, cut it out and then (will) glue it.
I've been quite busy trying to come up with a solution that would allow me to a decent job of detailing the cockpit interior without the decals. To me, this is probably the next best thing. I intend to paint around the edges of some of the cutouts so as to help blend them into the surface of the accessory or perhaps a silver color to help accentuate the metal trim. Either way, I'm confident it'll all work out. Of course, I'll keep you posted every step of the way.
Attachments
Last edited:
- Thread starter
- #511
Skyediamonds
Staff Sergeant
- 1,362
- May 26, 2018
Syscom3:
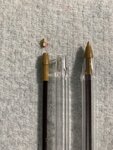
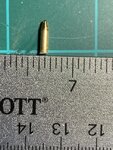
I'm glad you asked. It was one of those things I was about to post when I got ahead of myself. To fabricate all of the 130+ bullets needed for the open machine gun bay, I used the tips of ball point pens and small cutouts of brass tubing.
I'm glad you asked. It was one of those things I was about to post when I got ahead of myself. To fabricate all of the 130+ bullets needed for the open machine gun bay, I used the tips of ball point pens and small cutouts of brass tubing.
Attachments

- Thread starter
- #512
Skyediamonds
Staff Sergeant
- 1,362
- May 26, 2018
syscom3
Pacific Historian
A lot of pens met their fate with your hands. LOLTo say I went through a lot of ball point pens in making the 130+ bullets would be an understatement.....
- Thread starter
- #514
Skyediamonds
Staff Sergeant
- 1,362
- May 26, 2018
LoL..... In a sense, it was fate. I truly tried to find an alternate means of fabricating the bullets. If you refer back to my previous post # 470 dated way back in August 3, 2020, I asked if anyone had any ideas on fabrication of bullets. While waiting for a response (I also asked several other modeling sites) I tried local arts and crafts stores, toy stores, big box stores such as WalMart and more, looking for toy soldiers or cowboy dolls that might have bullet belts worn either across the chest or around the waist. Nada, zip, nothing. Ahhhh just had to be fate. luck
As luck (or Fate) would have it, it was the start of school season and the stores were having school supplies on sale. I purchased the pens in large bundles at steep discounts. So the timing wasn't all that bad. I purposely picked out the red-colored pens. I figured they would be the least needed. Unless of coure, the potential buyer would be a teacher. In that case, to write all those check marks, corrections and grades in red!
However, not all was lost. I saved the caps and the main plastic bodies to the pens. Just never know when they'll be useful in some future modeling project.
Last edited:
- Thread starter
- #516
Skyediamonds
Staff Sergeant
- 1,362
- May 26, 2018
Thank you Wurger, sir. For your support. & suggestion on the resin mold. I haven't tried the kit yet but it is only a matter of time.
- Thread starter
- #517
Skyediamonds
Staff Sergeant
- 1,362
- May 26, 2018
Good day everyone.
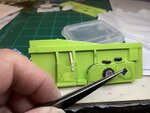
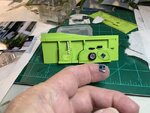
I'm jumping ahead of myself as usual to post the news I'm (finally) moving forward with the cockpit detailing. I'm also enclosing a few sample shots to illustrate my approach to the stenciling issues that have belittled me for so long.
As we (now0 know I have decided to use colored prints in lieu of decals.
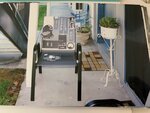
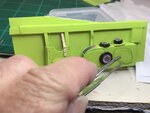
In. this demonstration, I've used. the large stencil that give instructions for the operation of the landing gear. The stencil is to be located by the pilot's left ankle (??)/. Why down there is beyond me & open for discussion but suffice to say these are the steps I took.
I identified the desired area for a stencil.
I picked out a colored pint that I felt was the correct size and color from one of many that I took.
I used a pair of scissors to cut out the stencil.
A dab of glue and a pair of tweezers were used to place the stencil.
Finished.
You can easily see that there were other stencils placed on the trim wheels. They were. not exactly my first choice, but at this point I decided they would have to suffice.
Other stencils were the operation of the blower located just on the bend of the console.
I'm jumping ahead of myself as usual to post the news I'm (finally) moving forward with the cockpit detailing. I'm also enclosing a few sample shots to illustrate my approach to the stenciling issues that have belittled me for so long.
As we (now0 know I have decided to use colored prints in lieu of decals.
In. this demonstration, I've used. the large stencil that give instructions for the operation of the landing gear. The stencil is to be located by the pilot's left ankle (??)/. Why down there is beyond me & open for discussion but suffice to say these are the steps I took.
I identified the desired area for a stencil.
I picked out a colored pint that I felt was the correct size and color from one of many that I took.
I used a pair of scissors to cut out the stencil.
A dab of glue and a pair of tweezers were used to place the stencil.
Finished.
You can easily see that there were other stencils placed on the trim wheels. They were. not exactly my first choice, but at this point I decided they would have to suffice.
Other stencils were the operation of the blower located just on the bend of the console.
Attachments
- Thread starter
- #518
Skyediamonds
Staff Sergeant
- 1,362
- May 26, 2018
- Thread starter
- #519
Skyediamonds
Staff Sergeant
- 1,362
- May 26, 2018
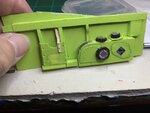
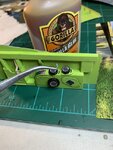
I'm trying to add as many stencils as possible **that will be seen.**
This was difficult, at least for me given my current skill level and what available tools I have at my disposal.
This stencil was cut using an X-Acto # 11 blade under a lamp with a magnifying lens. I was concerned with the thickness of the paper, but apparently it worked out.
This was difficult, at least for me given my current skill level and what available tools I have at my disposal.
This stencil was cut using an X-Acto # 11 blade under a lamp with a magnifying lens. I was concerned with the thickness of the paper, but apparently it worked out.
Attachments
Looks great so far!
Users who are viewing this thread
Total: 1 (members: 0, guests: 1)