Super detailing Guillow's P-51D Mustang

Ad: This forum contains affiliate links to products on Amazon and eBay. More information in Terms and rules

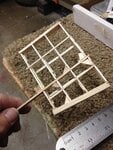
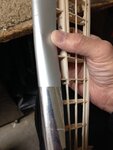
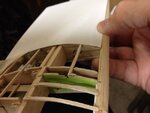
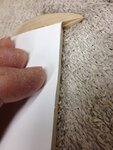
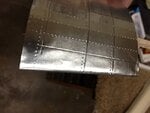
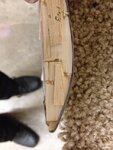
Jumping slightly ahead of myself, as I often do, I also created a faux wing section to try my ideas and experiments. This was created from scrap balsa laying around and quickly made into a wing section that I also purposely included a faper from an imaginary root to tip as well as reducing the thickness of the wing chord. I wanted to simulate the effects of the wing reasonably accurately so as to prevent any unforeseen surprises. At least that's the theory.
 

Attachments

  • P-51 wing cover foil # 9-Flt Mtl.JPG
    P-51 wing cover foil # 9-Flt Mtl.JPG
    330.4 KB · Views: 51
By using the pounce wheel from the backside, I was able to reproduce domed rivets on the polished surface. By using the same wheel on the front (surface) side, I was able to reproduce flush rivets. The third photo shows how the Flite Metal panels can be laid croxx-wise as well to help give the overall effects of true individual panels on the real aircraft.

The last photo shows that both Flite Metal (FM) and vinyl can be peeled off, if necessary. One only needs to resand the surface smooth to help get rid of any remaining residue and reapply another separate piece. I discovered, and it makes sense as well, one cannot reuse the same piece once it's been peeled off.

So, if they're both equal in appearance and method of application, what would one had the advantage over the other?
 

Attachments

  • P-51 15.jpg
    P-51 15.jpg
    46.6 KB · Views: 79
  • P-51 16.jpg
    P-51 16.jpg
    43.5 KB · Views: 73
  • P-51 17.jpg
    P-51 17.jpg
    47.5 KB · Views: 80
  • P-51 18.jpg
    P-51 18.jpg
    42.2 KB · Views: 76
Inside a nicely heated room of say between 75-80 degrees, the vinyl starts to bubble and gas out. I purposely had the room heated this high to simulate the possibilties of having the model outside for a short period of time for display. It also stands to reason, that my daughter might suspend the model from the ceiling (and out of reach of her young children and pets) that the temperatures near the ceiling would also be higher than what is felt closer to the floor or as we would define as "ambient temperature." The vendor of FM says his product will be able to withstand temperatures of direct sunlight up to 350 degrees before the FM will start to bubble. Decision was made. FM it is.

However FM is much more difficult to apply mostly due to its incredibly powerful adhesive. I've found that just touching the exposed adhesive backing with the tip of my finger nail (yes, you read that right), it will stick very well to the point where I have to pry it loose. By prying it loose, I ended up stretching the material and inducing wrinkles and scratches. So, it will be a learning experience for me.

Just like applying tissue to a doped wooden airframe, or using a heat-shrink covering, or even sanding wood by using various grades of sand paper and using different sizes and shapes of sanding blocks which is a skill that one must learn; so too, is the application of FM.

To that end, I've found by using the backing paper between my fingers that I just removed to expose the adhesive, I can handle the FM, since it doesn't stick to the backing paper. Well, it does, but it's almost non-existent for my purposes.
 

Attachments

  • Chrome vinyl 9.jpg
    Chrome vinyl 9.jpg
    44.3 KB · Views: 50
I also experimented using rub-on transfers to see if there would be any unsightly impressions from burnshing the image, or lettering onto the FM surface. Unfortunately, there was. The surface is still too sensitive to pressure from small points of a burnishing tool used to transfer the letters.

I could've used a different "burnishing tool" instead of the cover to a ball point pen, but the outcome would've remained the same. I would have to use enough pressure to transfer the lettering to the surface. Admitedly, I used an old set of letters that were several years old and I'm told that if I were to use a new set recently purchased, this would not be as much of a noticeable problem. With the shiney Mustang at 115th scale, it will be only natural for anyone to take a closer look at the details just as one would take a closer took at a plastic model that is say, 1/48th scale or even larger at 132nd.

So, I decided rather than taking chances with dry transfer letters, knowing that once I burnish a "dent" into the finished surface of the model, it would be too late to remove the whole surface covering and risk peeling off the surrounding panels as well, I decided to stick with water-slide decals.

True, they too have their own isssues such as "silvering," which is when there are microscropic air bubbles trapped between the decl and the surface that makes the clear portion of the decal appear "fog" or there is a "haze." look. Other issues can be folding over themselves while applying them to the model, but I think that will a bit of water, they can either be removed, or at least readjusted.

The last photo shows me using some extra decals found in my stash box as part of my experiment as how they will look on top of the FM's highly polished surface. As you can see, they look very well nearly as if they were painted on.
 

Attachments

  • P-51 4 dry transfers -4A.jpg
    P-51 4 dry transfers -4A.jpg
    46.2 KB · Views: 78
  • P-51 4 dry transfers -3A.jpg
    P-51 4 dry transfers -3A.jpg
    59.4 KB · Views: 78
  • P-51 4 dry transfers -2A.jpg
    P-51 4 dry transfers -2A.jpg
    48.6 KB · Views: 75
  • P-51 4 dry transfers -1A.jpg
    P-51 4 dry transfers -1A.jpg
    39.2 KB · Views: 79
  • P-51 Stenciling # 10A.jpg
    P-51 Stenciling # 10A.jpg
    45.7 KB · Views: 87
Last edited:
I'm jumping ahead again and going into the faux wing section before showing how I handled the FM using the backing paper between my fingers. Should I forget this small matter in future posts, I trust someone will gently remind me? Thanking you in advance. Having experimented with the faux fuselage, I thought it would be a good idea to try out my concepts of applying FM to glossy paper, add panel lines with the use of a black ball point pen, add some rivets from the pounce wheel, and then take the finished surface and apply it to the wing.

In this case, the glossy paper will serve as the "surface" of the wing, since I'm purposely leaving the framework in its original skeletal form.

Notice how the FM is larger than the glossy paper. The name of Brian Sandoval on the piece of glossy paper is (now, was) our governor of the state of Nevada. Oh well, we must move on.... shall we? The FM was purposely cut larger than the paper as I will illustrate.
 

Attachments

  • P-51 wing cover foil-Flt Mtl. # 5A.jpg
    P-51 wing cover foil-Flt Mtl. # 5A.jpg
    35.9 KB · Views: 55
Your experiences with Flite Metal and the vinyl product are a good learning/teaching tool for me. Please continue with the details.
 
Wurger, Crimea, thank you gentlemen.
Special Ed, I shall gladly continue. Just as I would imagine myself sitting on one's shoulders, I too learned from the experiences of others. I also try to read as much as possible from various modeling publications & where possible or feasible, I apply them. Or at least experiment first to see if it will satisfy the results I'm seeking. Thank you
 
Gentlemen,
Good evening. While I have been setting up the model for more photo-opts and working here and there, I did a lot of meauring and calculating on the cockpit interior. From the Internet, I managed to obtain some incredibly accurate CAD inboard profile drawings of the cockpit that includes the seat, the location of the control column, rudder pedals, and the instrument panel. Of course, there were many more details, but I was concentrating on the very basics of the interior to get a good idea of where to start.

It will be from these basic items that I can extrapolate the locations of the other items and use comparative analysis..... In another words, just eyeballing " what looks about right."

Good Lord! That freaking cockpit interior is small... !! By comparison, almost half of the interior is taken up by the radio stack sitting on the top of the rear decking. It's the other half of the interior that I have to figure out how to cram in all that stuff. I truly can appreciate that plastic model of the Mustang build thread. That guy even included springs for the rudder pedals. Who's gonna see that?

So, with all due respect to everyone reading this post, I truly desire to do as much as I reasonably can to fulfill the interior of the cockpit with as much detailing as practical. The key word here is, "practical." This will also give me a good excuse not to work so hard at creating details no one is going to notice anyway. So, having said all this, I'll proceed with where I left off and try a few more postings before turning in for the night. All comments are welcomed of course.

My experiments are mostly a physical manifestations of what has been brewing inside my mind. I'm trying to avoid using sand paper and sanding, filling, sanding more, priming and then sanding as much as possible. Thus, I have decided to employ some of the techniques I used on my previous Guillow's model, the S.E.5. Thus I chose to use glossy paper, some plastic sheets cut and bent to shape, and other materials in lieu of wood wherever possible. There are many areas that wood has to be employed and the fuselage, vertical and horzontal stabilizer as well as the basic framework of the wings are good examples.

This comes to where I left off with regards to my experiments on the wing section and to determine what works and what does not.
I'm using glossy paper that is somewhat thicker than the usual paper. This is primarily for the purpose of strength as well as maintaining integrity of the surface during handling of the model.
 
One area of concern was paint. I wanted to know how flexible the paint would be should I decide to detail the surfaces ahead of time prior to affixing the laminated FM and glossy paper covering to the wing frames. So, I simply grabbed a large piece of scrap glossy paper and spray painted it with silver paint. As you can see from the photo, the paint is amazingly flexible.

My reasoning behind the use of silver spray paint was to adhere to Airframe's reminder that the wings of the production Mustangs were puttied over and then sprayed with silver paint. The putty will cover up all of the small rivet dents, scratches and dings of the surfaces of the wing in order to help maintain a laminar flow. So, my intent is to have the wings sprayed with silver paint and have the rest of the airframe covered with FM.
 

Attachments

  • P-51 flex paint test # 1A.jpg
    P-51 flex paint test # 1A.jpg
    44 KB · Views: 53
The glossy paper seemed to fit the wing like a glove. All of the frames seemed to disappear under the relatively thick paper as I had hoped. I even had a small overhang where the aileron would be located to help give it a "seal" that is on the full sized Mustang. The third picture shows me having the wood aileron in place and this "seal" works very well.

I can just imagine now, I would only need to add rivet and panel detail to the FM, peel off the sticking backing and carefully laminate it to the glossy paper, Any excess overhand og the FM would be easily trimmed away. All seemed to be going according to plan.

Until I tried the sharp curved leading edges of the wing
 

Attachments

  • P-51 trail fit of glossy paper to wing # 2A.jpg
    P-51 trail fit of glossy paper to wing # 2A.jpg
    39 KB · Views: 63
  • P-51 wing cover  bend # 3.jpg
    P-51 wing cover bend # 3.jpg
    196.1 KB · Views: 60
  • P-51 wing cover bend # 4A.jpg
    P-51 wing cover bend # 4A.jpg
    38.6 KB · Views: 58
Despite my best efforts, the thick glossy paper did not fare well when subjected to sharp curves. I knew I had to stay with the thicker kind of paper in order to maintain the surface of the wing in between balsa ribs and stringers, so using a thinner type of glossy paper was ruled out.

It was suggested by a friend of mine to try pre-rolling the paper using a smooth stick or pencil. He suggested I roll the paper back and forth and gradually increase the sharpness of the curve of the paper until I worked out the internal grains. In this case, I used the handle of an X-Acto knife as it came pretty close to mimicking the leading edge of the wing.

As you can see, it didn't work very well.

This lead up to my idea of simply allowing the FM to overhang the paper -as seen in my previous post showing the paper with the governor's name and the excess FM behind it- and having the paper simply butt up against the balsa leading edge of the wing and from that point, the FM would take over and be allowed to roll over and around the leading edge to the underside where I could trim off the excess.

At the leading edge, the balsa wood would take over as a foundation for the FM and maintain surface shape.
 

Attachments

  • P-51 wing cover bend # 2A.jpg
    P-51 wing cover bend # 2A.jpg
    39 KB · Views: 49
  • P-51 rolled paper test # 2A.jpg
    P-51 rolled paper test # 2A.jpg
    58.2 KB · Views: 56
  • P-51 rolled paper test # 1A.jpg
    P-51 rolled paper test # 1A.jpg
    40.5 KB · Views: 53
Well, my idea worked. The following pictures show you in rough sequence my steps that I took to achieve my results. The very last photo is shown with the rib and the laminations sandwiched together. If possible, you can zoom up really close, you can just barely see the laminated balsa rib top curved surface, then the thin glossy paper just butted up against the leading edge of the wing and the FM flowing over and to the underside.
 

Attachments

  • P-51 wing cover foil-Flt Mtl # 10A.jpg
    P-51 wing cover foil-Flt Mtl # 10A.jpg
    48.7 KB · Views: 50
  • P-51 wing cover foil-Flt Mtl # 9A.jpg
    P-51 wing cover foil-Flt Mtl # 9A.jpg
    36.5 KB · Views: 51
  • P-51 wing cover foil -Flt Mtl # 10.JPG
    P-51 wing cover foil -Flt Mtl # 10.JPG
    235.4 KB · Views: 50
  • P-51 wing cover foil-Flt Mtl # 13A.jpg
    P-51 wing cover foil-Flt Mtl # 13A.jpg
    39.8 KB · Views: 68
  • P-51 wing cover foil-Flt Mtl # 12A.jpg
    P-51 wing cover foil-Flt Mtl # 12A.jpg
    62.1 KB · Views: 54
This is the underside. I did not bother to trim away the excess as my attention was focused on whether or not this concept would work.

Even then, I decided to give chrome vinyl a second chance. As you can see it still bubbled up, despite being laid over an open airframe. Yes, it was covered over the glossy paper too.

P-51 wing cover foil-Flt Mtl # 20A.jpg


Then it was time to combine the two. Spray paint silver, the FM cover over the glossy paper and all laminated on top of my faux wing section.

P-51 wing cover foil-Flt Mtl # 7A.jpg


First, I decided to mask off only one half of the wing section so I would have something to compare side-by-side.

P-51 wing cover foil-Flt Mtl -18A.jpg


Then I laid the faux wing next to a tube of FM as if the tube itself was the fuselage. I could easily see that the silver spray painted surface will work very well next to the FM's highly polished metal look. Looks like I've finally realized some of my main objectives.

P-51 wing cover foil-Flt Mtl # 17A.jpg


To be continued. Thank you everyone and comments or suggestions are always welcomed.
 
Wurger, thank you sir. I'm hoping within the next few days I can reproduce some of the stenciling to the cockpit interior. I realize that they will be very small, but it's worth a try. I'm still having problems with my laptop. So I'm going to take it down to a repair shop and see what they say. It's about 8 years old.
 
Gentlemen,
Good news. Took my antique laptop down to repair shop. The technician performed his magic just by clicking into the keyboard & with two hours, it is good as new. Best part? The technician didn't charge a thing. I kept trying to reimburse him for at least taking his time, but he wouldn't have any of it. I'll resume posting shortly.

Airframe: I have read your responses to other posts & im humbled by your vast knowledge of aviation. Good to know you, Wurger, & other fine gentlemen are here. Please forgive me for my ramblings of the Ugly WW2 aircraft column. Would I jump into the rear seat of a Mustang if I was invited? You bet!
 
Very nice work. I built this kit some time ago but for the purpose of making a weather vane. I sheeted mine in balsa then sanded smooth. I then added silk with acrylic varnish to provide strength like fiberglass. Currently going through smoothing out the bumps and dips before I do the painting.

LIke the method you have for rivets. :)
 

Users who are viewing this thread

Back