Navigation
Install the app
How to install the app on iOS
Follow along with the video below to see how to install our site as a web app on your home screen.
Note: This feature may not be available in some browsers.
More options
You are using an out of date browser. It may not display this or other websites correctly.
You should upgrade or use an alternative browser.
You should upgrade or use an alternative browser.
What's on The Workbench (2 Viewers)
- Thread starter Heinz
- Start date
Ad: This forum contains affiliate links to products on Amazon and eBay. More information in Terms and rules
More options
Who Replied?Airframes
Benevolens Magister
I'm sure you'll get there mate. It must be a fair size in 1/72nd scale. Not the sort of thing I would go for normally, and not my usual scale, but I think one would look good on the ...er....on the....b*gg*r, got nowhere to put it !!
well, in my boredom I've started work on my Curtiss Jenny. this is gonna be a real challenge for me since I've never done this much rigging on an aircraft. I dunno if I can actually do it. I've painted the interior and assembled it, assembled the fuselage, bottom wings, tail. gonna be a little difficult putting the top wing on.
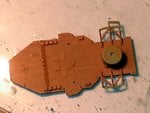
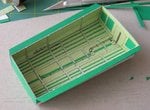
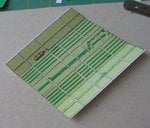
Now I don't know if any of you guys are interested in this kind of stuff but I thought i try it on you.I am in the process of working the planks of the deck to make them stand out some and this is my first attempt at such a thing.I start with a deck tan color and three empty jars.Jar(1) has deck tan,yellow and a little red;mix well.Jar(2) gets 1/2 of jar(1) plus alittle more red,yellow and some lt. gray.Jar(3) gets 1/2 of jar(2) plus alittle red,yellow and more gray.Spray the whole deck with #1 dry and commence to taping in my case 1/32 X 25/32 stripes I went with about 25-30% coverage then spray #2 over that.Then start taping again 25-30% then hit it with #3.Once that is dry pull the tape and tone it down with #1 to blend it in.What you see here is up to #2 and about 5-6hrs of work.
Pic 1: is a test piece of the upper deak came out okay for my first rodeo
Pic 2: is the tape after #1
Pic 3: is #2 applied notice the red tint
Pic 1: is a test piece of the upper deak came out okay for my first rodeo
Pic 2: is the tape after #1
Pic 3: is #2 applied notice the red tint
Attachments
dirkpitt289
Master Sergeant
I like it. Looks great so far
well, any kind of modeling can come here.i got a couple cars and star trek ships here
You know Trebor totally forgot about that.I just did not want to slow the thread down any.Then keep truck'in
That's nice work there Kevin....certainly takes time but worth the effort...on the theme of ships, next model up in my Winning models thread will be an IJN Carrier...just for you!
Airframes
Benevolens Magister
Looking good Kevin. I haven't done a ship model for donkey's years, but very nearly got the 1/72nd scale Flower Class corvette when it was re-released. Might get a 1/72nd scale RAF Rescue launch, just for something different.
vikingBerserker
Lieutenant General
That's nice work there Kevin....certainly takes time but worth the effort...on the theme of ships, next model up in my Winning models thread will be an IJN Carrier...just for you!
<PERK>
Hot dam!
<PERK>
Hot dam!
Now that will be cool Wayne.Terry I really needed a diversion and a different challenge and the GSpee is giving it to me.I spent another 4+ hrs taping the deck for the gray and spayed some H127 and peeled up the aft deck
this: Model Expo - NIAGARA, BATTLE OF LAKE ERIE 1:64 SCALE
or this: Model Expo - DAPPER TOM BALTIMORE CLIPPER 5/32 SCALE SCALE
these are both on sale at 1/2 price right now.I like working with wood and have a wood work shop already and have alot of tools also.I am not giving up plastic or planes just need more stimulation for the old brain.Cheers
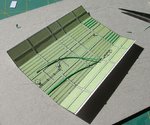
The deck is for the most finished except for a couple of touch-ups.I was going to stain in between the planks and tried it on the test piece and I just did not care for the effect got to kind a better mouse trap before that what I did hit the full deck.I see now why so many tape the wood on the deck and spray the gray it has a nice effect for sure but again talk about time comsuming.Well some pics are in order..........
Now this is with all the strips pulled and getting ready for the last coat of paint

an overall picture of the gray laid

now a close-up looking forward you can see the planking coming through

Now this is with all the strips pulled and getting ready for the last coat of paint
an overall picture of the gray laid
now a close-up looking forward you can see the planking coming through
vikingBerserker
Lieutenant General
I have to say Jav, that's a real cool technique on the decking.
Airframes
Benevolens Magister
Certainly looks good. Kevin, if you're interested in wood ship kits, there's some good stuff at a place called Mantua Models. They're an Italian company I believe, with an outlet also in the UK, and I think in the USA too.
Well Terry I have decided to scratch my first wood ship.The chap at the end of the street scratches all his own and has cad to do the conversion.This way the money involved will be minimum and see if I like doing it.I have decided it will be along the lines of a NE fishing schooner.
David it definitly an effective technique. Cheers
David it definitly an effective technique. Cheers
Nice work Kevin....8)
Nice job Kev...
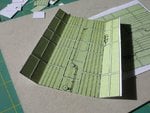
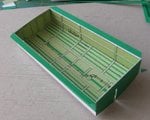
I'm working on interiors of the main landing wheel bays. I think these look much betters with these additional cardboard stiffeners.
I'm working on interiors of the main landing wheel bays. I think these look much betters with these additional cardboard stiffeners.

