What's on The Workbench (10 Viewers)

Ad: This forum contains affiliate links to products on Amazon and eBay. More information in Terms and rules

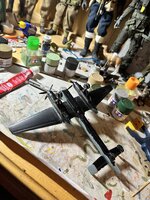
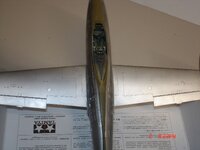
Thanks Evan. Preparing for togetherness. It's all just push fit so is better than it looks

IMG_3330.JPG

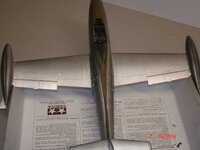
The gaps are almost the size of the kit panel lines but gluing and taping over the fuselage will pull it together more

IMG_3328.JPG

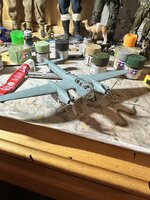
I had to grind the rear area of the fuselage as I did with the front; the rear of the wing was sitting well above the fuselage. I added the small flap (a) on the left as per instructions. All you get here is a butt fit at the front. I let it set for a bit and then push it down and glued it to the wing. Its sitting flush though the photo show different. Having learned that lesson, the right (2) side will have a bit of blue tack added to the inside of the wing and then I'll push the flap into place and glue.

IMG_3327.JPG
 
Looks like a prize fight but I think your getting the better jabs in, good work. I have this in the stash, as a whole I like the looks of the newer Airfix kits but do fine some arguing with each is in order.
 
Thanks guys. Almost looks like a Spitfire. I wanted to test fit the stabs but they locked into place so I ended up gluing them on. The wing have been set for about an hour now and I was looking at the under-surface join. As I held it in place, there was a small gap running along both sides so I figured I would be using some sprue to tidy things up. I started adding glue and noticed I could get everything to touch so I squeezed harder. I have never seen Tamiya Extra Thin weld the plastic like this before. I held it place for almost ten minutes and you can't tell there were gaps. I'm going back down shortly to make sure all held together

IMG_0002.JPG
 
Getting close to some decals still have a few panels on the bottom held in with pronounced screw heads.The panels I highlighted were basically ones with those screw heads.
default_wink.png
 

Attachments

  • george 001.JPG
    george 001.JPG
    403.2 KB · Views: 21
  • george 002.JPG
    george 002.JPG
    398.9 KB · Views: 17
  • george 003.JPG
    george 003.JPG
    375.6 KB · Views: 25
  • george 004.JPG
    george 004.JPG
    382 KB · Views: 22
  • george 005.JPG
    george 005.JPG
    365.4 KB · Views: 23
Doing some browsing on what little can be found on the Mk.XII and it seems the aircraft I'm portraying is based on the Mk.VIII fuselage, retractable tail wheel. The landing gear for the Mk.VIII had oleo scissors on either side of the landing gear depending on serial number. It seems mine is on the rear of the landing gear, being in the MB serials. Need to do a bit more checking before I remove the attachment lugs from the front
 
Somewhere, I have a list of which airframes were Mk.VIII (retractable tail wheel), and which were Mk.V (fixed tail wheel), but I can't locate it at the moment.
 
Thanks Wayne. We have a Spitfire. I've never had the elevators out of neutral before because I like clean lines regardless of what the real world says. However. I couldn't get the control column into the neutral position, slightly forward, so I went with it. A few small seams to deal with and spritz, spritz, spritz

IMG_3333.JPG


IMG_3334.JPG
 

Users who are viewing this thread

Back