What's on The Workbench

Ad: This forum contains affiliate links to products on Amazon and eBay. More information in Terms and rules

Great work guys!

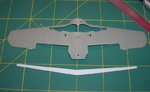
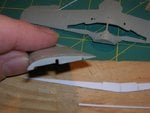
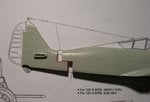
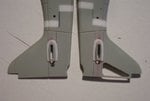
Wojtek, interesting approach to the spar. So you made the mainspar first complete, and will later add the side arms that run behind the wheel wells (to which the u/c is attached)?
I was just going to do the visible portions of the spars, but I like your idea better.
 
Yes Evan I will.It is caused by the real wing iron shape.What is more, making this one in the way I could correct one of the main mistakes of the model.The wing in the kit has the flat "M" letter shape ( gull's one ) I mean the wing tips are going down slightly.So if you want to keep the correct dihedral you have to set it earlier.What makes the matter worse , when you cut off flaps from the lower half of the wing , it becomes much more flexible and the mistake is much more seen.

Here additional two pics to show my way.
 

Attachments

  • iron3.jpg
    iron3.jpg
    88.3 KB · Views: 21
  • iron3a.jpg
    iron3a.jpg
    89.4 KB · Views: 23
THX Jasiu. :oops:

Here some corrections made to the fuselage.
 

Attachments

  • kadłub4.jpg
    kadłub4.jpg
    99.7 KB · Views: 22
  • kadłub.jpg
    kadłub.jpg
    75 KB · Views: 18
  • kadłub3.jpg
    kadłub3.jpg
    75.9 KB · Views: 20
  • kadłub2.jpg
    kadłub2.jpg
    72.4 KB · Views: 23
  • kadłub1.jpg
    kadłub1.jpg
    77.2 KB · Views: 19
The palm tree has been glued down to the base.

corsair3.jpg


I'm making another one right now for the other side of the base, I've taken some pics of the method I've used, when its finished, I'll post a guide for anyone who wants to try making one, it's not that difficult! :)
 
well, after a solid week of having a break from modeling (cleaning up and painting my room, plus fighting a cold) I've re-started work on the 1983 VW Golf. I've painted the inside of the body a dark gull gray (the interior color) I've installed the windows, the full interior, the bottom half of the car (which is always a biatch to get in there without screwing anything up) containing the engine, and finally the front grille. that's all drying as we speak. I'll put up some pics once things dry. I dunno if I've told ya this, but I've re-painted the car a nice silver color. I decided I have enough black and blue cars, I want silver this time. XD
 
Good on ya guys, some great progress made!

Wojtek, fantastic work mate!!! ..And you've opened up the side hatches now too.. looks like alot of internal scratchbuilding is in store! beautiful work mate.

M, how big is the second palm tree going to be? Does'nt look like a lot of room left on the base, but there would need to be ample clearance for the tail in real life.

Great work, all of yas'.
 

Users who are viewing this thread

Back