1/24 Grumman F3F-2 - From WW1 to WW2 GB

Ad: This forum contains affiliate links to products on Amazon and eBay. More information in Terms and rules

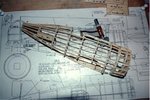
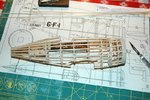
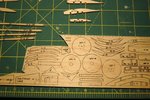
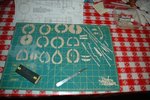
Got all the fuselage formers cut out today.... all 45 of them !! It's too late in the day to start construction on the fuselage, so I'll jump on it first thing in the morning. When I looked to make sure, I see two more for the cowl that I missed. Hope to have pic's of the fuselage tomorrow. Here's a look at the array of fuselage keel parts and formers.

Charles
 

Attachments

  • DSC_2751.JPG
    DSC_2751.JPG
    108.8 KB · Views: 61
  • DSC_2755.JPG
    DSC_2755.JPG
    115.2 KB · Views: 60
Wow , you're practically building the whole plane from scratch :D I like :) I couldn't do a balsa kit, too much cutting :D
 
Last edited by a moderator:
Wow, them's a lot of bits to cut out and shape and you recon were pushing it detailing the plastic kits! Recon your the king on the detail construction while we plastic stickers go for the overkill at the other end of the build.
 
Got one half of the fuselage pinned down this morning. Have to get more stringers on it, then take it off the board and do the port side. I can't believe this guy designed this airplane using 1/16" square balsa. Talk about very F R A G I L E !!

Charles
 

Attachments

  • DSC_2760.JPG
    DSC_2760.JPG
    100.1 KB · Views: 76
Got all the stringers of the starboard side on. Had to stop for lunch and some grocery shopping. Life does get in the way of my modelling.

Stopped at the LHS and bought some fine wire for the rigging and 1" soft rubber wheels. Will resume putting on the stringers later today.

Charles
 

Attachments

  • DSC_2762.JPG
    DSC_2762.JPG
    98.1 KB · Views: 61
nice one so far Charles ,do you cover the plans with anything as you work with them,i'm looking for tips as far as i remember i was always fighting with the airframe getting stuck on the drawings,prob me being heavy handed as a teenager
 
Nice one so far, Charles. Do you cover the plans with anything as you work with them ? I'm looking for tips as far as I remember, I was always fighting with the airframe getting stuck on the drawings. Prob me being heavy handed as a teenager

If you notice, in post #36, the plans are a bit shiny, that's because of the waxed paper. I always put waxed paper on top of the plans. Model airplane glue does not stick to it. Straight ole waxed paper from the kitchen...but, in this case, I have my own roll. As for a tip, didja know you can use Elmer's White Glue instead of the model airplane glue, like Testor's ? You can even use it to attach the tissue, if you mix it 50/50 with water !

With this model, because the plans are so big, and two sided, I've made Xerox copies of the components (fuselage, tail, wings, etc) and am working from these.

Here's where we are at the end of the modelling day.... Fuselage construction is done as far as I can go. The lower wing has to be attached before I can add the lower formers and stringers. Also started working on the Cowl. I'm using white putty to get the cowl the shape I want it.

Charles
 

Attachments

  • DSC_2771.JPG
    DSC_2771.JPG
    120.1 KB · Views: 68
  • DSC_2774.JPG
    DSC_2774.JPG
    101.1 KB · Views: 59
  • DSC_2776.JPG
    DSC_2776.JPG
    84.8 KB · Views: 68
Last edited:

Users who are viewing this thread

Back