Excellent work so far Gerry!
Navigation
Install the app
How to install the app on iOS
Follow along with the video below to see how to install our site as a web app on your home screen.
Note: This feature may not be available in some browsers.
More options
You are using an out of date browser. It may not display this or other websites correctly.
You should upgrade or use an alternative browser.
You should upgrade or use an alternative browser.
1:32 scale Lancaster Mk.1 Hachette Partworks (2 Viewers)
- Thread starter Gerry
- Start date
Ad: This forum contains affiliate links to products on Amazon and eBay. More information in Terms and rules
More options
Who Replied?- Thread starter
- #742
Gerry
Staff Sergeant
Thanks Terry and Gnomey. I've seen photos of both colours used on flaps in museum Lancs. I thought black may have been more used in wartime?
Gerry
Gerry
vikingBerserker
Lieutenant General
Brilliant work!
Airframes
Benevolens Magister
I've had a quick look Gerry, and the predominant colour seems to be grey green. The RAF Museum example is in the green colour too, although it might well be that later production, possibly from mid to late 1943, could possibly have been painted, or re-painted black.
A4K
Brigadier General
Bloody nice work Gerry! Will check my books tomorrow for photos of the flap cololurs.
(Sorry I couldn't make the IPMS Nationals, btw. Had a family issue to attend to)
(Sorry I couldn't make the IPMS Nationals, btw. Had a family issue to attend to)
Crimea_River
Marshal
Nice to see you back at this wonderful project Gerry. Our Lanc at the Bomber Command Museum in Nanton has flap interiors painted black.
Airframes
Benevolens Magister
Yep, I've since found a couple of (B&W) photos where the flaps appear to be black inside - these were from late 1944 and early 1945. So either colour would be OK.
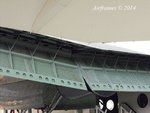
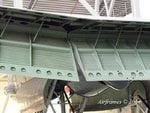
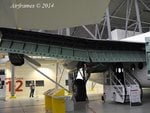
The pics below might prove useful for some details. It's the York at Duxford, but of course the layout is more or less the same - just higher !!
The pics below might prove useful for some details. It's the York at Duxford, but of course the layout is more or less the same - just higher !!
Attachments
Lucky13
Forum Mascot
Mindblowing work Gerry, absolutely fantastic!
Haven't seen any about flaps and paint, seen this though....
Just in case it'd be interesting...

A few other bits and bobs...


Just to show, how the fuel tanks were mounted....


From The Lancaster Manual, Greenhill Books...
Btw, I didn't know that the heavy bombs in the Lancaster, as it says in the book, must be loaded in the correct sequence.....and;
For this purpose, each bomb gear housing is numbered above and below the floor for ease of identification.....
Looking forward to the next update Gerry!
Haven't seen any about flaps and paint, seen this though....
Just in case it'd be interesting...
A few other bits and bobs...
Just to show, how the fuel tanks were mounted....
From The Lancaster Manual, Greenhill Books...
Btw, I didn't know that the heavy bombs in the Lancaster, as it says in the book, must be loaded in the correct sequence.....and;
For this purpose, each bomb gear housing is numbered above and below the floor for ease of identification.....
Looking forward to the next update Gerry!
SANCER
Senior Master Sergeant
I am pleased to say hello and see you're back Gerry.
Let continue enjoying your tremendous desk.
This system of ailerons is beautiful.
Btw, interesting and detailed informción Lucky13 !!

Cheers,
Let continue enjoying your tremendous desk.
This system of ailerons is beautiful.
Btw, interesting and detailed informción Lucky13 !!
Cheers,
Lucky13
Forum Mascot
Always, like many others here, happy to help Sancer, when possible.... 
- Thread starter
- #753
Gerry
Staff Sergeant
I'm bowled over with the number of replies to this post - far too many of you to name individually. My sincere thanks to all for your kind thoughts and wishes. I can assure you that both myself and my family greatly appreciate your support during our recent difficult times. We're only now beginning to come to terms with our loss and slowly trying to get back to normal life again.
just a few individual replies to your recent posts. Terry and Andy: thanks for your clarification on the colour issue and Terry for posting the excellent photos of the flap detail. As this is only the the first of four flap structures and the rest of the wing interior still needs painting grey/green, I'm considering possibly changing back to grey/green for the flaps, as it might just give better contrast against the exterior colour. I'm holding off on finishing the wing as I need to find out exactly how they suggest hinging the flaps and ailerons.
Jan, that's great material you've posted too. It should come in very useful. The description of the corrugated strengthening sheets in the flaps is very interesting and very clear in the photos Terry posted.I will look to see if there is any material available to replicate this.
Finally, Evan: sorry you missed making it to the show, I think you would have enjoyed it. I was on registration and was keeping an eye out for you over the weekend but I understand only too well how family takes precedence. Hope to see you in Dublin in the not too distant future.
Slåinte all,
Gerry
- Thread starter
- #754
Gerry
Staff Sergeant
Most of the time since I last posted has been taken up with sub-assemblies. Here are the fruits of the next three issues. Those of you following the thread closely will by now have deduced that I have a tendency to bitch about various aspects of the quality of this build but one thing that has been consistently positive has been the laser cutting of the frets.
Below is a typical fret; in this case the parts for the port tail plane. The quality is so precise , that once the tiny holding lugs are cut with a sharp blade they virtually fall off the fret. The tiny rib shows the precision of the cut, particularly in the notching and around the swallow tail.


This then translates to a very precise and stable assembly as in the tail plane below. Concentration is vital here to make sure the different sized ribs are orientated and positioned correctly but other than that, the fit is so tight that this could almost be assembled without adhesive. I've been using a very thin cyano adhesive called Rocket Hot. This is incredibly thin and fast drying as it evaporates in seconds but it can be very unforgiving. You need to keep the surfaces to be joined away from any other surface or indeed your fingers, otherwise you'll spend most of the session trying to dislodge it. It flows into the parts by capillary action and any left on the surface evaporates, leaving no raised spots. I've only used this on wood so far as I would be terrified of what effect it may have on plastic.

This is followed by the assembly of the port elevator and both parts are adjustable via a hinge rod. The one in the photo is one I had and I'm assuming that these will be supplied in a later issue . The trim tabs need chamfering and will be added later. Stringing, painting and skinning of these parts will be tackled in later issues.


The third issue contained some more equipment for the interior, but I have some questions about some parts supplied that I'm hoping to get some opinions on.

The cylinder is a gyro compass which was assembled and painted and had some decals added. It's photographed upside down as it's hung from the cabin ceiling by the bracket. The two escape axes were supposed to have red painted blades but I think the originals in wartime were bare metal. The two bags are supposed to be canvass holdalls. I've seen photos of these over the first aid kit in the BBMF Lancaster but I'm wondering if these are modern additions? The same applies to the torch and screwdriver. Again, I've seen a photo of these in The BBMF aircraft but would they have been in the original? I'll hold off installing them until I get your thoughts on the matter.
Finally some shots of some of the equipment installed. First the gyro compass mounted then with its safety cage installed. Sorry the second picture didn't come out as well as I hoped.


The first of the escape axes is positioned, with leather straps made from masking tape.

Lastly, having added some supporting stringers, the rear gunner's parachute and scratch built oxygen bottle holder are positioned by his station.

That's progress to date. I hope I haven't gone into too much detail on the assembly. Trouble is, I've got a lot of this basic work still to do and if I omit it there'll be much longer gaps between posts. I'll let the jury decide.
Cheers,
Gerry
Below is a typical fret; in this case the parts for the port tail plane. The quality is so precise , that once the tiny holding lugs are cut with a sharp blade they virtually fall off the fret. The tiny rib shows the precision of the cut, particularly in the notching and around the swallow tail.
This then translates to a very precise and stable assembly as in the tail plane below. Concentration is vital here to make sure the different sized ribs are orientated and positioned correctly but other than that, the fit is so tight that this could almost be assembled without adhesive. I've been using a very thin cyano adhesive called Rocket Hot. This is incredibly thin and fast drying as it evaporates in seconds but it can be very unforgiving. You need to keep the surfaces to be joined away from any other surface or indeed your fingers, otherwise you'll spend most of the session trying to dislodge it. It flows into the parts by capillary action and any left on the surface evaporates, leaving no raised spots. I've only used this on wood so far as I would be terrified of what effect it may have on plastic.
This is followed by the assembly of the port elevator and both parts are adjustable via a hinge rod. The one in the photo is one I had and I'm assuming that these will be supplied in a later issue . The trim tabs need chamfering and will be added later. Stringing, painting and skinning of these parts will be tackled in later issues.
The third issue contained some more equipment for the interior, but I have some questions about some parts supplied that I'm hoping to get some opinions on.
The cylinder is a gyro compass which was assembled and painted and had some decals added. It's photographed upside down as it's hung from the cabin ceiling by the bracket. The two escape axes were supposed to have red painted blades but I think the originals in wartime were bare metal. The two bags are supposed to be canvass holdalls. I've seen photos of these over the first aid kit in the BBMF Lancaster but I'm wondering if these are modern additions? The same applies to the torch and screwdriver. Again, I've seen a photo of these in The BBMF aircraft but would they have been in the original? I'll hold off installing them until I get your thoughts on the matter.
Finally some shots of some of the equipment installed. First the gyro compass mounted then with its safety cage installed. Sorry the second picture didn't come out as well as I hoped.
The first of the escape axes is positioned, with leather straps made from masking tape.
Lastly, having added some supporting stringers, the rear gunner's parachute and scratch built oxygen bottle holder are positioned by his station.
That's progress to date. I hope I haven't gone into too much detail on the assembly. Trouble is, I've got a lot of this basic work still to do and if I omit it there'll be much longer gaps between posts. I'll let the jury decide.
Cheers,
Gerry
Holy Sh!t....that is scrubbing up great Gerry, post as you need to mate, we will always be here waiting to see what you have been up too!
Great work so far Gerry!
vikingBerserker
Lieutenant General
Nice!!!!!!!!!!!!!!!!!!
SANCER
Senior Master Sergeant
Awesome !!  ... I'm thinking ... you are in this wonderful project and you are subscribed weekly since before you started to upload it to the forum ....
Gerry I have a few questions: 
Already finished receiving weekly shipments? If not how many left?
How long before March 2013 started to receive shipments?
You're doing a tremendous job, so meticulous and clean that you're accomplishing.
To give an idea of what you have in your hands, tell us how much assembly you with respect to material that you've received?
I appreciate your answers and congratulations on this great bird and I do not miss the next advance to show us.
Brindo a tu salud!
SANCER
... you are in this wonderful project and you are subscribed weekly since before you started to upload it to the forum ....Gerry I have a few questions:
Already finished receiving weekly shipments? If not how many left?
How long before March 2013 started to receive shipments?
You're doing a tremendous job, so meticulous and clean that you're accomplishing.
To give an idea of what you have in your hands, tell us how much assembly you with respect to material that you've received?
I appreciate your answers and congratulations on this great bird and I do not miss the next advance to show us.
Brindo a tu salud!
SANCER
Users who are viewing this thread
Total: 3 (members: 0, guests: 3)