1/32 Tamiya Merlin's Magic P-51D Reno dio

Ad: This forum contains affiliate links to products on Amazon and eBay. More information in Terms and rules

I haven't done the wiring yet, but..

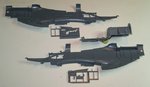
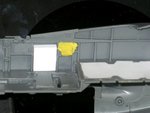
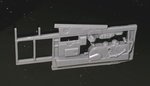
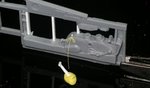
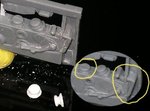
I have tucked into the cockpit. Showing both sides and the sidewall frames, nicely detailed, sorta. Could have been a little sharper on some things. Trim knobs and landing gear handle could have been separate.

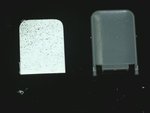
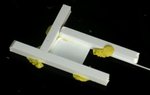
Stu has a single box for his radios on the strbrd side, so I have removed what was there and used white PVC for the new box.

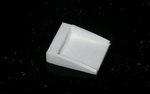
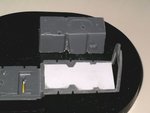
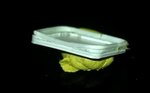
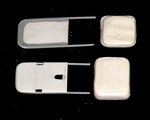
The bucket of the seat was a little deep as well as the seat back. So I am making my own of PVC. The seat bottom is dipped in front, so the pilots legs keep circulation going so I did that. The first layer I punched 4 holes and cut the center out. I will be making a parachute pack to fit in there.

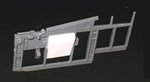
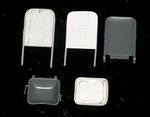
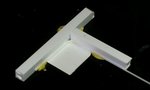
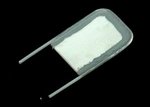
Did two backs. Had .5mm flat on front and is too flat. Second one I wrapped the .8mm rod around the outside of the back shape. Now I can fill in the edges to give it some depth tapered at the frame, as it should be.

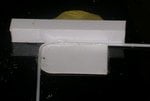
I cut the fuel tank off the back section, this could have been separate to give better detail as well. Filled in the hole with PVC shaped to fit for under the back seat. I will make the seat back as the pilot but the seat bottom is a padded flat, so I don't have to fiddle with that.

I now need an itty bitty saw to cut out the flare gun socket.

I pick away at it.
 

Attachments

  • 6a main pieces.jpg
    6a main pieces.jpg
    83.5 KB · Views: 120
  • 6b radio case.jpg
    6b radio case.jpg
    61 KB · Views: 114
  • 6c strbrd side mod.jpg
    6c strbrd side mod.jpg
    63.5 KB · Views: 117
  • 6d strbrd side.jpg
    6d strbrd side.jpg
    79.2 KB · Views: 115
  • 6e port side.jpg
    6e port side.jpg
    64.7 KB · Views: 120
  • 6n tank removed.jpg
    6n tank removed.jpg
    67.7 KB · Views: 114
the rest of the photos of my progress...... so far
 

Attachments

  • 6f pilot seat.jpg
    6f pilot seat.jpg
    66.1 KB · Views: 103
  • 6g seat bott 1.jpg
    6g seat bott 1.jpg
    60.3 KB · Views: 106
  • 6h seat bott 2.jpg
    6h seat bott 2.jpg
    61.4 KB · Views: 101
  • 6i seat bott 3.jpg
    6i seat bott 3.jpg
    62 KB · Views: 102
  • 6j seat back 1.jpg
    6j seat back 1.jpg
    64.8 KB · Views: 102
  • 6k seat back 2.jpg
    6k seat back 2.jpg
    63.2 KB · Views: 104
  • 6l seat back 3.jpg
    6l seat back 3.jpg
    61.6 KB · Views: 117
  • 6m seat back 4.jpg
    6m seat back 4.jpg
    62.4 KB · Views: 99
Last edited:
that is beautiful, I was there in 2006 and the Eberhardt family are lovely and friendly. I have more pix if you need them...pm me, also of her being 'broken down' for shipping after the oxy bottle explosion
 
Rocket, I would greatly appreciate any pictures of MM I can get.

Just waiting for the first of the month so I can get tucked into the Captured GB, and meanwhile......

Had to remove some of the fittings on the port side of the cockpit wall, the flare gun tube and map pouch. Then had to replace two of the upright ribs, did these with PVC. *Oh, and I broke off the itty bitty handle, made a replacement out of PVC!

I've finished off the back of the back seat, it's flat. The back of the pilot seat, it's concave and I tapered the edges with Mr Filler. Made the cushion for the back seat, it appears to be a wide flat one. Did the fanny chute pack in the bottom of the pilot seat, did these with miliput.

**I can't belive the luck of the Irish, I found decals for Merlin's Magic, all three scales!!!!! Nose art, all the markings, the whole shamozzle. I may have to do a 1/72nd now cuz I bought all three!!!!!!!!!!!! Wahoo
 

Attachments

  • 7a port side.jpg
    7a port side.jpg
    68.1 KB · Views: 90
  • 7b back filled.jpg
    7b back filled.jpg
    62.8 KB · Views: 86
  • 7c seats and backs.jpg
    7c seats and backs.jpg
    67.7 KB · Views: 93
Last edited:
Thanks fellas.......

Didn't like the nobs for the trim controls, or the thick molding of the bomb, fuel tank, releases.
So I made some new nobs and thinned out the molded control arms and handles for the release mechanism.
Now it looks better, eh?

Only a few more days to Captured GB start!
 

Attachments

  • 8 knobs-controls.jpg
    8 knobs-controls.jpg
    74.9 KB · Views: 97
Pictures as promised...
 

Attachments

  • Merlinmag1.jpg
    Merlinmag1.jpg
    42.1 KB · Views: 91
  • Merlinmag2.jpg
    Merlinmag2.jpg
    54.2 KB · Views: 94
  • Merlinmag3.jpg
    Merlinmag3.jpg
    68.1 KB · Views: 98
  • Merlinmag8.jpg
    Merlinmag8.jpg
    45.2 KB · Views: 102
  • Merlinmag9.jpg
    Merlinmag9.jpg
    46.2 KB · Views: 97
  • Merlinmag12.jpg
    Merlinmag12.jpg
    43.1 KB · Views: 92
  • Merlinmag14.jpg
    Merlinmag14.jpg
    53.3 KB · Views: 96
  • Merlinmag17.jpg
    Merlinmag17.jpg
    42.5 KB · Views: 104
  • Merlinmag19.jpg
    Merlinmag19.jpg
    64.1 KB · Views: 100
  • Merlinmag21.jpg
    Merlinmag21.jpg
    45.3 KB · Views: 93
I think Tony meant 'Wasted' as in waisted - the recess around the knobs under the flat tops, a waist, like on a pair of trousers. The originals were straight-sided.
 

Users who are viewing this thread

Back