Navigation
Install the app
How to install the app on iOS
Follow along with the video below to see how to install our site as a web app on your home screen.
Note: This feature may not be available in some browsers.
More options
You are using an out of date browser. It may not display this or other websites correctly.
You should upgrade or use an alternative browser.
You should upgrade or use an alternative browser.
1/32 Tamiya Merlin's Magic P-51D Reno dio
- Thread starter N4521U
- Start date
Ad: This forum contains affiliate links to products on Amazon and eBay. More information in Terms and rules
More options
Who Replied?- Thread starter
- #42
N4521U
Plastic Pirate
Any and ALL pointing out of corrections I can make are gladly accepted. Even yours Rocky! It did make me look. I often miss them little things that will make the difference, in this build particularly, since I have the association with this plane that I do.
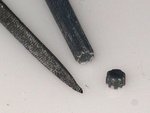
The way the picture of the knobs appears in the manual I mistook the shadow and glare as a "recess" is the shape. Perhaps the attached is a bit more realistic. I just took a piece of sprue and used a triangular file and made a spline on the end, then hacked it off after rounding the top slightly. I also filled in some of the slight push pin marks the show thru the framework.
Is there a 1/32nd parachute pack anywhere..... Lordy, I hope I don't have to make one of them too!
BTW, for the little white "wasted" ones , I shaped them on the end of a piece of PVC rod with a file and then hacked them off.
The way the picture of the knobs appears in the manual I mistook the shadow and glare as a "recess" is the shape. Perhaps the attached is a bit more realistic. I just took a piece of sprue and used a triangular file and made a spline on the end, then hacked it off after rounding the top slightly. I also filled in some of the slight push pin marks the show thru the framework.
Is there a 1/32nd parachute pack anywhere..... Lordy, I hope I don't have to make one of them too!
BTW, for the little white "wasted" ones
, I shaped them on the end of a piece of PVC rod with a file and then hacked them off.Attachments
Your trim knobs are still beautiful work and if smaller would be ideal candidates for the red control locking knob at the bottom of the stick. Are the pix I posted of MM any good? These were taken before they stripped the Merlin for bits. The piston shown was being held by Jim...and had been threshing around somewhat when the engine 'detonated'. It is pictured next to one I bought from Voodoo. I have a few more pics. The whole story that year of MM was one of bravery, enthusiasm, dedication, kindness, hard work and pit team spirit.
Doin' great Bill!
- Thread starter
- #45
N4521U
Plastic Pirate
Yep Rocky, pics are great. Some views I've not seen at all. How devastating that would have been if it had happened in the air. That piston is rather emaciated. I had a little 302 Ford V8 that dropped a piston skirt. Drove it for another 50 miles, but damn it made a racket. Pulled into my driveway at 3 o'clock in the morning.
Thems good pics of the motor as well. I can plumb my red one from them. Thanks mate.
Little story about Stu. I brought a friend around to his hangar in Livermore to say hello, he was in the middle of pre-flighting MM and I interrupted him. Got the redass from him a few days later at a little hangar get together. Marilyn told me he never gets angry, but he did with me. I never interrupt a pre-flight. I had one interrupted on me, forgot to put the fuel cap back in and took off in the 172 without a cap. Had to have someone fly one in to me so I could return. There the bugger was, on the taxiway!
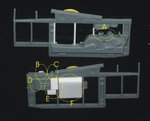
My cockpit sidewalls so far. A are the New nobs. B I defined the pivot for the canopy release handle. C I removed, and will reposition the canopy crank handle. D I wll remodel the fuse panel. E the switch panels have changed, and a new one below. F is a whole new radio BOX. It's getting there.
Thems good pics of the motor as well. I can plumb my red one from them. Thanks mate.
Little story about Stu. I brought a friend around to his hangar in Livermore to say hello, he was in the middle of pre-flighting MM and I interrupted him. Got the redass from him a few days later at a little hangar get together. Marilyn told me he never gets angry, but he did with me. I never interrupt a pre-flight. I had one interrupted on me, forgot to put the fuel cap back in and took off in the 172 without a cap. Had to have someone fly one in to me so I could return. There the bugger was, on the taxiway!
My cockpit sidewalls so far. A are the New nobs. B I defined the pivot for the canopy release handle. C I removed, and will reposition the canopy crank handle. D I wll remodel the fuse panel. E the switch panels have changed, and a new one below. F is a whole new radio BOX. It's getting there.
Attachments
Like it Bill, the attention to the little things is what makes it worth while!
Airframes
Benevolens Magister
It's looking great Bill. As for the parachute pack, i don't know of any in any scale. however, it should be easy to make, using Milliput for the pack, and foil for the harness. This would be a 'back-pack' chute (as were WW2 Mustang chutes), of modern, slim design, more than likely using the simple harness with a buckled chest strap and two leg straps fastened with snap hooks. Colours would depend on the personal choice of the user, but more than likely 'modern' nylon webbing, in red, blue, black, or whatever.
- Thread starter
- #48
N4521U
Plastic Pirate
Like it Bill, the attention to the little things is what makes it worth while!
I'm learning That from you Wayne.
Like everyone else on the forum we are learning from All the posts, good, and marginal, it gives us the fodder to base our builds on. Too philosophical.....
Terry, you have only confirmed my suspicions..... dam. The photos I have the parachute and seat cover are military greeeeeen! I did wear one of them little chutes every time I went up in a Pitts or Eagle. I prostituted my sign painting for rides in planes. Had a bunch ofem.
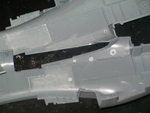
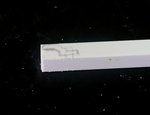
This morning no workey so I cut up the instrument panel. Shaped the panel insert, and dontcha bloody hate it when One hole is out of place. Make another is my only choice eh?
Attachments

Crimea_River
Marshal
Beauty!
- Thread starter
- #50
N4521U
Plastic Pirate
Sorry I'm putting so many little things up. But!
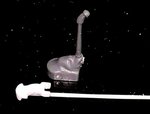
I did the yoke at the bottom of the stick. Used a 4x4 PVC square for the yoke and then cut down the bottom of the stick, the leather cover. The realy nice thing about this kit is the plastic....... it's just so workable. Cuts easy, files and sands down so nicely....
I will do a bit of thinning on it before final assy. But I am happy with it.
Attachments

very nice Bill
Airframes
Benevolens Magister
Very nice work Bill, and it'll make all the difference to the finished model.
Lucky13
Forum Mascot
Suuuperb!
Coming along nicely!
Night Fighter Nut
Master Sergeant
Good going there Bill.
Are you going to make the pallets for the broken engine like in the picture? Maybe use balsa if so.
Are you going to make the pallets for the broken engine like in the picture? Maybe use balsa if so.
Keep showing them little things Bill.....
- Thread starter
- #59
N4521U
Plastic Pirate
Thanks guys, didn't expect all the responses, but they keep me on my toes .
Nope, not gonna fly it. But I may enter it somewhere. Went to Hornsby this morning, a little model show. There was a Tamiya P-51 there decked out as provided in the kit and it was smashing! Some great car kits, fantasy, figures, and a great scratch built larger scale sub upper deck. But it made me think I could enter this one at some time as the complete dio. I've decided in seeing some of the entries tho, I'm not into the over exaggeration of the panel lines, they distract from the overall impact of the finished model. This one will not, because it's constantly polished.
*As far as the engine goes, the dio is as they were changing the engine, work platform(s), if I make anothe one, will try and get a fork lift to hang the prop from. The plane was crated up after the oxy tank explosion. The engine was crated up after the engine change. So this dio is in the heat of the battle. But I must admit it would be cool.
I did a little thinning out of what is the above pictures and the kit supplies the "A" frame in front of the stick with the locking pin and red nob. I punched a new panel. Since my punch set is not to SCALE, the panel is gonna be one gauge short, bugger. Now I need decals or placards for the fuel selector switch, I'll have to ask Craig if he can find something. It's gonna look pretty incomplete if That is not there. Will have to replace the Bump for the FIRE "T" handle as well.
I sailor on.
Last edited:
Airframes
Benevolens Magister
Bill, you could make placards from home-made decals on the PC. Another way is to use self-adhesive metal foil, painted black, with the wording, lines etc added by scratching in with the tip of a pin.
Users who are viewing this thread
Total: 1 (members: 0, guests: 1)