Navigation
Install the app
How to install the app on iOS
Follow along with the video below to see how to install our site as a web app on your home screen.
Note: This feature may not be available in some browsers.
More options
You are using an out of date browser. It may not display this or other websites correctly.
You should upgrade or use an alternative browser.
You should upgrade or use an alternative browser.
1/32 Tamiya Merlin's Magic P-51D Reno dio
- Thread starter N4521U
- Start date
Ad: This forum contains affiliate links to products on Amazon and eBay. More information in Terms and rules
More options
Who Replied?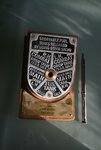
Aaron Brooks Wolters
Brigadier General
Superb work Bill!!!
- Thread starter
- #63
N4521U
Plastic Pirate
Thanks again everone.
Geez Gary, wouldn't we all like to have that pen holder!!!!!!!!
Eduard makes a PE with the all i=the interior placards including the FS, only thing is...... MM's is Red! May just do it printed on my PC from Garys photo.
Not much done today, just frazzled, did some napping after a big lunch, and a black beer, that may have been what put me out.
Back at it tomorrow. Been looking at the air intake and exhaust doohickies. Then the dreaded parachute pack.
Original ones were a orange/red plastic (bakelite)....I have the remains from my one and make 'new' ones is red resin (I have one on Ebay at the moment). They were sprayed black then rubbed to show lettering.
There are some nice pix of Gary's cockpit in the stickies
There are some nice pix of Gary's cockpit in the stickies
- Thread starter
- #65
N4521U
Plastic Pirate
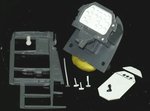
Have done a couple of things.
First I have made a clean instrument panel with the proper cluster! Made a PVC backing to mount the instruments to. Now to find some instrument prints.
In place of the gun sight Stu has a small 3 instrument panel with a couple of warning lights at the right side, onother on the left with 3 toggle switches. Anyone got clues how I can make a 1/32 toggle switch?
Made some "T" handles for the lower part of the panel, fire and such.
There is a brass valve added to the lower front, under the canopy release handle, nearer the floor so I have made one of PVC, it's in place.
And have added a plate behind the canopy crank handle, it's the itty bitty black thing. It's actually the kit handle, I just shaved it off and added the plate.
Looked for the eBay item, can't seem to locate it Rocky?
Attachments
Airframes
Benevolens Magister
Nice work Bill. For the toggle switches, use stretched sprue, glued into place. When set, cut these to the required length and bur the ends with a warm scalpel blade.
Crimea_River
Marshal
Looking very good Bill. A labour of love that is.
- Thread starter
- #68
N4521U
Plastic Pirate
Eggggggcelllent Terry.............. That's what I'll do!
Bewdy Bill! 
- Thread starter
- #70
N4521U
Plastic Pirate
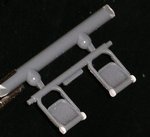
Well Terry, I wish I had done a couple of tests before I went and drilled holes for the stretched spru. I drilled a bit too big, then heated and stretched the spru. My first time and I never realized how thin that spru can go, and how tough it is when thin. I then pulled it thru the hole till it stopped, a drop of super glue. When dry I trimmed off at the back, and the front. The front was just a bit too thick cuz the hole was so big. So I may do it over and use the tiniest of drills for the holes. Lesson learned.
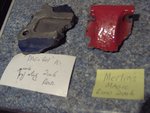
I also found a hole punch is a dangerous thing. See my rudder peddles. Why? You ask. I "don'tknow!"........... cuz I could.
I also found a hole punch is a dangerous thing. See my rudder peddles. Why? You ask. I "don'tknow!"........... cuz I could.
Attachments
Crimea_River
Marshal
Home made hole punch or bought?
vikingBerserker
Lieutenant General
NICE!!!!
Airframes
Benevolens Magister
Great stuff Bill. A few experimental tries with the stretched sprue should see you right !
- Thread starter
- #74
N4521U
Plastic Pirate
Andy, it is bought.......... having said THAT, i do wish it had more sizes!
Terry, stretched sprue rules!!!!!!!!!!!!!!! Here is my result. A .35 hole, pulled the prue thru from the back till it stopped, a spot of glue. No worries. Now just a trim and Bob's your uncle.
Terry, stretched sprue rules!!!!!!!!!!!!!!! Here is my result. A .35 hole, pulled the prue thru from the back till it stopped, a spot of glue. No worries. Now just a trim and Bob's your uncle.
Attachments
nice work Bill
Airframes
Benevolens Magister
Good stuff Bill.
- Thread starter
- #78
N4521U
Plastic Pirate
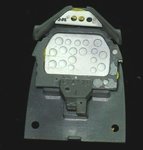
I hope I'm not boring everyone with all these little posts.
Nevertheless here is the front cockpit panels ruff assy as it is now.
I'm now remembering working in this scale. I started the Revell 1/32 P-51B in a once a month workshop with Rodney Williams in Californis a very long time ago. I had everything in two tackle boxes, they were nicked. Tools, kits and all.
Attachments
Airframes
Benevolens Magister
Nice work Bill, and certainly not boring. It should look the biz when the instruments and paint go on.
Users who are viewing this thread
Total: 1 (members: 0, guests: 1)