Navigation
Install the app
How to install the app on iOS
Follow along with the video below to see how to install our site as a web app on your home screen.
Note: This feature may not be available in some browsers.
More options
You are using an out of date browser. It may not display this or other websites correctly.
You should upgrade or use an alternative browser.
You should upgrade or use an alternative browser.
1/48 Airfix Hawker Hurricane Mk.I
- Thread starter Grant Barr
- Start date
Ad: This forum contains affiliate links to products on Amazon and eBay. More information in Terms and rules
More options
Who Replied?- Thread starter
- #22
Grant Barr
Senior Airman
Thanks Andy - I can see the muzzles are quite a way back, but the blast tubes are still visible near the leading edge of the wing. The tubing I have will be large enough to represent the blast tubes, so maybe I'll represent these instead and set them just inside the surface of the wing. It should still look OK at that, I think. 
Crimea_River
Marshal
Here's dem tubes:

And this is the inside of the leading edge panel that covers them:

And this is the inside of the leading edge panel that covers them:
- Thread starter
- #24
Grant Barr
Senior Airman
Awesome! Now I just need to get some time at the bench. Many thanks Andy.
Check out my GB45 Build Grant, that is the Airfix Hurricane. A nice kit to build.
Nice work so far!
- Thread starter
- #28
Grant Barr
Senior Airman
Thanks Wayne. I'll pop over to GB45 later today to take a good look!Check out my GB45 Build Grant, that is the Airfix Hurricane. A nice kit to build.
fubar57
General
Very nice work
- Thread starter
- #30
Grant Barr
Senior Airman
Just had a couple of minutes to pop over and have a look at the GB45 build by
 Wayne Little
- wow!! Would love to think I could work at that standard, but will continue on (mumbles quietly to self...
  ).
).
Got some intermittent bench time over the past week or so and managed to get the wings assembled. I did run into a few issues here, mostly with top wing panel alignment. I don't think I created this problem (at least I cant see where I would have), but when offering up the top panel I noticed on both sides that the top wing was about 0.5mm forward and about 0.25mm outboard of the lower wing. I fussed around with the fit, finding that the wing spar pieces attached to the lower wing when "keying" into their top wing positions pushed it out of whack. I ended up shaving a small amount of plastic from the spar ribs and got the wing to about 0.15mm within fore and aft and pretty much lined up laterally. The other issue this created was one of my pet hates - a gap on the trailing edges.
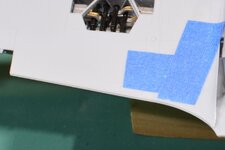
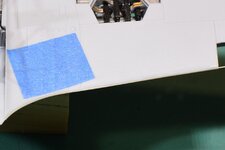
In the first of these two photos I hope you can see the gap and misalignment issue on the port wing. I did the usual things like shaving down the trailing edges as much as possible (without destroying the look of the wing) and chamfered plastic off the inside mating surfaces - still had a gap. So I thought - hang it - I'll just add a stretched sprue bead along the trailing edge and shape it back in to match the wing - see the second photo. I have say I am stoked with how it turned out. I was worried about how "soft" the Airfix plastic is, so I used some saved sprue from an old HobbyCraft kit which is really hard and glued that into place. Good choice. Not only did it allow me to fill in the gap, but the harder plastic allowed me to shape it into a fine edge without any issue.
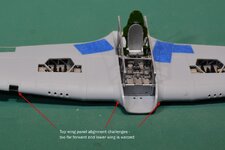
From the front you can see I still had an issue with the patchy alignment, as highlighted by the arrows. The other issue I had was with warping. In an earlier post I noted that one of the spar parts was warped - turns out that the starboard lower wing panel was also slightly warped. I tried my best to pull it back into shape but I think it is still a bit wonky and I think it makes the outboard section of the starboard wing droop slightly (or maybe I am just seeing things). I couldn't get a shot of it so maybe it is just my imagination...?
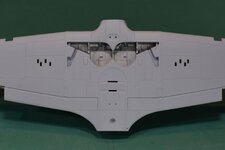
From the underside the wheel well panels all appear to fit really well, I have no significant gaps or alignment issues that I can see - happy days!
The other thing I have been working on is the blast tubes (thanks again to Andy - Crimea_River
- for the information on gun muzzles v's blast tubes). I cut some tubes from brass tube and set some styrene plugs in the ends so they can be inserted into the holes I pre-drilled in the wing spar gun locations.
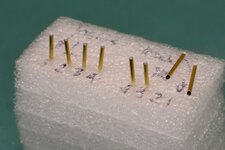
The tricky bit with these was to get the wing leading edge shape correct so they wont need too much touching up once in place.
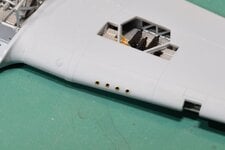
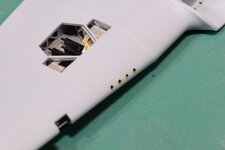
I managed to get them installed this evening - they haven't come out too bad. Some are not quite sitting as intended but I will work with them as they are I think. I did think that it would be a shame to cover them with red tape patches so the intent is to show the aircraft at the end of a sortie rather than the beginning. That way I can put holes in the tape and show the blast tubes - that's my working theory anyway...
As noted earlier, I did look at Wayne's GB45 build of this kit and have noted his comments re: fuselage to wing fit. I have done a rough test fit (without any fuselage assembly) and think I am going to have a real challenge with this. There appears to be insufficient fore/aft curvature in the lower wing panel to match the fuselage, which means I will be having fun trying to keep the whole thing clamped up whilst the glue dries. I suspect that a piece by piece approach to gluing them together might be the way to go. Updates on my plan of attack to follow.
I think that is about all I have for this post. Thanks for looking in and for all the information and guidance along the way!! Cheers.
Got some intermittent bench time over the past week or so and managed to get the wings assembled. I did run into a few issues here, mostly with top wing panel alignment. I don't think I created this problem (at least I cant see where I would have), but when offering up the top panel I noticed on both sides that the top wing was about 0.5mm forward and about 0.25mm outboard of the lower wing. I fussed around with the fit, finding that the wing spar pieces attached to the lower wing when "keying" into their top wing positions pushed it out of whack. I ended up shaving a small amount of plastic from the spar ribs and got the wing to about 0.15mm within fore and aft and pretty much lined up laterally. The other issue this created was one of my pet hates - a gap on the trailing edges.


In the first of these two photos I hope you can see the gap and misalignment issue on the port wing. I did the usual things like shaving down the trailing edges as much as possible (without destroying the look of the wing) and chamfered plastic off the inside mating surfaces - still had a gap. So I thought - hang it - I'll just add a stretched sprue bead along the trailing edge and shape it back in to match the wing - see the second photo. I have say I am stoked with how it turned out. I was worried about how "soft" the Airfix plastic is, so I used some saved sprue from an old HobbyCraft kit which is really hard and glued that into place. Good choice. Not only did it allow me to fill in the gap, but the harder plastic allowed me to shape it into a fine edge without any issue.

From the front you can see I still had an issue with the patchy alignment, as highlighted by the arrows. The other issue I had was with warping. In an earlier post I noted that one of the spar parts was warped - turns out that the starboard lower wing panel was also slightly warped. I tried my best to pull it back into shape but I think it is still a bit wonky and I think it makes the outboard section of the starboard wing droop slightly (or maybe I am just seeing things). I couldn't get a shot of it so maybe it is just my imagination...?

From the underside the wheel well panels all appear to fit really well, I have no significant gaps or alignment issues that I can see - happy days!
The other thing I have been working on is the blast tubes (thanks again to Andy -

The tricky bit with these was to get the wing leading edge shape correct so they wont need too much touching up once in place.


I managed to get them installed this evening - they haven't come out too bad. Some are not quite sitting as intended but I will work with them as they are I think. I did think that it would be a shame to cover them with red tape patches so the intent is to show the aircraft at the end of a sortie rather than the beginning. That way I can put holes in the tape and show the blast tubes - that's my working theory anyway...
As noted earlier, I did look at Wayne's GB45 build of this kit and have noted his comments re: fuselage to wing fit. I have done a rough test fit (without any fuselage assembly) and think I am going to have a real challenge with this. There appears to be insufficient fore/aft curvature in the lower wing panel to match the fuselage, which means I will be having fun trying to keep the whole thing clamped up whilst the glue dries. I suspect that a piece by piece approach to gluing them together might be the way to go. Updates on my plan of attack to follow.
I think that is about all I have for this post. Thanks for looking in and for all the information and guidance along the way!! Cheers.
Airframes
Benevolens Magister
Nice work, and the blast tubes really look the biz.
fubar57
General
Agreed
Vic Balshaw
Major General
Some amazing work Grant. 

- Thread starter
- #35
Grant Barr
Senior Airman
Quick update.
Managed some time at the workbench yesterday and today. All work has centred around the cockpit and the joining up of wings to fuselage. For the cockpit assembly attached to the lower wing I did remember to "dirty up" everything a bit. I was thinking about how many hours this aircraft may have done by the time it was shot down. The number cannot be very high so I resisted the temptation to add even more dirt along with wear and tear, just doing enough to make it look used rather than shiny and new.
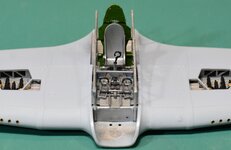
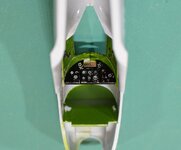
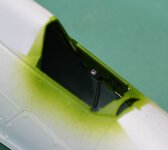
I forgot to take a shot of the IP once I got the supplied decal to sit nicely onto the raised details on the styrene part, so I took one after closing up the fuselage around it. It is ever so slightly out of whack, but you wont see too much of the IP once the gunsight/windscreen has been fitted. One other little detail I added was to put some dials and switches on the LHS cockpit wall, where Airfix just left round flat circles with instructions just to paint them black. The next photo shows another decal I added from spares that represents the voltmeter which I believe is correctly positioned for a Mk I. I am sure if I got it wrong someone will tell me...
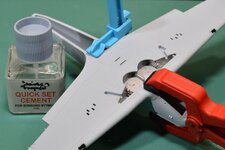
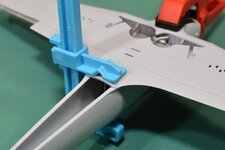
I then spent a whole lot of time trimming and shaving away plastic from the wings and fuselage panels. I got so carried away with this process that I fixed the wings to the fuselage before I remembered that the seatbelts should have been fitted BEFORE I completed this assembly!!! Talk about making things harder than they need be... As you might assume from the photos, I still needed to resort to brute force to get the wings and fuselage to meet up properly. The biggest issue seemed to be a lack of curvature from the front to the back of the lower wing panel, making me resort to forcing the front and back of the lower wing to their proper places on the fuselage. Looks brutal, but it was out about 1-1.5mm over the width of the centre section of the lower wing. I do have to say that the IckySticky liquid cement is the "ducks guts"! Smells a bit, but when it bonds plastic together there is no way it will ever come apart.
Not to worry - tomorrow's task will be to complete the painting of the paper seatbelts I have, add the buckles and other tiny details, then get them fitted to the seat. Might be a bit more challenging than I had originally intended, but I'll view it as a way to test my skills and patience
I think that's about all I have for tonight. Thanks for the feedback - ideas, opinions and thoughts always welcome.
Managed some time at the workbench yesterday and today. All work has centred around the cockpit and the joining up of wings to fuselage. For the cockpit assembly attached to the lower wing I did remember to "dirty up" everything a bit. I was thinking about how many hours this aircraft may have done by the time it was shot down. The number cannot be very high so I resisted the temptation to add even more dirt along with wear and tear, just doing enough to make it look used rather than shiny and new.


I forgot to take a shot of the IP once I got the supplied decal to sit nicely onto the raised details on the styrene part, so I took one after closing up the fuselage around it. It is ever so slightly out of whack, but you wont see too much of the IP once the gunsight/windscreen has been fitted. One other little detail I added was to put some dials and switches on the LHS cockpit wall, where Airfix just left round flat circles with instructions just to paint them black. The next photo shows another decal I added from spares that represents the voltmeter which I believe is correctly positioned for a Mk I. I am sure if I got it wrong someone will tell me...


I then spent a whole lot of time trimming and shaving away plastic from the wings and fuselage panels. I got so carried away with this process that I fixed the wings to the fuselage before I remembered that the seatbelts should have been fitted BEFORE I completed this assembly!!! Talk about making things harder than they need be... As you might assume from the photos, I still needed to resort to brute force to get the wings and fuselage to meet up properly. The biggest issue seemed to be a lack of curvature from the front to the back of the lower wing panel, making me resort to forcing the front and back of the lower wing to their proper places on the fuselage. Looks brutal, but it was out about 1-1.5mm over the width of the centre section of the lower wing. I do have to say that the IckySticky liquid cement is the "ducks guts"! Smells a bit, but when it bonds plastic together there is no way it will ever come apart.
Not to worry - tomorrow's task will be to complete the painting of the paper seatbelts I have, add the buckles and other tiny details, then get them fitted to the seat. Might be a bit more challenging than I had originally intended, but I'll view it as a way to test my skills and patience

I think that's about all I have for tonight. Thanks for the feedback - ideas, opinions and thoughts always welcome.
Vic Balshaw
Major General
This is looking very nice Grant and good luck with the seatbelts. 

Good work so far!
- Thread starter
- #39
Grant Barr
Senior Airman
Final update for the weekend. I managed some more time at the workbench - I gave SWMBO a cold and she is now way too cranky to talk to me, so I took refuge in the garage  .
.
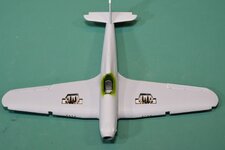
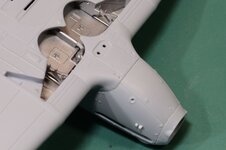
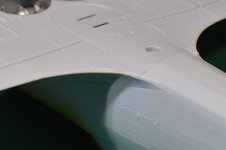
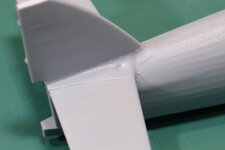
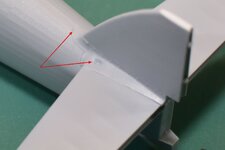
Now the wings are on it is starting to look like a Hurricane. I added the horizontal stabilisers and like almost every other part it needed a fair amount of "fettling" to get them to sit correctly without large gaps to the fuselage. I also took some shots of the front and rear joints for the wings. There is the slightest panel mismatch at the front (giving a "lip" to the joint) and at the rear you can see the slightly large joint gap where the wing fillet meets the fuselage. Not the end of the world, but something I will fix up some more to make it look right.
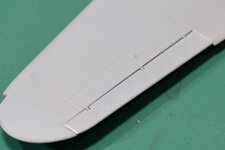
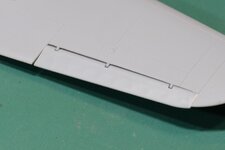
One other thing I found with the kit is there are very wide gaps between the ends of the ailerons and the wing cut outs. You can see in the shots above where I have added some plastic card to the aileron ends in an effort to close the gap somewhat. At 1/48 scale 25.4mm (1") is about 0.53mm and the gaps at either end were 1mm. I have not seen any photos where a 2" gap is apparent for each end of the ailerons, so that is now corrected. I did the same thing with the rudder where an even wider gap was evident (nearly 1.5mm), so the top of the vertical stabiliser has been extended ever so slightly (didn't take a specific shot of that).
Finally, as I was adding the horizontal stabs I noticed that there were three rather large sink holes in the plastic. Given how much positive press the Airfix kits have been getting for the past few years I am a bit surprised at the size of these holes. Nothing I can't fix with some filler, but thought it worthy of comment in my notes.
Thanks for the comments and reactions, hoping to keep up the speed on this build. Fingers crossed I can keep a lid on work and other commitments so I can continue to focus on the fun stuff like building kits!!


Now the wings are on it is starting to look like a Hurricane. I added the horizontal stabilisers and like almost every other part it needed a fair amount of "fettling" to get them to sit correctly without large gaps to the fuselage. I also took some shots of the front and rear joints for the wings. There is the slightest panel mismatch at the front (giving a "lip" to the joint) and at the rear you can see the slightly large joint gap where the wing fillet meets the fuselage. Not the end of the world, but something I will fix up some more to make it look right.


One other thing I found with the kit is there are very wide gaps between the ends of the ailerons and the wing cut outs. You can see in the shots above where I have added some plastic card to the aileron ends in an effort to close the gap somewhat. At 1/48 scale 25.4mm (1") is about 0.53mm and the gaps at either end were 1mm. I have not seen any photos where a 2" gap is apparent for each end of the ailerons, so that is now corrected. I did the same thing with the rudder where an even wider gap was evident (nearly 1.5mm), so the top of the vertical stabiliser has been extended ever so slightly (didn't take a specific shot of that).


Finally, as I was adding the horizontal stabs I noticed that there were three rather large sink holes in the plastic. Given how much positive press the Airfix kits have been getting for the past few years I am a bit surprised at the size of these holes. Nothing I can't fix with some filler, but thought it worthy of comment in my notes.
Thanks for the comments and reactions, hoping to keep up the speed on this build. Fingers crossed I can keep a lid on work and other commitments so I can continue to focus on the fun stuff like building kits!!
Users who are viewing this thread
Total: 1 (members: 0, guests: 1)
