1\48 Do 335 A12

Ad: This forum contains affiliate links to products on Amazon and eBay. More information in Terms and rules

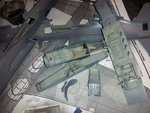
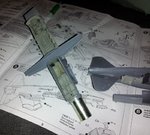
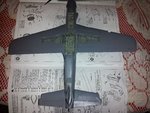
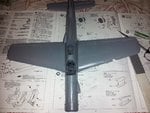
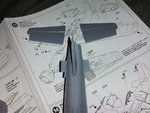
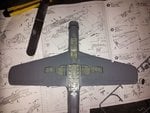
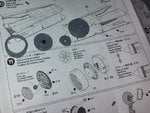
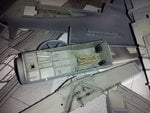
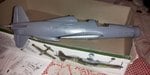
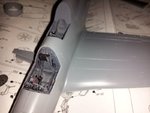
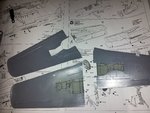
well i decided to post some late night pics my side wasnt killing me so i finished the pit. main work that i did was cutting out all the decals for the front instrument panel. then painting dials , did a few bits more to the cockpit tub area. ill be working on the kit again tomorrow. after some landing gear parts go together i can put the two fuselage halves together and really get going. so there will be another update again tomorrow anyway. It was a pain cutting out all the decals but there was no raised detail for the dials so it was worth it. after placing ,i clear coated decals with future then threw on another coat of clear gloss , learned my lesson not to put it directly onto the decal and melt it. I messed with the instrument dials so much i had to just stop before i went backwards. when you zoom in close on a computer you can see things your eye cant so it makes for an ugly cycle. i was satisfied in the end.

To sum up the build so far, cockpit detail it is really good and crisp , pretty accurate, and fits together good. it will go together very fast especially if you use the decals for the instrument panels without cutting them out individually . the only downside to cockpit is decal seat belts which are good for a laugh though and the instruments having a black panel background... everything else is great.
pitparts3.jpg
pitparts2.jpg
pitparts.jpg
goodpit.jpg
 
Last edited:
well why im still awake i glued the trainer tub and instruments into the trainer cockpit , which mounts cleanly to the two halves. i glued the trainer pit tub and instruments, placed in the main decking and front cockpit just to dry fit , taped the halves and took some pics. everything fits nicely like i remembered. trainer section is also just dry fitted nothing is glued .
tub.jpg
tub (2).jpg
tub (3).jpg
 
crimea they include a pretty decent (heavy ) nose weight its a metal cylinder , ill include pics this part of the build is coming up soon. looking at instructions now and this baby should have wings , elevators, the whole nine yards not much to do but paint some RLM 02 in the hard to reach places and put her together.
 
Heres quite a few pics of what i did today . started with gear and weapons bay. nose landing gear bay and weapons bay connect to the bottom of the cockpit deck. they include a weight that fits tightly into a retainer that goes on the end of the nose gear compartment. A wing spar with detail for weapons bay connects to the underside of the cockpit deck. a small rack that looks like a ribcage also glues to the underside of cockpit deck. next you glue the completed assembly in between the two fuselage halves. the wing halves glue together nicely as do the elevators. the wings click into place very tightly so tight you cant dry fit because it wont come off ! i had to glue the left wing after it was in place, right wing i glued prior to clicking it in place. elevators slide nicely over a tab . Fit is great and the kit is engineered so that it cant really be misfit due to error. nose is made up of cowling , flaps, and a two piece assembly to represent the front of the inline engine that would be visible. choice of open or closed cowling flaps, i chose open. both look good. 2 air scoops , 3 rear ducts, and 2small machine gun fairings where added .. . at this point i will sand and make sure all joints are tight for base coat of aluminum and pre shade with black. to sum up this part of the build , it was very basic yet smartly engineered modeling that fits great. very fast paced model and no real putty required . props, gear and small bits will go on after i get the majority of painting decals and weathering done.
 

Attachments

  • bayparts.jpg
    bayparts.jpg
    131.3 KB · Views: 97
  • bayparts2.jpg
    bayparts2.jpg
    118.8 KB · Views: 98
  • baypartsnoseweight.jpg
    baypartsnoseweight.jpg
    103.9 KB · Views: 97
  • completebottom.jpg
    completebottom.jpg
    121.4 KB · Views: 94
  • completetop.jpg
    completetop.jpg
    104.9 KB · Views: 109
  • elevator.jpg
    elevator.jpg
    108.4 KB · Views: 89
  • gearbayscomp.jpg
    gearbayscomp.jpg
    111.4 KB · Views: 90
  • nose.jpg
    nose.jpg
    107.5 KB · Views: 85
  • nosebay.jpg
    nosebay.jpg
    105.2 KB · Views: 100
  • profile.jpg
    profile.jpg
    46 KB · Views: 111
  • scoops.jpg
    scoops.jpg
    108.6 KB · Views: 111
  • tightwing.jpg
    tightwing.jpg
    45.1 KB · Views: 114
  • wingparts.jpg
    wingparts.jpg
    102.6 KB · Views: 100
Thank you wayne. even though i tried to post the pictures in order but needless to say they didnt come out that way... you will just have to use your imagination that the complete model with scoops, wings, elevators, should of been the last three pics. oh well. i wanted to take this pause to ask what should be the next start to finish build i do... not that anyone cares but your input will help me decide ... right now im rolling over these ideas in my head leaning heavily toward a Ju 88 H1.

all in 1\48 scale

1)Ju 88 H-1 , converting an A4 with paragon kit, extratech radar antenna, plan on doing it with a blue squiggle pattern camo sprayed over splinter camo. U4+CL was an actual H1 but i dont think there are pics so i can take the liberty to apply RLM 76 squiggle camo.

2)Ju88 G \ Fw190F-8 mistel S2 with shaped charge head. pretty exotic camo options available

3) Me 410 B

4)Ta 152 H

5) Bf 109 G14 blue 3 of JG 77

6)Fw 190 D-13 yellow 10 very cool camo

7) converting a Ju 88 A4 into a Ju88 S-2 or S-3

i have other kits that are gonna be time consuming in 1\48 like He 177A5 , Fw200 C4, He 111H22 , BV141, Do-24 flying boat fit is horrible!!! but only game in town for this kit in 1\48. i: kinda wanted to knock out a few of the easy ones before i start cursing and screaming again :)
 
Last edited:
Nice work and looks like an impressive kit too. Pity it's the two-seater, as i have a Falcon vac-form canopy, for the single seater, you could have had - doubt I'll ever use it.
BTW, if you want to get your pics in order, once they're selected and clicked on 'upload', they should appear in a box below the previously posted pics. They can then be 'dragged' into the required order. This can also be done by using the 'Manage Attachments' button, to access the pics, and dragged around as above. Hope this makes sense?!
 
thanks guys , and airframes i appreciate the offer very much! if anyone who happens to look at my posts ever needs anything luftwaffe send me a message i have a decent amount of crud in my spares box, decals, instructions.maybe i could help worth a try anyways.
the kit is really nice and gets to the paint stage fast.i bought it for 18 dollars so im happy all around on this build so far.
just need to whine a little i slept through my auction i was bidding on a dml 1\48 Ju 88 G-6 ... she sold for 12 bucks! last time i did that i missed a trimaster Fw-190 D-9 freakin thing sold for 6 dollars... i hate when they get away! updates on the build soon.
 
Yep meat loaf .revell/pro mod , It is a super sweet build . I had built one in the past... the fit and detail put it up their if not better than tamiya hasegawa.... The price is high now that its oop, but I snagged one cheap hoping to build soon. Only funny thing is revell put its name moulded on the underside of the elevator but it can be sanded of as its embossed. Pro mods Do 217 is another sweet kit with good fit and detail up there with tamiya/ hase reputation. Thanks for the interest Wayne hopefully nothing goes wrong :). Crimea I think it will b the ju 88 h-1 next, as this draws to a close ill post some pics with whats gonne be modified and parts involved.
 
Last edited:
The office is looking great! I vote for the 410 ,got that one in the stash as well. Looking forward to seeing the next update!
 
The suns about to come up so i think i better put her down and get some sleep . firstly i might be laughed out of here but i was going to share a method i use for filling fine cracks or gaps , where for instance you wouldnt want to putty or sand very much(wing roots or tight angles). i really dont like rescribing panel lines if i can avoid it. Im a painter so i have plenty of 35 year (dense) latex caulking one day i decided to make a small pipette bag with some in it to try and surgically apply filler to tight joints like wing roots or engine panel joints where a panel line is acceptable but not a gap. i put a small amount on a square of plastic wrap. synch it up. poke a fine hole with a needle. and if you position it right and poke the whole in the end you can get a decent tiny bead going . squadron putty dries as it hits the air in small amounts ... this stays workable long enough to bead it out and use a wet q tip or finger tip to smooth out. dries very fast and any excess in panel lines can be cleaned out easily with a needle tip. so heres a few examples of what i did today to fill small tight joints on wing roots and elevators so on. im sure scratch builders could adapt this for filling small master molds or small flexible hoses. very dense stuff and flexible .
bagpric.jpg
upclose.jpg
filler.jpg
last pic shows one joint filled vs. one unfilled

Next i masked off selected panels , sprayed black and dark gray also on selected panels , then removed masking so i left some bare plastic panels as well. then i took alcladII aluminum and shot the enire wing , elevators , engine, and cowl. heres where i made my mistake i should have let the black dry completely before i sprayed dark gray. so i could mask the black panels sharpley, even though i kept the lines fairly tight for free hand with the dark gray, the soft edges between black and gray, translated to the aluminum if that makes sense. sharp panels are a must to pull of a multi colored raw metal look. anyways i sprayed all the areas with alclad II Alum. this is what stage im at. tomorrow after a full day of drying im going to mask off select panels that im un happy with and spray with a doctored version of testors alumn . the pictures of Wrk. # 112 show the underside of the wings with all sorts of shaded panels meaning it was likely raw metal bottom. i think captured the look fairly well when i angle the bottom in the light ... after i do a little more tomorrow in aluminum, i will spray elevators and ailerons RLM 76 , i think then i will be happier . also some careful post shading will help frame out each individual change in tone. anyways heres where i stopped today.
masking1.jpg
black and dark gray.jpg
silver 2.jpg
silver3.jpg
Silver1.jpg
 

Users who are viewing this thread

Back