Fearsome-13
Airman
- 20
- Aug 4, 2014
Morning all,
Have a look at a quick build I did using the Tam P-51D. Built as a 2 Sqn SAAF F-51D in Korea.
I used an Aires cockpit set, and it was going to be my first attempt at using Alclads.
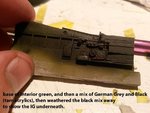
After quite alot of research on the P-51 cockpit color conundrum, I decided to go for a well used look. Laying down a base of Interior green, and then a mix of German Grey and Black (tam acrylics), then weathered the black mix away to show the IG underneath.


Having read alot about the surface prep required for Aclads, I spent far more time than I should have preparing the kit for paint. This included filling in the wing panel lines, as was done on the P-51. I couldnt find any definitive answers, so I worked on a best guess average from research done online.

Then it was time for alclads... the bird was primed and painted with tam X-1, then gloss coated...


On her own legs for the first time

I subsequently made a boo boo with the weather process, so she isnt yet finished. I havent got the heart to strip off the paint and start again, so I'm strongly considering finishing her with the boo boo and moving on.
Have a look at a quick build I did using the Tam P-51D. Built as a 2 Sqn SAAF F-51D in Korea.
I used an Aires cockpit set, and it was going to be my first attempt at using Alclads.
After quite alot of research on the P-51 cockpit color conundrum, I decided to go for a well used look. Laying down a base of Interior green, and then a mix of German Grey and Black (tam acrylics), then weathered the black mix away to show the IG underneath.
Having read alot about the surface prep required for Aclads, I spent far more time than I should have preparing the kit for paint. This included filling in the wing panel lines, as was done on the P-51. I couldnt find any definitive answers, so I worked on a best guess average from research done online.
Then it was time for alclads... the bird was primed and painted with tam X-1, then gloss coated...
On her own legs for the first time
I subsequently made a boo boo with the weather process, so she isnt yet finished. I havent got the heart to strip off the paint and start again, so I'm strongly considering finishing her with the boo boo and moving on.
")