A deviation from my rule: Tamiya A6M2 in 1:32

Ad: This forum contains affiliate links to products on Amazon and eBay. More information in Terms and rules

Hello everybody,
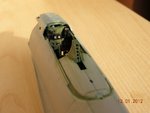
I did some progress on my Zero model and I will post some picture tomorrow, if I will be able to take them under the sunlight.

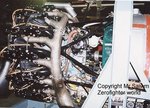
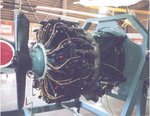
But, as I'm trying to add some more details to the Sakae 12 engine, I would like to know if someone can suggest me where to find good pictures of it where to find out where to connect the various pipes and cables.
Many thanks in advance.
Alberto
 
As I mentioned above, I managed to take some shots on my work, some otside with the sun and some inside.

The cockpit and the oil tank.
DSCN1727.JPG
DSCN1732.JPG


and a few shots on the engine
DSCN1738.JPG
DSCN1740.JPG
DSCN1742.JPG
DSCN1743.JPG


as you can see I added some pipes and rubber hoses, some more will follow, specially if I will manage to find good documentation to refer to.
Cheers
Alberto
 

Attachments

  • DSCN1729.JPG
    DSCN1729.JPG
    193.9 KB · Views: 115
nice motor good job
I paint my zeke use in your day that I mixed a fairly nice, paint first with c-15 (IJN green) mr Gunze color, then top with the C-35 (IJN gray) but very slightly dissolved between 70 and 90% by different layers of color to give the appearance somewhat like that of little wayne but of course mine was a 1 / 72 that the color was lighter yet.
 
Last edited:
Google images has a few pics of the Sakae 12, several more of the 21. These pics are labelled as the 12:
 

Attachments

  • sakae1.jpg
    sakae1.jpg
    44.5 KB · Views: 130
  • sakae2.jpg
    sakae2.jpg
    46.5 KB · Views: 138
Many thanks to all for your nice comments and for the pictures.
I tried Goggle several times but I wasn't very lucky.
Alberto
 
Wiring on the Sakae engines was very simple.
Each cylinder had two plugs as a set and the backside one had an air-cooling tube led from the front.
Attached photo shows an image seeing from the bottom.

Sakae12_wiring.JPG
 
Last edited:
Hello!
Thanks to the pictures I did some improvement on my engine.

Added a second row of cables
DSCN1744 edit.jpg


Added some more hoses on the back side, with a few cords and a bar clearly visible on pictures.
DSCN1745 edit.jpg


Added all linkages between cylinders
DSCN1747.JPG


And an oil filter with relevant hoses
DSCN1748 edit.jpg


I know that not much will be clearly visible when the engine will be installed on frame, but I also know it's there!

Next I will have to take care of canopies and then my Zero will take its own place in the queue waiting for painting.

Cheers
Alberto
 

Users who are viewing this thread

Back