Building a Luftwaffe Diorama.

Ad: This forum contains affiliate links to products on Amazon and eBay. More information in Terms and rules

[SC] Arachnicus

Senior Airman
439
4
May 1, 2012
West Chester OH
I recently acquired most of the things I will need to create a Luftwaffe Diorama. It will be created on top of a square foot oak board. Below are pics of the first vehicle on 1:72 scale I ever built.


K1.jpg
K2.jpg
K3.jpg
K4.jpg
K5.jpg


The Diorama will also have:

2 FW-190s
A fuel truck
Barrels
Jerry cans
Creates
And of course figurines.


I'm using one of the two 190's that I have already built and am in the process of building the second one.
 
The base of this Kuberwagen was painted in MM enamel Gunship grey. The darkening in grooves was done with a diluted Tamiya Acrylic German grey where I dry brushed it to give it texture. The greet convertible soft top fabric was painted with MM enamel RLM 62 then a diluted acrylic Tamiya Deep green also dry brushed.

I assume the barrels and fuel truck with be the same grey as the Kuberwagen from what images on Google suggest. I have already got Spring Tuftgrass wild grass by Heki and fine dirt for the runway and perhaps a small road. I haven't got trees yet but I will buy two trees on there somewhere. Currently I have a bunch of spare figurines to practice on before painted the ones who will go on the diorama.

I will post pics of the board and supplies later.
 
Looks pretty good. Note that after late 1941, all ground vehicles and equipment were to be painted in Dunelgelb (Dark Yellow) a 'sand' colour. Vehicles normally had a stripe or mottle of at least one other colour, more often two, which were known as Dunkelgrun (Dark Green) and Wein Rot - wine red, a dark reddish brown colour.
Items such as fuel drums were also painted in the base colour by this time, but without the mottle, but of course, drums still in use from an earlier period might still be in the grey colour.
The German land and air forces took camouflage and concealment very seriously, and were extremely good at it - apart from those instances when the would paint, for example, a HQ building in cammo colour, when it really stood out as the only camouflaged building in a town !
 
Yep, in Europe too, as shown on the box tops of your kits. That's the plain 'factory' finish, and the other colours were normally field additions. There was no 'hard and fast' rule for the additional colours, but they tended to be in stripes, or a very heavy mottle, often with most of the 'sand' colour almost obliterated. It was actually very effective.
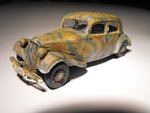
Here's a typical example of how a vehicle would look, in this case a 1/48th scale Citroen, for my still in progress 1/48th scale diorama.
Note that in some cases, with earlier vehicles which had been painted grey, the interiors, particularly the cabs of trucks, were sometimes left grey, although the open truck back would normally be re-painted.
 

Attachments

  • Radener dio 002.jpg
    Radener dio 002.jpg
    65.2 KB · Views: 163
Should be straightforward. You could leave the interior of the Kubelwagen in grey, or even put the canvas top on. The exterior can be overpainted quite easily, by brush or airbrush, and then just brush paint the fittings such as the spare wheel etc. From what I remember, the stripes on my car were brush painted anyway.
 
It will take awhile. The second 190 I'm making for it I'm progressing quickly but the fuel truck will take awhile because I'm used to building planes. That kubelwagen is only the third vehicle I have ever made.
 
There's no rush, especially when building a diorama. It's taken me one and a half months and 120 hours on the Halifax alone for my diorama, and I haven't finished it yet, and still have to start on the base and figures etc.
The trick to getting a good result in a diorama, is careful planning beforehand, and knowing what every 'person' (figure) and vehicle are supposed to be doing in the scene being depicted. Each piece should sit in the diorama, not on it, and be posed in such a way that it's obvious to the viewer what is happening, rather than having a figure just standing there, stiff as a tailor's dummy. Also, each piece should literally fit in, in as much as items like oil drums, packing cases and so on, should look as if they're on the ground properly, and not sitting above, for example, the grass.
Looking forward to your progress, and don't be afraid to ask if you need help, advice, or suggestions.
 
A short note here... the Panzergrau was used untill the Fall of the 1942. So by the time all WH vehicles including Kübelwagens were painted with the colour. Unless these were used by the DAK.
 
Oops! Thank you my friend, I've just realised I made a typo - it should have read late 1942, not 1941 !
However, as the diorama is featuring FW190s, on the Eastern Front (so I'm informed), then the vehicles would almost certainly be in the later colour scheme. Our friend has asked me, via a PM, if I have a picture of a fuel truck on the Eastern Front, which I don't think I have, but probably have one for the Western Front. I've explained the similarities, and local 'adjustments' to colours to suit terrain, but if you have a suitable photo of a fuel truck or personnel truck, it would be helpful.
 
No problemo pal. I wasn't sure about the year as well so I posted my three cents here. As far as the WH vehicles used on the Eastern Front... it seems there's much variants of a camo scheme we can expect. As memo serves crews of them adjusted it to areas where these were used. So the variety of them might have appeared.
I'll check on the pic of a fuel truck on the Eastern Front.. but can't remeber if I have seen a such one at all.
 
Opel Kfz.385 Blitz Fuel Truck with Bf110 during a winter...

file.jpg


...with Do-17

file.jpg


...with Ju-52 ( not sure if it was taken in Russia)

file.jpg


An interesting camo of the fuel truck..

file.jpg

file.jpg

file.jpg

file.jpg

file.jpg

file.jpg


A small shot with Hs-126...

42opBlitzlicisternairazvedchikHs126Russland_Baydeww2.jpg
 
Last edited:

Users who are viewing this thread

Back