Navigation
Install the app
How to install the app on iOS
Follow along with the video below to see how to install our site as a web app on your home screen.
Note: This feature may not be available in some browsers.
More options
You are using an out of date browser. It may not display this or other websites correctly.
You should upgrade or use an alternative browser.
You should upgrade or use an alternative browser.
**** DONE: 1/32 Bf109G-2 - Aircraft in Foreign Service WWII
- Thread starter Wayne Little
- Start date
Ad: This forum contains affiliate links to products on Amazon and eBay. More information in Terms and rules
More options
Who Replied?Airframes
Benevolens Magister
Looking good.
- Thread starter
- #123
Thanks Very much Guys!
dneid
Staff Sergeant
Very nice, Wayne. I too am looking forward to watching the colors go on.

ccheese
Member In Perpetuity
Way cool, Wayne-Oh !
Charles
Charles
- Thread starter
- #127
Thanks guys.
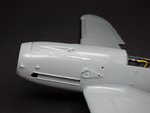
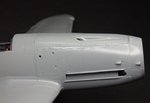
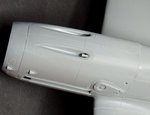
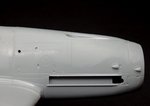
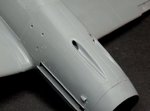
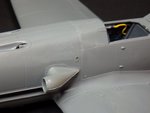
Superglue filler around the edge of the upper cowl section as this is not a panel line, then went to work filing and sanding back to a nice clean finish, also added the Intake to the port side cowl and slipped the oil tank section into the front of the cowl...not glued just yet!
Superglue filler around the edge of the upper cowl section as this is not a panel line, then went to work filing and sanding back to a nice clean finish, also added the Intake to the port side cowl and slipped the oil tank section into the front of the cowl...not glued just yet!
Attachments
-
 51_CA Fill Cowling_1632.jpg47.5 KB · Views: 97
 -
 52_CA Fill Cowling_1633.jpg39.3 KB · Views: 91
 -
 52_CA Fill Cowling_1634.jpg54.1 KB · Views: 94
 -
 54_Cowl sanding_1642.jpg53.3 KB · Views: 103
 -
 54_Cowl sanding_1646.jpg42.5 KB · Views: 94
 -
 55_Cowl sanding_1643.jpg53.1 KB · Views: 95
 -
 56_Intake and Oil tank_1648.jpg225.5 KB · Views: 101
Angels one-five
Airman 1st Class
Looking very good
- Thread starter
- #129
Cheers mate!
ccheese
Member In Perpetuity
Saaweet !!
Charles
Charles
Crimea_River
Marshal
I tend to favour thick primer paint to fill those kinds of joints as I find CA hard to shape. One of many options I guess. Looks good though Wayne.
Looks great so far Wayne!
al49
Tech Sergeant
Very nice so far!!!
Alberto
Alberto
Vic Balshaw
Major General
I've been a bit slack over the last week or so Wayne and am now doing the catch-up. Happy New Year to you and what superb stuff you are producing, also like you instructions on the IP build.
- Thread starter
- #136
I tend to favour thick primer paint to fill those kinds of joints as I find CA hard to shape. One of many options I guess. Looks good though Wayne.
a delicately handled round file does the initial job of cutting back the CA Andy, followed by the 600 800 sandpaper....
I've been a bit slack over the last week or so Wayne and am now doing the catch-up. Happy New Year to you and what superb stuff you are producing, also like you instructions on the IP build.
Thanks Vic and happy New year to you and Hilary....
And thanks to all you guys for stopping by...
Crimea_River
Marshal
Thanks fro the tip Wayne. "Delicately handled" is right!
- Thread starter
- #138
Cheers Andy!
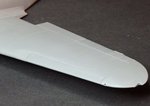
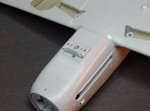
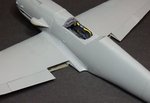
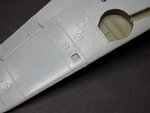
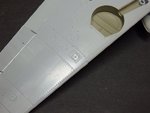
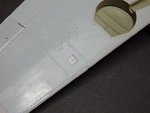
Ok further progress from yesterday and today, added the leading edge slats and the flaps, filled and sanded the holes for the G-6 cannon bulges, added the Oil cooler section under the nose and added the grilles too(forgot pics), filled the antenna hole for later models again with the CA filed and sanded, added the exhausts and covers too. finally today I managed to get the first paint on, the Yellow tactical markings.
Ok further progress from yesterday and today, added the leading edge slats and the flaps, filled and sanded the holes for the G-6 cannon bulges, added the Oil cooler section under the nose and added the grilles too(forgot pics), filled the antenna hole for later models again with the CA filed and sanded, added the exhausts and covers too. finally today I managed to get the first paint on, the Yellow tactical markings.
Attachments
-
 57_Slats Flaps_1649.jpg54.3 KB · Views: 105
 -
 58_Oil Cooler section fitted_1650.jpg56.9 KB · Views: 110
 -
 59_Flaps in Place_1654.jpg56.5 KB · Views: 109
 -
 60_holes filled_1656.jpg47.3 KB · Views: 107
 -
 61_Antenna Hole filled_1658.jpg61.4 KB · Views: 115
 -
 62_Antenna hole filled_1659.jpg59.3 KB · Views: 106
 -
 62_Antenna hole filled_1662.jpg57.1 KB · Views: 108
 -
 66_Yellow markings applied_1694.jpg57.5 KB · Views: 99
 -
 67_Yellow ID Markings_1698.jpg63.8 KB · Views: 111
 -
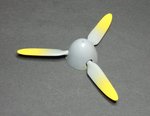 68_Prop blades painted_1691.jpg67.1 KB · Views: 92
ccheese
Member In Perpetuity
Verrrrry Nice, Wayne.
Charles
Charles
Crimea_River
Marshal
Nice! Yellow prop tips?
Users who are viewing this thread
Total: 1 (members: 0, guests: 1)