**** DONE: 1/32 N1K2-J Shiden-Kai - Pacific Theatre of Operations II

Ad: This forum contains affiliate links to products on Amazon and eBay. More information in Terms and rules

Thanks guys,
Was going to stick with the plastic retraction arm and springs for the undercarriage even used my fine saw to cut the spring profile one by one,with the extra time I have made one small improvement.......have now removed the plastic spring and replaced it with copper wire wound around some short lengths of .9 x.45 brass tube, then inserted some .45 brass wire through the tube to create the attachment points representing the end of the springs, looks better and provides a stronger fixing point.
So now painted these and applied a tiny bit of wash to finish it off...
 

Attachments

  • 140_Spring Assy_3533.jpg
    140_Spring Assy_3533.jpg
    38.9 KB · Views: 86
  • 141_Spring Assy_3537.jpg
    141_Spring Assy_3537.jpg
    37.1 KB · Views: 89
  • 142_New Spring Assy_3578.jpg
    142_New Spring Assy_3578.jpg
    44.3 KB · Views: 90
  • 143_Spring Assy Fitted_3580.jpg
    143_Spring Assy Fitted_3580.jpg
    68.5 KB · Views: 92
  • 144_Spring Assy fitted_3586.jpg
    144_Spring Assy fitted_3586.jpg
    73.4 KB · Views: 89
  • 145_Spring assy painted_3598.jpg
    145_Spring assy painted_3598.jpg
    67.3 KB · Views: 84
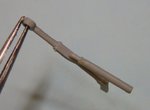
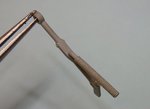
Shame you didn't think of it BEFORE you cleaned up the seam along the plastic one but it sure turned out nicely.

I did give it some thought earlier Andy..but decided to just finish the plastic and be done with it, then changed my mind at the last moment....

Appreciate your comments Guys, thanks.

cannons painted and fitted, inner gear doors and drop tank attached too...
 

Attachments

  • 146_Cannons-Drop tank_3599.jpg
    146_Cannons-Drop tank_3599.jpg
    66.5 KB · Views: 72
  • 147_Cannons-Drop Tanks_3600.jpg
    147_Cannons-Drop Tanks_3600.jpg
    63.6 KB · Views: 79
  • 148_Cannons-Drop Tank_3603.jpg
    148_Cannons-Drop Tank_3603.jpg
    70.7 KB · Views: 75

Users who are viewing this thread

Back