Very clever !
Navigation
Install the app
How to install the app on iOS
Follow along with the video below to see how to install our site as a web app on your home screen.
Note: This feature may not be available in some browsers.
More options
You are using an out of date browser. It may not display this or other websites correctly.
You should upgrade or use an alternative browser.
You should upgrade or use an alternative browser.
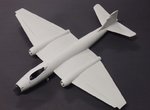
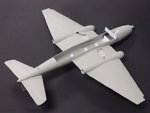
**** DONE: 1/48 Canberra PR.9 - The Jet Age.
Ad: This forum contains affiliate links to products on Amazon and eBay. More information in Terms and rules
More options
Who Replied?- Thread starter
- #102
Yeah, as long as I don't drop it on my toe, plenty heavy now..!
Lucky13
Forum Mascot
Great work so far Wayne!
Vic Balshaw
Major General
Nothing wrong with a good bit of weighty insurance old cap.
Crimea_River
Marshal
After getting the lead out, you're putting the lead in.
- Thread starter
- #107
trying to!
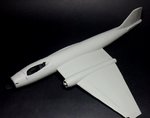
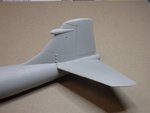
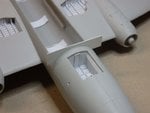
Port wing and horizontal stab in place also filled and rescribed some main panel lines the first showing what was under both wings and one with these lines filled and panels rescribed.
there's also been lots of filling and sanding of seams around the fuselage too....
Port wing and horizontal stab in place also filled and rescribed some main panel lines the first showing what was under both wings and one with these lines filled and panels rescribed.
there's also been lots of filling and sanding of seams around the fuselage too....
Attachments
Looks good
- Thread starter
- #110
Thanks Guys, both 'othe rwings are in place now....left my damn camera at work....
Looks great so far Wayne!
Vic Balshaw
Major General
Doing good old mate!
- Thread starter
- #114
Cheers fellas...
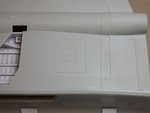
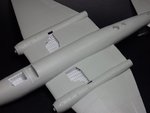
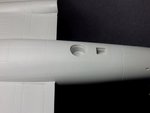
ok them wings on and more filling and sanding and a plasticard strip for the gap that was coming for the lower panel to be inserted...
ok them wings on and more filling and sanding and a plasticard strip for the gap that was coming for the lower panel to be inserted...
Attachments
nice job Wayne
Airframes
Benevolens Magister
Taking shape nicely there, Wayne.
Great work so far Wayne!
Crimea_River
Marshal
I'm likin' it.
- Thread starter
- #120
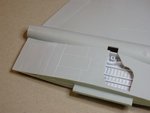
Thanks Guys, the lower panel is in place and sanded flush on both sides and front and back, this took a while as the fit was a bit orinary but i managed to get it to set right and used no filler at all! So now i can recribe the panel lines as required and then add the reinforcing strips I sanded away to amke the whole job easier...
Attachments

Users who are viewing this thread
Total: 1 (members: 0, guests: 1)