Navigation
Install the app
How to install the app on iOS
Follow along with the video below to see how to install our site as a web app on your home screen.
Note: This feature may not be available in some browsers.
More options
You are using an out of date browser. It may not display this or other websites correctly.
You should upgrade or use an alternative browser.
You should upgrade or use an alternative browser.
**** DONE: 1/48 P-47D Razorback - Your Favorite Aircraft of All Time GB (1 Viewer)
- Thread starter T Bolt
- Start date
Ad: This forum contains affiliate links to products on Amazon and eBay. More information in Terms and rules
More options
Who Replied?
Aaron Brooks Wolters
Brigadier General
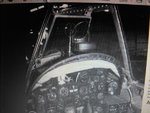
Glenn, the gunsight sits to the right of center when mounted where they want you to on the kit. Not sure this is correct. I didn't notice it until I had put my cockpit in the fuselage so it will stay as is regardless on mine. Just a heads up.
ccheese
Member In Perpetuity
Looking real good..... keep at it...
Charles
Charles
meatloaf109
1st Lieutenant
Nice pit!
- Thread starter
- #65
T Bolt
Colonel
I noticed that Aaron and wasn't sure it was right. In all the bubble top Thunderbolts the sight is dead center in the middle, but all the cockpit pics I've seen of the razorback don't show the sight so I'm planning on doing some more searching. My guess is that it should be offset because of the center post in the windscreen of the razorback canopy.Glenn, the gunsight sits to the right of center when mounted where they want you to on the kit. Not sure this is correct. I didn't notice it until I had put my cockpit in the fuselage so it will stay as is regardless on mine. Just a heads up.
Aaron Brooks Wolters
Brigadier General
Forgot about that. You are probably correct about the center post.
- Thread starter
- #67
T Bolt
Colonel
I've made quite a study of the thunderbolt cockpit and it surprises me that I didn't have a picture of a razorback cockpit with a gun sight.
Aaron Brooks Wolters
Brigadier General
I've only got one of a bubble canopy to. I'll do some checking.
Airframes
Benevolens Magister
- Thread starter
- #70
T Bolt
Colonel
Thanks Terry!
- Thread starter
- #71
T Bolt
Colonel
I did a black wash on the gear wells -they still need detail painting- then dry fitted the wings, tail, and cowling. Every thing seemed to fit up real nice.


Last edited:
Airframes
Benevolens Magister
Not long now until painting time Glenn, good progress.
Vic Balshaw
Major General
Coming together nicely Glenn, even the wings seem to slot in well.
great stuff Glenn!
Crimea_River
Marshal
I've heard this kit is a beauty for fit and it's proving out. May have to crack open my P-47M soon...
Looks good so far Glenn!
Lucky13
Forum Mascot
Excellent work mate!
- Thread starter
- #78
T Bolt
Colonel
Everything is fitting up very well, at least as good at the Tamiya P-51D kit or better, and Andy, I have the "M" sitting in my stash and it looks just as nice.
- Thread starter
- #79
T Bolt
Colonel
I did a lot of work tonight starting with the engine.
1 The real thing, except the push rods should be painted black
2 The cylinder banks painted aluminum with a black wash and the push rods painted black
3 The only part of the ignition wire harness present in the kit is the ring so I drilled 18 holes for some wire
4 The copper wire glued on. The real thing was brass so I won't paint these.
5 6 Completed engine. 9 pairs of wire, one to the spark plug and one over the top of the cylinder.
7 8 Several day ago glued up the wingsand today I dressed up the joints and added the navigation lights. I filed them to match the shape of the wing tip a little better then sanded and polished them with a nail polishing stick.
Last edited:
Airframes
Benevolens Magister
Nicely done on the engine and nav lamps Glenn.
Users who are viewing this thread
Total: 2 (members: 0, guests: 2)