Navigation
Install the app
How to install the app on iOS
Follow along with the video below to see how to install our site as a web app on your home screen.
Note: This feature may not be available in some browsers.
More options
You are using an out of date browser. It may not display this or other websites correctly.
You should upgrade or use an alternative browser.
You should upgrade or use an alternative browser.
**** DONE: 1/48 P-61B Black Widow - Pacific Theatre of Operations II
- Thread starter mikewint
- Start date
Ad: This forum contains affiliate links to products on Amazon and eBay. More information in Terms and rules
More options
Who Replied?- Thread starter
- #42
mikewint
Captain
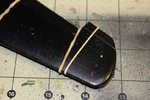
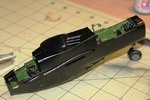
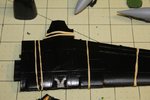
OK, here's my train of thought, the real plane was painted gloss black and while the entire kit was indeed cast in black polystyrene it did not look like paint sooo... I decided to paint the roses red! The reason behide paint before join was because of the cannons sticking out of holes in the belly. Had I painted after the cannons were installed they (cannons) and all those small spaces behind would have been either missed or covered in black paint.
Sooo to make a short story long every exterior surface got painted gloss black. The joints (good meeting all around) will be touched up and smoothed and then a quick airbrushing to blend in.
Quite possibly backassward but it seemed reasonable
Sooo to make a short story long every exterior surface got painted gloss black. The joints (good meeting all around) will be touched up and smoothed and then a quick airbrushing to blend in.
Quite possibly backassward but it seemed reasonable
Vic Balshaw
Major General
Smart thinking Mike and some very fine detail your doing. Looks good.
Crimea_River
Marshal
I still have bits and pieces of that kit in my spares box from when I built it 30 years ago. Good work Mike.
N4521U
Plastic Pirate
It's the old addage............
If nothing is tried, nothing changes???? Something like that.
You approach seems to have a bit of merit. It'll be interesting to see how it plays out.
Great work so far, and the pictures look great!
If nothing is tried, nothing changes???? Something like that.
You approach seems to have a bit of merit. It'll be interesting to see how it plays out.
Great work so far, and the pictures look great!
Good logic Mike, keep up the good work sir!
Night Fighter Nut
Master Sergeant
Sorry I've been out for awhile. Built a few of these myself. Let me know if I can help with anything. Just glanced through the other posts so I'm not sure, Mike are you going to have this standing on it's own with radar showing or not? How do you plan to weight it down?
- Thread starter
- #48
mikewint
Captain
NFN, going to try. The old olive drab P-61A does stand on its own. I had to fill the nose with lead and put lead in the one non-detailed engine cowling and it still barely balences. Thinking I may try the new tugsten weights at 19.3 g/cm3 (lead 13.4g/cm3) they are quite expensive, but then I can get the same weight with less volume. Definitely a bridge to cross
Night Fighter Nut
Master Sergeant
Mike, as long as the weights are ahead of the rear wheels, it will help keep it balanced. A couple of other places to put the weights are behind the gunners station, if you have not attached the wings yet, and up in the forward wheel well between upper and lower decks. If you have not attached the nose cone yet, there is a little room behind the control panel. You could check my build for pictures of where I stashed weights in the Night Fighter group build.
Night Fighter Nut
Master Sergeant
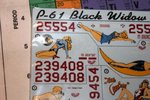
From the pictures, it doesn't look like you have gone that far yet. On your decals, what color is the girl's swim suit, blue or red? It should be blue. Be careful also of the plane's tail numbers on the side. Many decal makers have gotten those numbers wrong.
Last edited:
Vic Balshaw
Major General
Lots of food for thought there Mike.
- Thread starter
- #52
mikewint
Captain
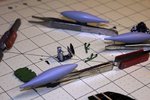
Going to look into the tungsten weights or some lead shot which I can pour in and drip glue to hold in place. Meanwhile back at the ranch: wings painted and together and detailed, not sure what the silver part is, see I even got the fussy little marker lights red, green, and yellow; radar unit done; they say to leave the nose cone off to show the radar in place but I'm thinking of glueing it open, any one know if the nose opened up or to the side? The "B" version had the wing tanks. Devided on neutral gray so they would stand out more; and smoothing out the joint seam
These are the decals, should be correct
These are the decals, should be correct
Attachments
Last edited:
N4521U
Plastic Pirate
Mikd, when I did my Havoc I had to use a hammer in little fishing weights to flatten them. Then I could stack and got about 30 percent more weight in the same volume.
Lookin good man.
Lookin good man.
- Thread starter
- #56
mikewint
Captain
Finally got the pics to load
Catch22
Major
Nice work Mike!
going great guns there Mike!
Airframes
Benevolens Magister
Good stuff Mike.
Users who are viewing this thread
Total: 1 (members: 0, guests: 1)