**** DONE: 1/48 Spitfire Mk.Vc - Pacific Theatre of Operations II

Ad: This forum contains affiliate links to products on Amazon and eBay. More information in Terms and rules

Thanks a bunch Gents. Your comments are always welcome and much appreciated.

Lovely work there, Vic. I swear by Gator Glue when it comes to getting the glass in place. I use a toothpick and get a fair amount on the various glass pieces. As I place the pieces, I keep a damp piece of tissue at hand to wipe the excess glue and get those seams filled. Stuff dries real clear, so a quick dab of paint and things are done.

Glad you mentioned that Dale, reminded me I have some tucked away somewhere.

Great stuff Vic, it's really looking the biz mate.
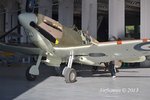
f you're able to without damaging anything, see if you can angle the cockpit entrance hatch slightly - it didn't/doesn't hang straight down, flat against the fuselage, due to the angle of the hinge and cockpit hatch sill.
Have a look at the photo below, but remember that the red-painted crow bar was either plain metal or Cockpit Grey Green during the war, the red being a post-war 'safety equipment' colour.

Thanks again Terry, knew it didn't look right. Now fixed and yes, the crowbar is bare metal, I remembered that bit.
 
Pretty spectacular Vic, One question/comment: When I do exposed exhaust manifolds I always paint them RUST. Would that not be what would happen in a real aircraft?
 
I would think that would normally be the case Mike as the heat would tend to do that, you only have to look at a car exhaust. But if one looks at the colouring being factory fresh and work out from there, I normally start with a silver/steel colour and the add dirt, rust and so on by dry brushing or using the pigments.
 
I'm learning, there's no exposed exhaust on the Widow but as you can see I generally just paint anything exhaust rust
 

Attachments

  • DCP_1477.JPG
    DCP_1477.JPG
    50.8 KB · Views: 120
  • DCP_1486.JPG
    DCP_1486.JPG
    54.5 KB · Views: 109
It often depends on the aircraft, the type of exhaust and it's shape. Remember that a car exhaust ir remote from the main heat emissions, and exposed to all sorts of muck and filth, including road salt, beneath the vehicle, and rusts from the outside very quickly, with corrosion from exhaust gasses from the inside (which is why spending lots of cash on a stainless exhaust can sometimes be a bit of a waste").
Aircraft exhausts are of much higher quality material, and most discolouration is caused by heat, the extent of this dependent on the shape and design of the exhaust stubs or pipe, and how much hot gasses are passing over the individual stubs, from front to rear.
These two shots of different Spitfire exhausts might help give some idea of the variations.
Sorry for the diversion Vic, and now, back to the thread.
 

Attachments

  • Duxford show Sept 13 058.jpg
    Duxford show Sept 13 058.jpg
    137 KB · Views: 107
  • Duxford show Sept 13 220.jpg
    Duxford show Sept 13 220.jpg
    127.5 KB · Views: 99
surely at the end, it gets down to the colour you prefer as well. If the idea is to present the aircraft more like it is new and straight from the factory a metallic colour is okay. if the idea is to present the aircraft after some period of extended operations, a more rusted appearance is appropriate.

For the record Mike, your rust colour looks very cool.
 
What I am learning in this build it that I am a mechanic where as people like Terry and Vic are artists whose medium happens to be model aircraft. So I can put them together OK and slap a coat of paint on but to do what Vic does....would not even know where or how to begin
 
Sorry for the diversion Vic, and now, back to the thread.

No intrusion Terry, glad you chipped in.

Mike

Nothing wrong with the rust exhaust, but with those on your models, if you want to turn them into used looking, I would have just used a technique called 'dry brushing'. A touch of a darkish colour and a touch of steel, dry brushed would bring them alive. But do this before fitment to the model as I have found the technique of dry brushing is not exact and can easily spill over onto other parts of the model. Also remember when dry brushing, keep rubbing the brush on a piece of paper until it looks as though there is no paint on it, and then do it some more before you even approach the model. If'n your confused just say so and I'll explain deeper.

MSN-Emoticon-thums-up-059.gif
 
We will, we will vic this you already have... mood.

I'm going to do my bit for the rusty of leaks, also can grind a little cake red oxide, and with coalescer parle to make the crust, is already an extreme oxidation. for the oxide I me guio by an article that came out for centuries already SAM magazine that towards leaks very easy with color humbrol enamel base 113 drying this filter with 26 drying this another filter with 110 but only in the interiors of this dry gave black diluted almost like a washer and finally occurs from leaks until the end is marked with beige mixed with Yellow Earth Dark marks this is for American and British aircraft, the Germans or Japanese were more Brown and black.
 
My grandfather flew this plain when it was QY-L. John Walter Shoesmith, he's still alive at 94. The model is amazing!
 

Users who are viewing this thread

Back