Navigation
Install the app
How to install the app on iOS
Follow along with the video below to see how to install our site as a web app on your home screen.
Note: This feature may not be available in some browsers.
More options
You are using an out of date browser. It may not display this or other websites correctly.
You should upgrade or use an alternative browser.
You should upgrade or use an alternative browser.
**** DONE: 1/72 Morane Saulnier 406 - Pacific Theatre of Operations II
- Thread starter parsifal
- Start date
Ad: This forum contains affiliate links to products on Amazon and eBay. More information in Terms and rules
More options
Who Replied?Catch22
Major
Nice work!
Doing good Michael!
Vic Balshaw
Major General
Wow…………I'm impressed and in that scale.
Crimea_River
Marshal
Good attention to detail.
- Thread starter
- #106
parsifal
Colonel
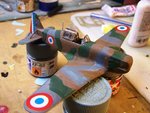
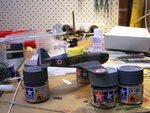
last night i dry brushed the simulated cooling fins with a black colour, the intent being to see glimpses of the 'bronze" but to make the dominant colour black as per the detail provided by wotjek. it was an ambitious idea, and I am a bit sceptical that i nailed it, but its still okay.
I also applied a few more of the decals, only have a couple to go now, and then I will apply the top coat sealant. Then im alsmost there really, just have to attach the undercarriage, some fittings like the guns and various antennae and stuff.
With the decals, its starting to look okay.
I also applied a few more of the decals, only have a couple to go now, and then I will apply the top coat sealant. Then im alsmost there really, just have to attach the undercarriage, some fittings like the guns and various antennae and stuff.
With the decals, its starting to look okay.
")
- Thread starter
- #108
parsifal
Colonel
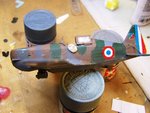
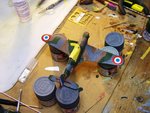
some pictures as requested. I took a couple of the radiator cloe up, but they were not in proper focus. the putty on the side of the model im using to keep the radio line tensioned while the glue dries.
I would have to say that the quality has worked out better than i had expected, but still falls well short of what i had hoped for. i can only keep trying i guess
I would have to say that the quality has worked out better than i had expected, but still falls well short of what i had hoped for. i can only keep trying i guess
Attachments

mikewint
Captain
Michael, the decals make a big difference. On your next to last pic, there is a round thingy (looks like a shield?) next to the cockpit. What is it?
- Thread starter
- #111
parsifal
Colonel
Michael, the decals make a big difference. On your next to last pic, there is a round thingy (looks like a shield?) next to the cockpit. What is it?
Hi mike
its just some putty ive used to hold one end of invisible thread, which then threads back through a hole in the tail ive made, and then back to the radio mast (just behind the cockpit). I had already glued one end of the thread to the mast. Now with the thread slightly tensioned and held in place by the putty, i have glued the thread to the tail, to simulate the radio antennae array.
Flattering to say it looks like a shield, I would say it looks more like a lump of dog turd myself....
mikewint
Captain
Looking closer I see the thread. And, Naw, wrong color. I was thinking twas a Viking ship aircraft and you were begining to hang the side-shields
Catch22
Major
Looks good!
fubar57
General
Finish line is in sight Michael, coming along nicely and what an odd contraption that radiator is.
Geo
Geo
- Thread starter
- #115
parsifal
Colonel
it sure is, and must have inflicted a speed penalty of at least 10mph. Why the radiators werent in the wings escapes me.
The morane was quite a pleasant aircraft, but was never better than average, overwhelmingly because of its lack of speed. It struggled along on just 860hp when its competitors were beginning to use engines in the range of 950-1100 hp. In other respects it was a contemporary of the hurricane, but with extra power, could have outgunned the early versions of the hurri.
But that radiator placed it behind the hurri in terms of speed, because of the low power engine that it was saddled with
Vic Balshaw
Major General
Good effort Michael and yes that radiator would have been like lugging a permanent bomb around.
- Thread starter
- #117
parsifal
Colonel
Ive completed the decalling process and have started to fit the guns, gun sights and some other bits and pieces becfore final seal. I took one look at the gun sight and 7.5mm gun barrels and basically ditched them. No matter what I did with them, they were bent, or droopy and really did not give much benefit in terms of detailing. Ive made up replacement barrels from thin gauged (8A) fuse wire, and am making a replacement gun sight, from very thin lightlly tempered steel rod (not fuse wire, I want a perfectly straight and rigid effect) . Having a few issues making the sight mounts, but I might now have a solution made up. Ill reveal them once I have a result.
Ive decided that this paint job is just too rough even by my standards. Its a bitter disappointment, because i thought it looked okay to start with. For the most part it IS okay, but its ruined by some imperfections here and there. ive tried to just man up and live with it, but its driving me nuts. So, I decided to use a brush to try and fix up some of the oxiding and texture blemishes that are really getting to me.
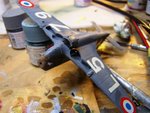
On the starboard wing the grey element of the camo is badly oxided, ive started the repair by putting a light (thin) grey wash over the top. I think it looks better. there were also some scratches (or something) affecting some of the brown and green elements. Ive used a a light wash over these as well, hoping not to lose too much of the nice even texture that I achieved with the airbrush for most of the model. this is risky, but I have to do something, or this modl will end up with lighter fluid on the clothes line.....
Hopefully this works, but I know that i could not live with the result that I started with. I might regret this, i know, but i needed to try something
Ive decided that this paint job is just too rough even by my standards. Its a bitter disappointment, because i thought it looked okay to start with. For the most part it IS okay, but its ruined by some imperfections here and there. ive tried to just man up and live with it, but its driving me nuts. So, I decided to use a brush to try and fix up some of the oxiding and texture blemishes that are really getting to me.
On the starboard wing the grey element of the camo is badly oxided, ive started the repair by putting a light (thin) grey wash over the top. I think it looks better. there were also some scratches (or something) affecting some of the brown and green elements. Ive used a a light wash over these as well, hoping not to lose too much of the nice even texture that I achieved with the airbrush for most of the model. this is risky, but I have to do something, or this modl will end up with lighter fluid on the clothes line.....
Hopefully this works, but I know that i could not live with the result that I started with. I might regret this, i know, but i needed to try something
Maybe a light sanding with a real fine sand paper to smooth it down a bit before the brush work....it might help? delicate touch being required...
- Thread starter
- #119
parsifal
Colonel
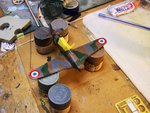
well, i gave it a very light sand and then applied a thinned overwash to at least try and reduce the effects of the oxiding.
im too scared to say whether i like it or not, for fear the gremlins might hear me again. here are some shots of what the results so far are
im too scared to say whether i like it or not, for fear the gremlins might hear me again. here are some shots of what the results so far are
Attachments
Users who are viewing this thread
Total: 1 (members: 0, guests: 1)