Navigation
Install the app
How to install the app on iOS
Follow along with the video below to see how to install our site as a web app on your home screen.
Note: This feature may not be available in some browsers.
More options
You are using an out of date browser. It may not display this or other websites correctly.
You should upgrade or use an alternative browser.
You should upgrade or use an alternative browser.
**** DONE: 1/72 Spitfire Mk Vc – Pacific Theatre of Operations II
- Thread starter imalko
- Start date
Ad: This forum contains affiliate links to products on Amazon and eBay. More information in Terms and rules
More options
Who Replied?")
T Bolt
Colonel
I really like that paint scheme Igor
Wildcat
Major
Nice work Igor!
N4521U
Plastic Pirate
Lookin the biz Igor
very nice Igor
Looks ok to me too!
- Thread starter
- #47
imalko
Chief Master Sergeant
Thanks mates! Planning to place the decals tonight, then some weathering, so should have finished model tomorrow. (I hope.)
Vic Balshaw
Major General
Looking good Igor, hope you can slot it in, in time
le_steph40
Chief Master Sergeant
- Thread starter
- #50
imalko
Chief Master Sergeant
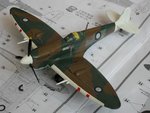
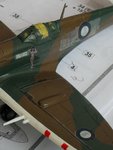
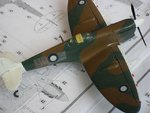
Well my friends, I hit a snag with decals for this model. These has to be the thickest and most rigid decals I've ever seen! I usually find Airfix decals to be of better quality. The decal softener was useless on them and they placed very poorly on the model. And now there's silvering all over the place! Just look at the pictures...
Needless to say how annoying this is. I'm open to suggestions how to solve this problem, but nothing else comes to my mind except from removing them altogether and finding replacement decals of suitable quality. For now I will only remove the mask from the canopy and ad the exhausts, but omit any weathering. So, for the purpose of this group build I call this one "done". I can post separate ***Finished thread if you like, but in light of these problems with the model would like to ask the judges to exclude my entry from the judging process (I missed the deadline for one day anyway). Though I wouldn't mind to have GB icon added to my siggy if that's ok with everyone. Cheers!
Needless to say how annoying this is. I'm open to suggestions how to solve this problem, but nothing else comes to my mind except from removing them altogether and finding replacement decals of suitable quality. For now I will only remove the mask from the canopy and ad the exhausts, but omit any weathering. So, for the purpose of this group build I call this one "done". I can post separate ***Finished thread if you like, but in light of these problems with the model would like to ask the judges to exclude my entry from the judging process (I missed the deadline for one day anyway). Though I wouldn't mind to have GB icon added to my siggy if that's ok with everyone. Cheers!
Attachments
Last edited:
Catch22
Major
Yikes Igor, don't have any solutions for you other than maybe get new ones. Otherwise it looks great!
- Thread starter
- #53
imalko
Chief Master Sergeant
I use Revell Decal Soft. Always worked just fine for me.

I see Igor. The main problem with these decals is that the decal glue was either old or was lost while soaking. It may be difficult to fix the problem. The easiest way seems to be getting its replacement and removing these already applied markings firstly. Or unsticking of these decal markings one by one with warm water and re-applying them with a way so-called "on a fresh lacquer". Although a clear enamel would be a better for that but you may give a try to an acrylic clear varnish too.
- Thread starter
- #55
imalko
Chief Master Sergeant
I see. Thanks for your input Wojtek. I think I'll go with replacing the decals altogether once I find a suitable replacement. Too frustrated now to try something else. Besides, I doubt I could remove them in one piece anyway. So, for now this model is done and as such is going to the shelf. Should I post ****Finished thread anyway?
Last edited:
Good work so far Igor!
Wildcat
Major
Damn what a shame Igor, she was looking great too.
I see. Thanks for your input Wojtek. I think I'll go with replacing the decals altogether once I find a suitable replacement. Too frustrated now to try something else. Besides, I doubt I could remove them in one piece anyway. So, for now this model is done and as such is going to the shelf. Should I post ****Finished thread anyway?
Yes you should post the thread.
As far as "unsticking" of the decal marking is concerned... it should be easy. Just apply some of the warm water with a "soft" brush at the top ( just a little bit above ) of a decal marking and let the water wash over it and penetrate under bottom of the marking. Sometimes it has to be repeated twice or three times depending on how much of water you applied. Don't try to move or unstick the decal using brute force. The decal marking is ready to be moved/unstuck ( slide onto a piece of decal paper with a brush ) when the water is gathered under the decal. It can be easy noticed because the area around the marking looks like being dry and there is a wet ( dark ) outline around the decal only. Also the marking looks like being "swollen" because of the wather under it.
Vic Balshaw
Major General
That is a shame Igor and on such a nice looking model. I'd be inclined to get shot of the decals as best you can and the replace them.
Hope you get it sorted Igor...
Users who are viewing this thread
Total: 1 (members: 0, guests: 1)