Doras Galoras - Unofficial GB

Ad: This forum contains affiliate links to products on Amazon and eBay. More information in Terms and rules

Definitely not a light red Jerry. Suggest you try painting the white first which will not only form the basis for the white stripes that you can mask, but will make a good basis to accentuate the red colour, which is often too thin to apply to unprimed plastic.
 
JV44 red 3

Thanks Andy, been working on the legs added brake lines.

002-56_zps28be307b.jpg
 
wayne, I'm a little lost is the odd bulge?, today I could have started painting see but I preferred to take your advice and I tried to find information on the differences between 210xxx and 500xxx series but has confused me even more. help me.

woody I use the Gunze RLM 23, the H413, first with red is so white I live, says Andy if behind the white lines after das enmascaras red look great, so I did mine in the forum.
 
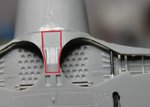
I will point out that the small bulge at the mid point of the bottom of the gun cowl should be removed for your Dora Sergio it was only on 500000 series Doras and not on the earlier 210000 series that you are building.

Not to mention the Radial Engine Exhaust type fairing between the gear bays, that needs filling and smoothing to be applicable to the majority of D-9's. My personal theory is that exhaust fairing is only present on i) development a/c and ii) a/c that have undergone big repairs; such as 601088, which appears to have been given the wing set from an Fw 190F-8.


Dan
 
wayne, I'm a little lost is the odd bulge?, today I could have started painting see but I preferred to take your advice and I tried to find information on the differences between 210xxx and 500xxx series but has confused me even more.

Sorry Sergio didn't mean to confuse you...just add a correction and knowledge...:D I see Andy has provided the necessary info...

Not to mention the Radial Engine Exhaust type fairing between the gear bays, that needs filling and smoothing to be applicable to the majority of D-9's. My personal theory is that exhaust fairing is only present on i) development a/c and ii) a/c that have undergone big repairs; such as 601088, which appears to have been given the wing set from an Fw 190F-8.Dan

Well wasn't going to mention that, out of sight out of mind, but seeing as though Dan has mentioned it, you need to fill and sand smooth the red area as well Sergio!
 

Attachments

  • D-9_vent area.jpg
    D-9_vent area.jpg
    34.8 KB · Views: 109
Wayne You Just do not confused me, but it was the information I found on the net, i was trying to find some plan or drawing both versions but nothing just text and each one said something different, that's what confused me.
and they saw the comment and you're drying putty there.

Thanks so learned and improved
 
At some point, it makes little sense to address small deviations from reality. It's a slippery slope. If the area between the wheel wells is fixed, then the dimpled wheel well covers should also be removed, in which case the engine needs to be modelled......yada yada....
 
Black 6 REDUCED.jpg


Update on Black 6. The instrument panel and shroud have been installed and the gun sight has been secured in the hole in the top of the shroud. The reflectors on the kit part have been removed to be replaced by scratch built parts just before the windscreen goes on. In addition, I've done a couple of other things. Not easily seen, the part shown by the red arrow is a scratch built tube and brace that represent the shaft for the starter crank. The yellow arrow shows a slot that I cut in the ammo feed chute before painting this part gunmetal. The MG 131's were installed and painted and some additional wiring to these guns was started (green arrow).

13021801.jpg


Here's a shot from the other side without the arrows. The gunmetal parts will need to be glossed up a bit as I ran out of gloss black to mix with my silver so I had to use flat.

13021802.jpg


The 20mm cannon barrels were also installed in the wing roots and painted at the same time. I snapped off the protruding barrels as these will be made of brass tube and installed near the end of the build.

13021803.jpg


Thanks for checking this out.
 
Great work guys!

Great choice too Zaggy, had considered that myself but wasn't aware of it's colour scheme!

Still finishing off some builds, but plan to join yas March 1st. Just cut out the two wheel wells so far.
 
Black 10

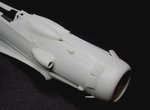
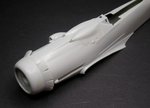
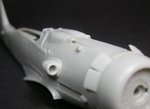
well time to post the little bit of forward progress...the already long ago pre-made fuselage...added the main intake with etch mesh inside, also drilled out and attached the small intake on the upper cowling as well as install the guns in the cowl....

and as mine is a Mimetall produced Dora the small cowling bulges remain in place! :D
 

Attachments

  • 2_Fuselage-Before_3438.JPG
    2_Fuselage-Before_3438.JPG
    41.9 KB · Views: 101
  • 3_Intakes and Guns_3599.JPG
    3_Intakes and Guns_3599.JPG
    51.6 KB · Views: 104
  • 4_Intakes and Guns_3590.JPG
    4_Intakes and Guns_3590.JPG
    43.8 KB · Views: 97
  • 5_Intakes and Guns_3592.JPG
    5_Intakes and Guns_3592.JPG
    33 KB · Views: 101
Last edited:
@Wayne - Looking sharp mate :)

@A4K - yeah the D-15 is a sticky one - most models (RV Resin in 1/48 and Planet in 1/72) seem to base their's on the earlier 'paper-versions' with the Big Tail, DB603 engine with the smaller supercharger scoop and full compliment of Wing Guns (and MAYBE an engine mounted MK108) - thats fine if you like that stuff (hey, I have Fw Triebflugel kit on the way, and a Cyclon Raider in the paintbooth - I like sci-fi!). Now maybe most of this would have happened (because lets face it, wing root guns only are not producing a hard hitting a/c); in fact I'm sure production/remanufactured a/c would have gotten the big tail and documentation seems to support a heavier wing armament.

BUT the a/c that was/were converted (and probably flew) don't seem to reflect this - standard 8-190 tail, large Ta152C DB603LA intake, extra fuselage reinforcing, different radiator flap shapes, wing root guns only and as a result, ends up looking more like the originally planned D-14. BUT Unlike the 'paper-projects' and Cyclon Raider, we have period photo's; and being remanufactured by Roland AG (who seem to be using RAL colours on a lot of their custom parts, will make for an interesting paint job!

But for now, I need sleep... Then finish work stuff tomorrow and maybe get this thing primered and finish up the radiator flaps! Then we can make some real progress and catch up to Wayne! :)


D
 
OK, everyone seems to be catching up... Better get a move on and get this Damned-Frikken-Sh*t-@#!*%!*@#$!!!!! nose sorted out... I know I have said it before, but, NEVER doing a D-15 (or D-14 for that matter) like this ever again!
 

Users who are viewing this thread

Back