I'm Finally Back

Ad: This forum contains affiliate links to products on Amazon and eBay. More information in Terms and rules

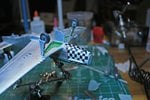
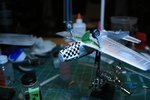
Yeah, I shot the anti glare on top of the cowl first and thinking that I had the decals, which I thought were complete and there, decided to shoot the aluminum and then install the decals. First rule of thumb, ALWAYS CHECK THE DECAL SHEET FOR EVERY THING.:lol: So that's why I am in this pickle now. Live and learn. Once I get the tape tomorrow I can start back the other way with it. I went ahead and finished sanding the spots I found in the photos to so it's tape and shoot tomorrow.
 
Sounds to me as though you're having fun Aaron old chap, but it's lovely to see your having a go and I'm looking forward to seeing the end result.
 
I got the white shot on the nose for the checkered section. Will let it cure of a day or two and decide in the meantime on how to touch up the aluminum without screwing up the repainted parts again. I know this is taking forever but I am going to finish this.
 
The new Future seems to take more coats than the older stuff Aaron. I had to put 4 brushed on coats on my last build when it use to take 2, but it still worked out fine.
 
Ok, so here's the catastophy, it's things like this that make you wonder if you doing the right thing. Put the checkers on the nose and the last decal to go on came all to pieces. After all the help Terry and the rest of you have given I don't want to give up but this one is getting shelved for a while before it becomes a permanent part of the basement floor. I'm sorry guys, I really am.
 

Attachments

  • IMG_4805 adjed resized 20.jpg
    IMG_4805 adjed resized 20.jpg
    78 KB · Views: 85
  • IMG_4806 resized 20.jpg
    IMG_4806 resized 20.jpg
    65.4 KB · Views: 81
I'm real sorry to see and hear this Aaron, some decals can be such sh*t's at times.

But my friend, there is a solution when you are in the mood. All you need are bits of black and white decal from any source and just cut little slivers from either and place them over the offending area to make up the little checks. it is something I often do when a decal cracks or fragments on me. With the help of decal solution you will find the slivers blend in very nicely.
 
Last edited:
ABW, sorry for your problems. it is still a nice looking kit. How about paint? Flatten the decal with micosol and use a very fine brush to fill in the spaces or weather the plane and make it look deliberate: mud, grease, rust?
 
For now I'm going to put it on the shelf, I need to order some extra decals for the A-20 and if I can find said decals I will also order another set of checkers. I want to finish the 51 not just because of all of the help from you guys but for the simple fact of not giving up. I'm kinda hard headed when it comes to that but I need to put it down for a bit. Work has been the same way for me recently. Paints being mixed wrong and what not, I've been a little stressed and it made it from work to home so. I am going to get the invasion stripe on the A-20 this weekend I hope. I found a way to get my tape to 9mm strips the easy way. My Olfa knife blades when laid on there side are exactly 9mm.:) So hopefully if I can keep my wits about me I can get this done. I am finding out when you do two similar things, one for work the other for hobby it may not work out. I just need to find a way to do this because I really do enjoy it. Thank you all for the encouragement. And Terry, I will get the Doll done sir, I don't want all that you have done to go for naught.
 

Users who are viewing this thread

Back