No 56 Squadron, RAF, 'The Firebirds', 1918 - 2008.

Ad: This forum contains affiliate links to products on Amazon and eBay. More information in Terms and rules

Thanks Alex, Daniel and Karl.
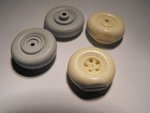
I re-checked the KK site Karl, and they have the AMT Tempest at £19, which I'm fairly sure is the same kit as mine, maybe with different decals. It's not too bad out of the box, if you leave the canopy closed and can live with the basic undercarriage and wheels. At least the shape looks right!` I'm surprised that there isn't a 1/48th Tempest from a mainstream manufacturer yet.
 
Things are progressing well so far. The 'Sky' tailband was brush painted then masked when dry, and the model sprayed overall in Medium Sea Grey, mixed from Humbrol enamels, to act as a primer, to check for any flaws, and as the underside colour. Once dry, this in turn was masked where required, including any areas which might be affected by overspray. The Ocean Grey was again mixed from Humbrol enamels, using Grey No.27, which is more or less the correct colour, but with a spot or two of white added, just to lighten the shade slightly. This is to allow for the 'scale effect', and to compensate for the clear coats which, of course, will darken the overall appearance slightly.
PICS 1 and 2 Show the model as it looks so far.
Next sterp is to mark the upper surfaces camouflage demarcation in pencil, and then spray the Dark Green. This will be done freehand.
Thanks again for your interest, and more pics soon.
 

Attachments

  • 56 Sqn Build 116.jpg
    56 Sqn Build 116.jpg
    44.6 KB · Views: 64
  • 56 Sqn Build 118.jpg
    56 Sqn Build 118.jpg
    40.9 KB · Views: 83
Thanks guys. Vic, if you mean that little whisp coming off one gear leg, it's a 'string' of glue - my hair is still black(ish) - which is puzzling, as my moustache is white! The brake lines are stretched sprue BTW.
 
The main painting has now been completed, without any dramas, surprisingly. I was prepared for a bit of hassle when freehand spraying, due to some of the sharp angles and awkward access in some places, but all went smoothly.
The masking was removed, and then the areas for the AEAF stripes, and the yellow, wing leading edge I.D. stripes were masked, and the colours brush painted. I was a bit unsure about the yellow I.D. stripes, as the Squadron had been involved in anti - 'Diver' patrols, combating the V1's, and aircraft on these operations normally had the stripes removed. However, I found some photos of Tempests from the Wing at Grimbergen, the day before they moved to Volkel, in October 1944, displaying the I.D. stripes. As this is the period depicted by the model, that was good enough for me!
The black stripes were brush painted free hand, in an effort to simulate the appearance of these temporary markings. Finally the wheel bays and the inner faces of the undercarriage doors have been painted silver, which will be clear matt coated later.
The pics show how it looks so far, and the next step is to spray the entire model in a gloss clear coat, ready for the decals.
 

Attachments

  • 56 Sqn Build 126.jpg
    56 Sqn Build 126.jpg
    36.3 KB · Views: 63
  • 56 Sqn Build 124.jpg
    56 Sqn Build 124.jpg
    39.2 KB · Views: 64
  • 56 Sqn Build 123.jpg
    56 Sqn Build 123.jpg
    26.4 KB · Views: 73
Thanks very much Alex, Daniel and Harrison.
The decals are now on, including more than fifty stencils, some of which were miniscule. The national markings and stencils came from the kit decals, whilst the individual code letters, and the separate characters for the serial numbers are from 'Xtradecal' and 'Tally Ho' sheets respectively. The kit decals are actually rather good and, having checked the stencil details against my reference diagrams, I found them to be accurate and correctly marked for placement.
Work has started on some of the smaller details, including the main wheels, whilst waiting for the decals to set.
PIC 1 to 3 show how the model looks so far. Once the decals have fully settled, the residue of Micro Sol and decal adhesive will be cleaned off, another clear coat applied, and some light weathering done, before a first coat of clear matt is sprayed, ready for a little more weathering and some light panel line work. A final matt coat will then be applied.
PIC 4. The reason aftermarket resin wheels were obtained! On the left are the somewaht crude kit wheels. The 'True Details' resin wheels, at right, show how they should look! At this stage, the resin wheels have been cut from the casting block, and holes drilled for the axles. They are yet to be cleaned and primed, when the tiny air holes visible here will be eliminated, before painting and weathering.
The next update should show the model nearing completion, the first complete build in this 'Squadron History' exercise. Thanks very much once again for your interest and kind comments, and I'll post some more pics soon.
 

Attachments

  • 56 Sqn Build 138.jpg
    56 Sqn Build 138.jpg
    37.1 KB · Views: 74
  • 56 Sqn Build 139.jpg
    56 Sqn Build 139.jpg
    41.1 KB · Views: 74
  • 56 Sqn Build 133.jpg
    56 Sqn Build 133.jpg
    41.8 KB · Views: 78
  • 56 Sqn Build 130.jpg
    56 Sqn Build 130.jpg
    35.6 KB · Views: 75

Users who are viewing this thread

Back