P-47D RAZORBACK, 1/48 Monogram " DONE! " (1 Viewer)

Ad: This forum contains affiliate links to products on Amazon and eBay. More information in Terms and rules

... we continue .... (thanks Wojtek and Terry) :D

I punched a little more the cowling panels and made the separation of the ailerons with a "mini-sierra"

2014-12-10143126_zps18c62f1b.jpg


2014-12-10143252_zpsbb7e76a2.jpg


2014-12-10143325_zps4c5325de.jpg


2014-12-10143429_zps67b393bd.jpg


I using my Dremel, I improved the look of the engine exhaust ... :lol:

2014-11-26193423_zps1530e740.jpg


2014-11-26193501_zps2c7879c3.jpg


2014-11-26194518_zps482c0ef0.jpg


Join me now to take advantage of inside the cokpit .... !!

I have observed for reference how to build some models ... and I understand that my model is very old and not very easy to make improvements. Models Tamiya and Testors (among others), I can see that bring the engine and cab into several parts, which makes it easier to do the detail.

So make the best effort to do my best, :!: "the difficult things that are done well, worth it" :!:, I hope you like it ...! :shock:

After erasing the seat belts and oxygen hose, I used a guitar string (I think 4th.), To simulate new hoses.

2014-11-28151019_zps1cb01275.jpg


2014-11-28155147_zps15634302.jpg


Then with some small pieces of electronics, PVC and wires I completed more missing accessories. :idea:

2014-12-02204623_zps3d6397b7.jpg


2014-12-02204653_zpsa72eaaad.jpg


2014-12-02204735_zps988bb1c9.jpg


2014-12-02204815_zpsa9f6cb37.jpg


2014-12-02204904_zps168f211e.jpg


2014-12-02204933_zps2088f7e0.jpg


Let's finish the various handles ...

2014-12-10190004_zps10f12216.jpg


2014-12-10190030_zpsedcfc8e8.jpg


2014-12-10190106_zps9803d70c.jpg


2014-12-10190132_zpsc828da85.jpg


Finally (in this sequence) I will put the wiring inside the moat landing. (not sure if spelled right ... still learning English)

2014-12-01213431_zpse270ac05.jpg


2014-12-01213459_zps247ff62d.jpg


2014-12-01213710_zps0b3f5a8f.jpg


2014-12-01213843_zpsbc37457d.jpg


2014-12-01214134_zps3a87efcd.jpg


So far progress ... will prepare the first pieces for PRIMER. :p

Muchas gracias por sus visitas...!! :turn-l: :fadein:

SANCER
 
Last edited:
Nicely done, especially working in the confined space of the one-piece cockpit. The name for the 'Landing moat' would be wheel well, or gear well or bay, but I'm sure we all understand what you mean - and your English is 1,000 % better than my Mexican ... I only know the word 'Tequila', and that's only due to the name of a former girl friend's dog !!!
 
Great detail work once again Luis-Carlos. You've correctly captured the oxygen system in the cockpit except for one thing. The feed to the regulator would have been via metal tubing from a group of bottles stowed in the rear fuselage rather than with a hose. There was then a hose from the regulator to the pilot's mask. When not in use, the hose was stowed on the side of the cockpit wall (if the ground crew was neat).

Untitled.jpg
 
I am filled with pride and motivation for your kind comments ... Dear friends of "plastic and painting" :oops: :toothy2:

Nicely done, especially working in the confined space of the one-piece cockpit. The name for the 'Landing moat' would be wheel well, or gear well or bay, but I'm sure we all understand what you mean - and your English is 1,000 % better than my Mexican ... I only know the word 'Tequila', and that's only due to the name of a former girl friend's dog !!!

Dear Terry, thanks for the English lesson, I hope been practicyng the new words!... and "Tequila" is a great name for a dog (must be a great dog, with a happy and big heart :onfire: jajaja :lol: )

very nice, i can honestly say the 2 in my stash will not be getting anywhere near this kind of detail added !

I can not imagine what you say mi amigo Rochie, sure you can do it as well or better !!. I am gratified to know that I can inspire you to make new attempts ... I could see them much flatter !! :thumbleft::thumbright:

Great detail work once again Luis-Carlos. You've correctly captured the oxygen system in the cockpit except for one thing. The feed to the regulator would have been via metal tubing from a group of bottles stowed in the rear fuselage rather than with a hose. There was then a hose from the regulator to the pilot's mask. When not in use, the hose was stowed on the side of the cockpit wall (if the ground crew was neat).

View attachment 279567

My dear master Andy, you're an open book :read2:
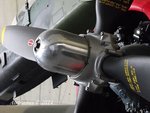
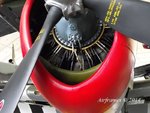
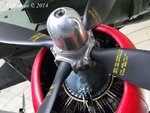
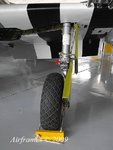
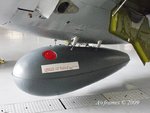
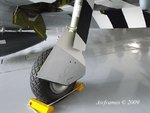
, you're right in your comment and the picture you show us is also very clear. I checked several photos on the web and trying to identify the representative for my particular model; I noticed that some show one or two hoses, ... these are some of the best photos that I relied:

5500561911_ee27553171_zps5005ff4c.jpg


republicp47thunderboltc6_zps8843281b.jpg


Zx70424_zps8e1a1c3b.jpg


It is a compliment and a great opportunity of living in this forum with people as skilled in aviation (not get tired of repeating :idea::shock::idea: )

Small space inside the cockpit challenged me to put the 2 hoses and look for accommodation as close to reality.
Deeply appreciate the time you offer me with your comments. :idea:


There is so much I'm enjoying this hobby, I am sure that with your company and closeness, I will have more and better planes !!

Thank you all !! :wav:
 
In the first and third picture, I only see one hose. In the second one, what appears to be two hoses is, in fact, the same one. One end comes out of the regulator an the other is hung right next to it. That's the end that attaches to the pilot's mask.
 
In the first and third picture, I only see one hose. In the second one, what appears to be two hoses is, in fact, the same one. One end comes out of the regulator an the other is hung right next to it. That's the end that attaches to the pilot's mask.

I never would have imagined , thanks for clarifying. I guess then and hopefully the pilot has taken his mask after leaving his plane.


Gracias de nuevo Andy.

Cheers and happy sunday to all!! :salute:

LC
 
Advancing as possible, update some photos and the progress so far. :toothy2:

To facilitate light colors I painted matte white areas where I shall begin with the yellow color of the interior of the gates, gear well, the bottom of the engine and cowling.

2014-12-10191010_zps1cabdacb.jpg


... the color used (I've had very good results with the colors of Vallejo Model Air)

2014-12-11133216_zpsb36935fd.jpg


2014-12-11133108_zps0861121b.jpg


2014-12-11133031_zpsf7bf8ebc.jpg


2014-12-11132735_zpsc215a8c6.jpg


2014-12-11132547_zpsc3d6521b.jpg


..the color used for the tips of the propeller blades ...

2014-12-11140846_zps28112197.jpg


... with the liquid mask, I cover the periphery of the engine and leave it ready to paint it in gloss black as the basis for the implementation of of ALCLAD II Polished Aluminum ...

2014-12-13175559_zps35bdd507.jpg


I made improvements to detail landing gear, making it hole detail some parts of the structure, filing, sanding, polishing parts and two different wire sizes, making hydraulic lines.

2014-12-15172710_zps6f8302cd.jpg


For these pieces I used Testors 1147 Gloss Black. And I prepared the pieces that would go in metallic color.

2014-12-16170431_zps018eb775.jpg


2014-12-16170509_zpsed7acc23.jpg


2014-12-16170549_zps93ee09d9.jpg


2014-12-16170748_zps44dd55e2.jpg


2014-12-16170820_zpsd08a6a01.jpg


... I continued in the preparation and application of color for the cockpit interiors.

2014-12-16180456_zpsaacdd2f5.jpg


2014-12-16180636_zps87388a5c.jpg


2014-12-16180714_zps93a8d236.jpg


I applied the same liquid mask, I covered the section of the rotor propeller that must retain the black color ...

2014-12-18112003_zps8d6b095b.jpg


2014-12-18112020_zps6ee8fc0a.jpg


Let dry my best all the pieces to continue further with the application of color of ALCLAD II (it is the first time I try) :!: :rolleyes: :shock:


All comments are welcome dear friends. :idea: :arrow: :lol:

:!:
:!:

If I had no chance to download more photos before Christmas, I want to take the time to wish you a very happy Christmas in the company of their loved ones. That everything is joy and happiness.
:wav::love3::wav:

Sinceramente y con mucho cariño para todos en el foro!! :thumbup::thumbup::x-mas::thumbup::thumbup:

Luis Carlos
SANCER
 
Last edited:
Nice work so far. Don't forget the retraction rods on the gear legs, which compress the oleo when the gear is retracted. If I get time later, I'll post some pics taken at Duxford, showing the rods, some other areas of the gear wells, and the engine.
 
The retraction rod is just visible in the first, and the last pictures posted by Andy. It's that 'thin', silver-coloured rod, at the top and behind the main gear leg, between the leg and the door.
It was attached at the hinge point of the leg, just inside the wing, and to the lower shackle of the oleo connection. The gear legs were too long to fit into the bays with the oleo extended, so, as the gear retracted, this rod compressed the oleo, allowing the leg, and wheel to fit. The semi-circular depression in the wheel well door, and in the wheel well wing root bulkhead, is to accommodate the tyre, otherwise it still wouldn't fit !
I'm sorting some photos I took at Duxford, which I'll post shortly, and I should have some more in books, plus a diagram - if I can get the PDF writer to hook-up for those books on my computer. Since the change-over to Windows 7, it doesn't seem to want to play !
However, in my 'Bridge Buster' P-47 build thread, there should be some pics showing how I added the rods from plastic rod, or stretched sprue.
Meanwhile, here's a few other detail shots. Note that the gear legs here are finished in 'Aluminium', as this is a later model 'bubble top'.
The 'razorback', and early 'bubble tops' had the gear legs painted Olive Drab.
More detail pics to follow soon.
 

Attachments

  • Gransden and DX 2014 352.JPG
    Gransden and DX 2014 352.JPG
    91.7 KB · Views: 107
  • Gransden and DX 2014 353.JPG
    Gransden and DX 2014 353.JPG
    100.8 KB · Views: 111
  • Gransden and DX 2014 354.JPG
    Gransden and DX 2014 354.JPG
    104.2 KB · Views: 108
  • Czech 198.jpg
    Czech 198.jpg
    96.7 KB · Views: 102
  • Czech 199.jpg
    Czech 199.jpg
    59.5 KB · Views: 114
  • Czech 201.jpg
    Czech 201.jpg
    105.6 KB · Views: 125
  • Czech 204.jpg
    Czech 204.jpg
    77.7 KB · Views: 121
  • Czech 208.jpg
    Czech 208.jpg
    98.9 KB · Views: 116
  • Czech 209.jpg
    Czech 209.jpg
    80.9 KB · Views: 100

Users who are viewing this thread

Back