Revell 1/32 Spitfire MK1 #4555

Ad: This forum contains affiliate links to products on Amazon and eBay. More information in Terms and rules

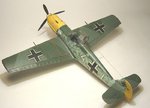
I was trying to hunt down a tutorial on brushing mottles. If I can't find one (try looking in the modeling techniques area), I'll try to cobble something together and post in a bit.
 
I may have posted this before, but a Q-tip is a great mottle maker. Roll it between your fingers to lay down any stray wisps before dipping in paint. I used to blot it on a piece of paper towel and then hit the model a couple of times. I went through 4 or 5 Q-tips to a side, so that they would not become too saturated.
 
More awesome info. Thanks Meat's. Will apply this to the 109-g,f,k,l,m,a,b,c,d,e whatever the hell revell has made.
 
Have a look at the Brush Painting Guide I posted some time ago - it's basic, but covers mottle and diffusion.
Here's a result of brush and cotton-bud (Q-tip) mottling on a Hasegawa 1/48th scale '109 - all brush-painted with Humbrol enamels, about 20 years ago.
 

Attachments

  • Gallery models 105.jpg
    Gallery models 105.jpg
    49.9 KB · Views: 92
I cut down a round brush until there was just over an 1/8" of bristle showing. Wipe of most of the paint and lightly dab the area, slowly building up the color, kinda like dry-brushing. That looks really cool Terry.

Geo
 
Thanks for another valuable pice of info.BTW she's holding up well after 20yrs. Thanks for that as well fubar57. I am becoming an expert without even applying paint to brush.:)
 
I cut down a round brush until there was just over an 1/8" of bristle showing. Wipe of most of the paint and lightly dab the area, slowly building up the color, kinda like dry-brushing. That looks really cool Terry.

Geo

That's exactly what I was going to describe. Dab the paint onto paper until there's just enough to leave a faint blotch and then dab the model over the same spot continuously, creating a denser pattern in the center of the mottle and softer edges. The mottles in reality varied quite a bit, from larger, dense blotches to very diffused and fine ones. Best to get pics of your subject and try to replicate the same style.
 
That works, but a softer, more 'sprayed on' appearance can be achieved with the cotton bud, followed by a light, dry-brushed diffusion - all described in the Brush Painting article.
 
I think you've done a fine job. Apart from the deal dots I mentioned before, there's little that I see that won't be solved with a bit more practice. For a beginner, I think you've demonstrated excellent perseverance in trying to get seams just right with sanding a filling but, as Wojtek points out, a couple of more spots might have stood a bit more attention. Just goes to show the importance of this step.
I am going to fix the engine area seams and fill them in. I is really bugging me. I know I can do better
 
Last edited by a moderator:
I think you've done a fine job. Apart from the deal dots I mentioned before, there's little that I see that won't be solved with a bit more practice. For a beginner, I think you've demonstrated excellent perseverance in trying to get seams just right with sanding a filling but, as Wojtek points out, a couple of more spots might have stood a bit more attention. Just goes to show the importance of this step.
I am going to fix the areas in question and repaint that area.I keep looking at the engine covers and they are driving me nuts.
 

Users who are viewing this thread

Back