Many of these PE parts have to be shaped before sticking to a model. It can be done with a special tool like the one below.... but it is not cheapest thing. Of course , fingers, pliers, tweezers, sticks of different diameters etc can be used too. For sticking of a such parts Cyanoacrylate glues have to be used ( e.g Superglue) But these offered as a gel are useful and give you some time for setting pieces at a correct location. For cutting off of these details you will need a sharp scalpel blade and a file for removing remainders of these "bridges" between a part and a frame. A few guys suggest airbrushing a primer overall frames with details before cutting.
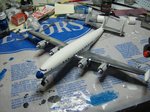
more details added, I've applied the required shade of blue to the nose (it was in the instructions) I've painted the engine cowlings light grey and did the spinners chrome. I'm just waiting for the de-icing boots to dry so I can apply a second coat. after that, I'll be coating it in Future Floor polish for a nice, smooth surface for decals to slide on to.