Airframes
Benevolens Magister
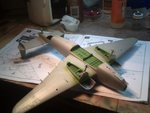
Nice work so far. I've been looking at the kit, and it can't really be easily converted to the RAF version. There are a few small things to change, but the gun turret is a major conversion, even if able to obtain a vac-form item. The kit costs £26 in the UK, so I'll wait, and hope the RAF version isn't too long in coming.