Navigation
Install the app
How to install the app on iOS
Follow along with the video below to see how to install our site as a web app on your home screen.
Note: This feature may not be available in some browsers.
More options
You are using an out of date browser. It may not display this or other websites correctly.
You should upgrade or use an alternative browser.
You should upgrade or use an alternative browser.
Russian Pe-3 Bis, Russia's first use of radar for a night fighter
- Thread starter Night Fighter Nut
- Start date
Ad: This forum contains affiliate links to products on Amazon and eBay. More information in Terms and rules
More options
Who Replied?vikingBerserker
Lieutenant General
I agree!
- Thread starter
- #43
Night Fighter Nut
Master Sergeant
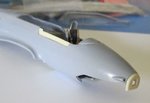
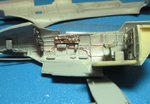
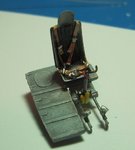
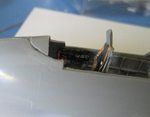
Thanks guys for your patience. I did get some more items accomplished. Granted not great but doing what I can. ") I drilled the hole in right side for machine gun as called out in directions. Made seat belt for gunner in back and started working on the rest of the flight controls.
I drilled the hole in right side for machine gun as called out in directions. Made seat belt for gunner in back and started working on the rest of the flight controls.


On the left side I started on the throttles but as you can see, has a ways to go.
I drilled the hole in right side for machine gun as called out in directions. Made seat belt for gunner in back and started working on the rest of the flight controls. On the left side I started on the throttles but as you can see, has a ways to go.
Airframes
Benevolens Magister
Good work there, some nicely done detail.
dirkpitt289
Master Sergeant
Nice work so far. I like all the scratch building going on
vikingBerserker
Lieutenant General
I agree, well done!
Erich
the old Sage
really curious gentlemen do we know for fact where these Soviet NF's served on the Ost front ? if we can narrow it down am sure Dr. Theo Boiten can fill us in as to casualties if any from LW Night fighters as his work on the Ost front continues and available hopefully in the year 2015.
- Thread starter
- #48
Night Fighter Nut
Master Sergeant
Thanks all for your support. It really helps me keep moving and trying to do a good job of it. Always learning new things as I go through each model.
Hello Erich, from what I have in the directions, it says these planes with radars operated in the Moscow district. I don't know if that would help but any information about these planes would be great as that is another reason for this hobby... to learn. BTW, for my next plane, I would like to build the Wabash Cannon Ball IV but I will need help locating someone who can make the decals for it. I already have the plane and a few pictures.
Hello Erich, from what I have in the directions, it says these planes with radars operated in the Moscow district. I don't know if that would help but any information about these planes would be great as that is another reason for this hobby... to learn. BTW, for my next plane, I would like to build the Wabash Cannon Ball IV but I will need help locating someone who can make the decals for it. I already have the plane and a few pictures.
Erich
the old Sage
in time we will know I believe from Dr. Boitens work, am not sure myslef what was flown around near or above Moscow. Wabash am curious what pics you are using as I interviewed the pilot, CO of the 425th nfs at his home here in Orygun some years back..............
- Thread starter
- #50
Night Fighter Nut
Master Sergeant
I found some pictures of this plane when I was looking for anything and everything about P-61's. I showed you the picture of the pilot you interviewed on another thread. The pictures I have were when this plane was in maintenance. I also found other websites that have artists renditions in profile of this plane and several others.
- Thread starter
- #51
Night Fighter Nut
Master Sergeant
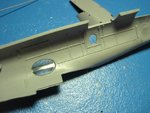
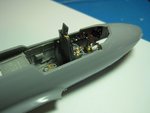
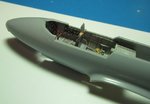
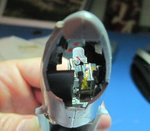
Ok, I finally found time to do more on this plane. Finished up more of the forward section adding bits of things I found from the reference material. Added a few windows and brought the halves together. Any guidance would be appreciated as I continue to learn. Thanks.
Attachments
-
 016.JPG33.1 KB · Views: 154
 -
 006.JPG51.8 KB · Views: 146
 -
 005.JPG48.8 KB · Views: 157
 -
 007.JPG54.5 KB · Views: 143
 -
 008.JPG55.6 KB · Views: 149
 -
 009.JPG36.1 KB · Views: 158
 -
 010.JPG30.8 KB · Views: 143
 -
 011.JPG34.7 KB · Views: 151
 -
 012.JPG41 KB · Views: 152
 -
 013.JPG33.6 KB · Views: 142
 -
 014.JPG30.8 KB · Views: 146
 -
 015.JPG25.1 KB · Views: 154
- Thread starter
- #53
Night Fighter Nut
Master Sergeant
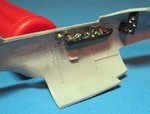
I know, the gaps are terrible but I will be filling these in and smoothing them out. That window on the top was suppose to be a solid piece but since I couldn't find that part I had to sand the window detail flat and glue in place. I'll be filling this in as well. The windows were kind of tricky but I followed you advice and coated them in future then attached them with white glue. No fogging as far as I could see.
Airframes
Benevolens Magister
Looking good so far. As the windows are attached with PVA, be very careful when masking, particularly when removing the masks after painting. Before applying any masking tape, run it between your finger and thumb, pinching slightly, to remove some of the tack, and fit it lightly in place. This should minimise the possibility of the windows pulling out when the tape is removed.
For future reference, if at all possible, fit windows after painting, if they don't need to be blended in, and can be fitted from the outside, and 'stuff' the apertures with damp tissue or crumpled kitchen foil. They can then be fitted after painting the model, by applying a few small spots of PVA (white glue) to hold the transparent part, then sealing the entire window in place by running a thin bead around the periphery, applied from the tip of a cocktail stick.
For future reference, if at all possible, fit windows after painting, if they don't need to be blended in, and can be fitted from the outside, and 'stuff' the apertures with damp tissue or crumpled kitchen foil. They can then be fitted after painting the model, by applying a few small spots of PVA (white glue) to hold the transparent part, then sealing the entire window in place by running a thin bead around the periphery, applied from the tip of a cocktail stick.
- Thread starter
- #56
Night Fighter Nut
Master Sergeant
Thanks Terry, since I do have them attached only with white glue, I may just remove them and add them later as you suggest. PVA, or white glue, disolves in water so removing them shouldn't be a problem. I was very carefull to file or sand the windows until they fit tightly all around, no gaps Any other helpful hints would be great later on as well.
Any other helpful hints would be great later on as well.Airframes
Benevolens Magister
You're welcome, and I'll keep looking in, adding suggestions if required.
Doing good!
- Thread starter
- #59
Night Fighter Nut
Master Sergeant
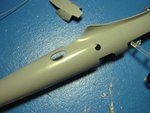
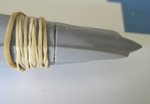
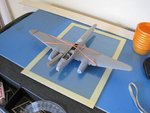
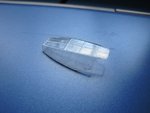
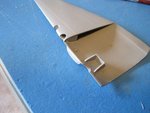
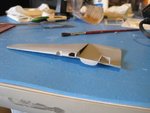
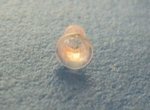
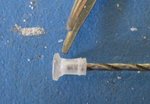
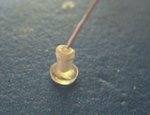
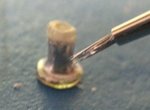
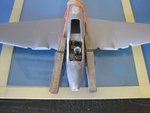
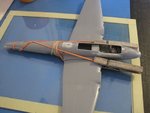
Thanks... Well I was finally able to do a little more with this plane but I'm finding the fits are terrible. There are exceptionally large gaps all over the place so it's getting interesting finding ways to fill the gaps and keep the correct shape and alignment. I'm sure most will see the gaps. Please excuse... under construction. On a lighter note, I did make a landing light for the left wing. Till next time...
On a lighter note, I did make a landing light for the left wing. Till next time... Attachments
-
 IMG_1638.jpg36.7 KB · Views: 117
 -
 IMG_1626.jpg28.4 KB · Views: 113
 -
 IMG_1627.jpg33.4 KB · Views: 115
 -
 IMG_1628.jpg33.1 KB · Views: 130
 -
 IMG_1630.jpg69.5 KB · Views: 131
 -
 IMG_1631.jpg38.3 KB · Views: 117
 -
 IMG_1632.jpg37.5 KB · Views: 150
 -
 IMG_1633.jpg40.3 KB · Views: 135
 -
 IMG_1634.jpg36 KB · Views: 141
 -
 IMG_1635.jpg27.9 KB · Views: 114
 -
 IMG_1636.jpg29.3 KB · Views: 134
 -
 IMG_1637.jpg29.4 KB · Views: 138
Airframes
Benevolens Magister
Good stuff, and I see you have a couple of little helpers!
Oh, and Happy Birthday - I forgot to post in the correct thread!
Oh, and Happy Birthday - I forgot to post in the correct thread!
Users who are viewing this thread
Total: 1 (members: 0, guests: 1)