Scratchbuilt bf-109 -- in progress

Ad: This forum contains affiliate links to products on Amazon and eBay. More information in Terms and rules

Hallo John, :)

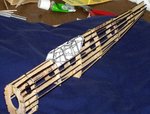
The E serie of Bf-109 had a wingspan 9.9m. So taking this into considerartion a model in 1:32 scale should have wingspan = 30.9375 cm
a model in 1:24 scale should have wingspan = 41,25 cm
So looking at your model wingspan I would say that it is the 1:24 scale.To be much more accurate I must state that the scale of your model is 1:23.6, then the wingspan of a model should be 41.94915 cm what is much more close to your number.

Now I have some questions.
1. What material did you use for building the fuselage structure ( balsa,others...?
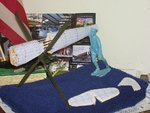
2.How deep do you want to make corrections with the cockpit area?
3.Could you resemble me what kind of a model you decided to make ( static or flying)?
4.Could you upload some pics of the cockpit conopy ( if you have this conopy of course)?
5.How more detailed cockpit do you want?

best regards,
Wojtek :)

Wojtek,

Pardon my delayed response. Way too much going on....but answers to your questions.

1. I used balsa only.
2. Wow! I'm open to suggestions on that one!
3. This will be a static model.
4. I will upload canopy picture. It's a one piece plastic.
5. Currently, the kit has no plans for a cockpit. So anything will be an improvement.

Regards,

John
 
Hi,
Don't worry about your no quick response.I also have busy days.
But let's come back to your model.I think the first step should be to fit a cockpit conopy to the fuselage to get something like this at the enclosed pic.Therefore both dimensions of the conopy and its shots will be needed.
 

Attachments

  • bf109korekta_a2.jpg
    bf109korekta_a2.jpg
    104.2 KB · Views: 177
I will do that. I planned on doping some of the wood frame tonight. You are good at the drawing!! wow!
 
It is a Photoshop only.But in reality you will have to rebuild the rear part of fuselage.It seems a semi-cross section and some additional elements will be needed to add in order to make the fuselage much more stiff in this aera.If you want we can cope with this together ,step by step certainly.And then we can make the cockpit interior.Unless you have your own idea how to do it.
 
Ah yes! Thank you. I could use step by step plans. I noticed I have to build the rear part. I don't have any better ideas. I finished doping the reast of the fuselage last night. Peeeeuw!! the smell..:)
 
Hi,
I have an additional question.
What was the thickness of balsa you have used for those cross-sections and stringers?
 
John: Just found your thread, tonight. You can do it.... get crackin' man !
I'm hung up on wing fairings....

Charles
 
I have found inspiration after seeing Charles starting the model after me and getting way ahead!!!! Last night I papered the nose - working on the rudder and tail now.. pictures soon.:D
 
John: I just noticed something... you're missing a fuselage stringer. Look
at the plans for A-3. It runs from B-2, across the bottom of B-3 to B-4. It's
where the wing attaches on each side of the fuselage. Dont leave that off.

Charles
 
John: I just noticed something... you're missing a fuselage stringer. Look
at the plans for A-3. It runs from B-2, across the bottom of B-3 to B-4. It's
where the wing attaches on each side of the fuselage. Dont leave that off.

Charles

Whew! thanks for catching that. You saved my butt!!:)
 
As part of my New Year resolutio of finishing lingering projects, I "partially" papered the fuselage, rudder and stabilizer. Here is my trusty trooper carrying it to the next part of the assembly line!:)
 

Attachments

  • bf-109 progress_post.jpg
    bf-109 progress_post.jpg
    138.3 KB · Views: 153
John: Suggestion... mix a 50/50 clear dope/thinner and paint over the
silkspan. When dry sand lightly. This will remove the seams
where the silkspan was over lapped. Also on the tail ass'y. It will make good
clean edges. Be sure to "round" the leading edges and "taper" the trailing
edges of both the wings and tail surfaces. It looks better that way !

You're also missing two very small triangular pieces that go at the lower
forward part of the cockpit. I'll let you know what they are tonight,
when I check my plans. (I'm at work)

Charles
 
Charles,

I'm so glad you mentioned doping. I'm a novice at wood and dope.

The dope product I have is made by SIG, and is labelled Supercoat (Butyrate Dope). Do I just add regular paint thinner and mix it up? do you suggest I use a broad brush or use an airbrush? Will it clog up the airbrush?

I purchased a new airbrush and am still to hook it up. What do you think?

I looked at the plans close and can't seem to find the 2 triangle parts. Since you have the same, what number is it?

Again, appreciate all your help, and thanks for hanging in there with me.

Regards,

John

John: I would check with your hobby shop about the clear dope/thinner.
I use Testors products, and the Testers thinner works good with their
products. I use a 1/2" brush for the clear dope. Let it really dry (about an
hour) before sanding... Be extra careful on top of formers, and edges.

Have you sprayed the covered surfaces with water ? This will stretch the
silkspan.

I did not look for the small triangular pieces for the cockpit, last night. I
will tonight. They go in the forward side of the cockpit, to give the canopy
something to sit on at the front corners. I'm almost sure they have a B-
number. I've written myself a note (us older people do that) so I will check
on it tonight.

Charles
 
OK, John.. looking at the main side view of the BF-109, you're looking for L-2.
Find the main former B-3. Follow it to the top, and look at the first verticle
bar of the canopy frame. You should see L-2 right there. It is attached to
the top most stringer and forms the front corner (on each side) of the
cockpit. While I have your attention find L-1. This attaches to the trailing
edge of the wing, and the fuselage. It's part of the trailing edge wing fairing.
If you look at the main side view, it's right above the word FULL in Full size side
view. Another tip, attach the landing gear (w/o wheels) to the wing, before you
attach the wing to the fuselage. It's a hell of a lot easier that way. Final note,
if it's to be rubber powered, get the rubber band in the
fuselage before you finish covering it.

Hope this helps.

Charles
 

Users who are viewing this thread

Back