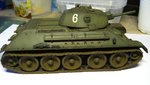
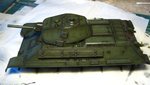
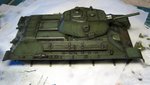
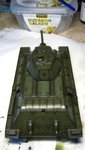
A little heads up on what's been going on with my T-34 build lately. I decided to take it down a pretty extreme path in terms of weathering and dust n dirt. Think about a desperate battles between Smolensk and Moscow in the fall/early winter '41 kinda of vibe to go with it. Seas of mud, and intense fighting going on to try and stop the German advance on Moscow.
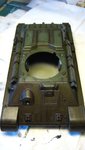
In a nutshell, I sprayed a good couple of coats of future to seal the basic green paint job as can be seen of previous pictures. Then I took out Revell aqua anthracite (black grey) and set out to make that the paintwork all raggedy and pretty much torn up. Again sealed the preliminary results of that that step in a goud couple of coats of future. Once that had dried a day or two I took out some brown oil paints, brushed a good bit onto the model (see first pic), let that sit for an hour or so and then began to 'clean it up' using a damp brush (in white spirit) and a nice big pile of cotton buds. Let it sit in the sun for a days or so and then again sealed it with a nice coat of future.
I stilll would like to try and add some more smaller subtle weathering and things and ofcourse there's still a load of mud and dust to add using pigments and things like that, but sofar I'm pretty happy with how my first AFV is coming along.
Attachments
Last edited:
")