Yep.. It might have been exactly like you said. Here is enlarged piece of the first picture posted above. If there would be a silver or yellow ring there it could be noticed . Especially that the yellow number 12 and bar are well seen while the front ring is dark. We can argue about the yellow underside of the engine cowling. However the second picture of its front area shows dark paint there comparing to the one on the wing undersides. Taking the kind of a negative used for picture taking into consideration it might be possible it was yellow. So the ring wasn't yellow because it would be as dark as the number 12. Also we can compare it to the lower part of the absorber of the landing leg. For sure it is of bare metal ( silver ) because the part wasn't painted at all.
Navigation
Install the app
How to install the app on iOS
Follow along with the video below to see how to install our site as a web app on your home screen.
Note: This feature may not be available in some browsers.
More options
You are using an out of date browser. It may not display this or other websites correctly.
You should upgrade or use an alternative browser.
You should upgrade or use an alternative browser.
What's on The Workbench (9 Viewers)
- Thread starter Heinz
- Start date
Ad: This forum contains affiliate links to products on Amazon and eBay. More information in Terms and rules
More options
Who Replied?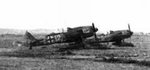
Airframes
Benevolens Magister
I think I'm right that these aircraft had the armoured cowl ring - if these were retro-fitted, then that could well explain the 'fresh' look of the RLM 76, or primer. It might even have possibly been deliberate, to enhance frontal camouflage, when viewed head on, against a brighter sky.
A4K
Brigadier General
Wow, like that scheme! Go for it Jelmer!
Looks pretty good Jelmer
Crimea_River
Marshal
Nice ones guys.
Lucky13
Forum Mascot
Nice ones guys! 
Hey fellas, I finally managed to up off my bahookie and mask the 757. Just gotta thermalize the workshop out back so I don't freeze while painting. The fuselage will receive a couple coats of Dark Sea Blue, whilst the wings and tail planes will receive a coat of Canadian Voodoo Gray but that'll wait till next weekend.
Attachments
Airframes
Benevolens Magister
Good stuff Rob.
A4K
Brigadier General
With Terry there!
Rustybugs
Banned
OOOOHHH pretty
love the colour of that tape Rob, good stuff mate!
Hehe that's frog tape, my friend. The edges of the tape are coated with this powder that when hit with moisture, it swells up a bit to give a crisp clean paint edge. Works great with both water and oil based paint.
EDIT: btw, that pic was taken a couple days before I posted it. Ll the whole thing's now got the tape on both sides. It was pretty difficult to get the paint like just right. The cheatline decals are a red and gold combo, and they're pretty thick, but I wanted to make VERY sure I was well into the line, so I had to cut out all the cheatline decals and use them as references to make sure the edges of the tape were well within the cheatline decals. I have managed to get it all right (I hope). I think, when I get the decals on, that the. Most challenging part will be getting the node decals in the right spot. And I've got detail decals by Flying Colors, so the windows and doors will be replaced by better looking ones. I didn't get the Flying Colors TWA decals, because the color on the, was too bright. From all the photos of the new TWA livery I've seen, Minicraft nailed the red and gold colors spot on, and I think the dark blue they suggested will go great with the whole thing.
EDIT: btw, that pic was taken a couple days before I posted it. Ll the whole thing's now got the tape on both sides. It was pretty difficult to get the paint like just right. The cheatline decals are a red and gold combo, and they're pretty thick, but I wanted to make VERY sure I was well into the line, so I had to cut out all the cheatline decals and use them as references to make sure the edges of the tape were well within the cheatline decals. I have managed to get it all right (I hope). I think, when I get the decals on, that the. Most challenging part will be getting the node decals in the right spot. And I've got detail decals by Flying Colors, so the windows and doors will be replaced by better looking ones. I didn't get the Flying Colors TWA decals, because the color on the, was too bright. From all the photos of the new TWA livery I've seen, Minicraft nailed the red and gold colors spot on, and I think the dark blue they suggested will go great with the whole thing.
Last edited:
Rustybugs
Banned
Frog tape?? Please a little more info about that stuff, something I could really use. I hate the little leakages I get sometimes. More about where to buy.
Rustybugs
Banned
I have several dioramas that I have in the works. Building buildings (yeah that's right) and all the little vehicles that go with them all are 1/72 and 1/76 scale jeeps, truck, tanks, and what not.
Some of the buildings I got from kits and one I scratch built

A bunch of vehicles in storage so I don't lose them or break them

Here are some close-ups of another 1/72 spitfire cockpit, I am doing 4 of them for a RAF base diorama. This is the 3rd one, one to go if I don't go blind first.


Some of the buildings I got from kits and one I scratch built
A bunch of vehicles in storage so I don't lose them or break them
Here are some close-ups of another 1/72 spitfire cockpit, I am doing 4 of them for a RAF base diorama. This is the 3rd one, one to go if I don't go blind first.
Thanks for that Rob, didn't know about that extra feature of frog tape! 
Some nice work there rusty, Terry will be especially interested in the Spitty diorama...
Some nice work there rusty, Terry will be especially interested in the Spitty diorama...
That's not a bad lookin cockpit there, rusty! I like those airliners, too.
FINALLY got painting done on the 757. Dark sea blue for the fuselage, and Canadian voodoo gray for the wings, horizontal stabilizers, and engine struts. The only assembly I was able to do, tonight was the engine exhaust to the engines.
FINALLY got painting done on the 757. Dark sea blue for the fuselage, and Canadian voodoo gray for the wings, horizontal stabilizers, and engine struts. The only assembly I was able to do, tonight was the engine exhaust to the engines.
Attachments
Airframes
Benevolens Magister
Good stuff, Rob and Rusty.