What's on The Workbench

Ad: This forum contains affiliate links to products on Amazon and eBay. More information in Terms and rules

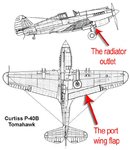
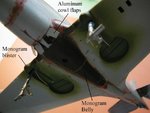
I notice on Matt308's line drawings that the plane has flaps on the under surface just ahead of the wing, these are not represented, anyone got ideas on how to make accurate flaps to stick on in 1/72?
 
Wojtek, he uses silicone, the stuff you use for sealing bathrooms, he sticks whatever he is casting into a blob of the silicone and pulls it out when the silicone is dry leaving a mould.

I'm trying to get him to send me some pics of his builds to post here in the 'models that aren't yours' thread, all North Africa vehicles, Axis Allies. Hand painted too. They're really nice builds. He's also been building a 1/24 FW190A with his nephew for the last few years.

Sorry Chris can't help you with the flap question!
 
Thanks Muller.I understand.I use the same when I need a detail of quite complex shape.But it takes usually much more time ( silicone has to be hardened).The mould of modeline is quick solution ( it is limited by the time of hardening epoxy, so if you use 10-15 min one you will get these details in the time)and what is more you can use the same piece of modeline for future.Unless you put it into hot water.:lol:I think I should make some rudders for my Fw190s using my way.So I'll take some pics.

Now these flaps..I didn't catch, sorry ,Explain it once again Gijive, please.
 
See the drawings posted on page 44 by Matt308 of the Curtiss P-40 B Around the fusalage nose section are flaps below the aircraft, completely missing on the model. I asume they are flaps for slowing aircraft on landing, and I assume they open and close. How to model best?
 
Ah! I can help you Chris! I scrathbuilt those flaps on my Academy P-40. They are represented on the kit like panel-lines, I cut them out and made new ones from plastic card. But i did it before I had the wings on.
 
Ok..here you are.Now I understand what you mean.But these flaps aren't for slowing down.These are the part of cooling system.It is radiator outlet.These were for the temperature control..Flaps are usually mounted on wing undersides.

And I agree with Muller.these are engraved on the model ( quite poor though) .If you want to make them opened you have to cut off these and either separate all of them using these you had cut off earlier or have them scratch-built.And then glued at the correct position.
 

Attachments

  • P-40B new.jpg
    P-40B new.jpg
    110.2 KB · Views: 34
Here's a pic of mine, it was the 1st 'proper' model I built after returning to the hobby after 18 years (i won't mention the MiG-3 bf109E!), its not great and the scratchbuilt flaps aren't great either, but you can get the idea how i did them.

SL380329.jpg


SL380364.jpg
 
Exceptionally good M! Looks like the real thing - used, abused, and dirty!
Some modellers won't believe that aircraft, particularly WW2 aircraft, got so dirty and stained. They'll go balls out for 'weathering', but not the dirty foot prints, heel marks, oily hand prints and just overall 'muck' - great stuff mate.
 
guys i am looking for some enigne parts on a 1/75 scale b-29
 
Thanks fellas, I didn't think it was that good, it was my 1st attempt at weathering, I thought it was way OTT! It was brush painted, also done before I discovered decal fluids. The exhaust stains are coal dust dabbed on! :lol:
 
First a big thanks you guys, some awsome ideas and weathering, Now don't worry about the prop, I got whole new model coming for just £2.51 and no postage cost. So I have a new prop to fit.
 

Users who are viewing this thread

Back