southerndoug
Airman
A post started in (comparison with) / (companionship with) / (contrast to) my Aussie comrade-in-Stuka-building-arms Grant, who is (contemporaneously) building the same Italeri beast with a different scheme/finish than me.

See Grant's thread for impressions of the quality of the model, but to summarise, we've both found poor fit at the wing roots, super thick trailing edges of wings, and chunky sprue attachments.
Build begins: I couldn't resist having a crack at detailing the engine, even though I'm not sure I'll have it on display or not. I'm envisaging an airfield diorama, so cowlings off would be nice, but I'm not convinced I can cram enough complexity into the Jumo to make me happy. Not at the first attempt anyway! The basics are there, but they are basic...


I started by getting rid of the 2D plug leads and drilling the extra hole visible in most images of the engine. Then used fine lead wire to give them something in the third dimension. The firewall is pretty sparse too, so I added extra structural components and details using the detailed manuals available here, but feel like it's still the comic book version of what's really there.


Note the extra hole added in the "ringspant" (the circular silver bit at the front of the engine) which Italeri had filled with plastic. Italeri have helfpully provided some flexible hose to add some life to the engine, but examination of the manuals shows it going in the wrong directions and places, so I tried to get that sorted. Missing from the engine are the structures that the various cowling pieces actually attach to, and although I made an attempt at scratch building these, they failed dismally. Cowls may have to go on after all...
Cockpit next: I bought the Eduard cockpit detail set, but foolishly for the Airfix kit, thinking there wouldn't be much difference. Wrong. Needed a bit of surgery to make the instrument panel fit into the tub assembly.


I thinned down the pilot seat quite a bit, but overlooked doing the same to the spent shell casing container at the rear of the gunner's position. Looks pretty fat! Had trouble locating the extra MG ammo containers too.
I also opened up the handhold on the fuselage, as they didn't have spring mounted covers like the more "modern" fighters did.

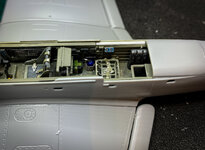
Fuselage halves joined:


Couldn't resist popping the engine on to have a look!

See Grant's thread for impressions of the quality of the model, but to summarise, we've both found poor fit at the wing roots, super thick trailing edges of wings, and chunky sprue attachments.
Build begins: I couldn't resist having a crack at detailing the engine, even though I'm not sure I'll have it on display or not. I'm envisaging an airfield diorama, so cowlings off would be nice, but I'm not convinced I can cram enough complexity into the Jumo to make me happy. Not at the first attempt anyway! The basics are there, but they are basic...
I started by getting rid of the 2D plug leads and drilling the extra hole visible in most images of the engine. Then used fine lead wire to give them something in the third dimension. The firewall is pretty sparse too, so I added extra structural components and details using the detailed manuals available here, but feel like it's still the comic book version of what's really there.
Note the extra hole added in the "ringspant" (the circular silver bit at the front of the engine) which Italeri had filled with plastic. Italeri have helfpully provided some flexible hose to add some life to the engine, but examination of the manuals shows it going in the wrong directions and places, so I tried to get that sorted. Missing from the engine are the structures that the various cowling pieces actually attach to, and although I made an attempt at scratch building these, they failed dismally. Cowls may have to go on after all...
Cockpit next: I bought the Eduard cockpit detail set, but foolishly for the Airfix kit, thinking there wouldn't be much difference. Wrong. Needed a bit of surgery to make the instrument panel fit into the tub assembly.
I thinned down the pilot seat quite a bit, but overlooked doing the same to the spent shell casing container at the rear of the gunner's position. Looks pretty fat! Had trouble locating the extra MG ammo containers too.
I also opened up the handhold on the fuselage, as they didn't have spring mounted covers like the more "modern" fighters did.
Fuselage halves joined:
Couldn't resist popping the engine on to have a look!