1/48 Lysander Mk III - Defense of Britain/Atlantic.

Ad: This forum contains affiliate links to products on Amazon and eBay. More information in Terms and rules

Thanks George - I've tried that in the past, along with another service the name of which escapes me, but didn't have much luck, possibly due to the poor connection service in my area.
Don, got your PM, and the 'Mushroom' book will be in the mail to you, hopefully on Tuesday. The '4+' book is only 9 MB, so I'll e-mail that one.
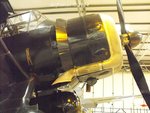
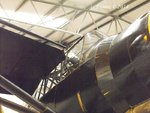
The mods are covered in both books, from memory, especially that all important center section fuel tank, and enlarged oil tank, which are highly visible under the canopy, behind the pilot's seat.
 
Here are the details pics of the Shuttleworth Collection's aircraft, plus a couple of flying shots showing the upper surfaces.
Apologies for the 'grainy' appearance of the indoor shots - they were taken without flash, under mixed sodium, fluorescent, and available light.
Note that this particular aircraft is a Canadian-built example, and the inspection panel forward of the fin differs from British-built aircraft, where the latter had a rectangular, clear 'Perspex' window in the full inspection hatch, rather than the small circular window in the center of the hatch.
Hope these help !
 

Attachments

  • D Day DX Fuji 255.jpg
    D Day DX Fuji 255.jpg
    116.7 KB · Views: 80
  • D Day DX Fuji 257.jpg
    D Day DX Fuji 257.jpg
    133.6 KB · Views: 79
  • D Day DX Fuji 258.jpg
    D Day DX Fuji 258.jpg
    122 KB · Views: 91
  • D Day DX Fuji 259.jpg
    D Day DX Fuji 259.jpg
    131.5 KB · Views: 96
  • D Day DX Fuji 260.jpg
    D Day DX Fuji 260.jpg
    96.6 KB · Views: 96
  • D Day DX Fuji 261.jpg
    D Day DX Fuji 261.jpg
    125.3 KB · Views: 95
  • D Day DX Fuji 265.jpg
    D Day DX Fuji 265.jpg
    112.6 KB · Views: 98
  • D Day DX Fuji 266.jpg
    D Day DX Fuji 266.jpg
    111.1 KB · Views: 85
  • D Day DX Fuji 268.jpg
    D Day DX Fuji 268.jpg
    127.8 KB · Views: 93
  • D Day DX Fuji 269.jpg
    D Day DX Fuji 269.jpg
    1.1 MB · Views: 93
  • D Day DX Fuji 271.jpg
    D Day DX Fuji 271.jpg
    138.7 KB · Views: 92
  • D Day DX Fuji 274.jpg
    D Day DX Fuji 274.jpg
    137.4 KB · Views: 91
  • D Day DX Fuji 275.jpg
    D Day DX Fuji 275.jpg
    99.3 KB · Views: 95
  • D Day DX Fuji 277.jpg
    D Day DX Fuji 277.jpg
    91.5 KB · Views: 89
  • D Day DX Fuji 278.jpg
    D Day DX Fuji 278.jpg
    104.1 KB · Views: 78
  • D Day DX Fuji 280.jpg
    D Day DX Fuji 280.jpg
    122.5 KB · Views: 92
  • D Day DX Fuji 281.jpg
    D Day DX Fuji 281.jpg
    125.7 KB · Views: 79
  • D Day DX Fuji 282.jpg
    D Day DX Fuji 282.jpg
    102.5 KB · Views: 97
  • D Day DX Fuji 302.jpg
    D Day DX Fuji 302.jpg
    102.4 KB · Views: 88
  • ZZ 176.jpg
    ZZ 176.jpg
    88.1 KB · Views: 81
  • ZZ 178.jpg
    ZZ 178.jpg
    79.5 KB · Views: 88
Thanks a billion Terry, wonderful shots and the close up are great. Well I have put together large sub assembly's and worked on the PE for the cockpuit area.
 

Attachments

  • L-8.JPG
    L-8.JPG
    15.5 KB · Views: 65
  • L-9.JPG
    L-9.JPG
    14.8 KB · Views: 60
  • L-10.JPG
    L-10.JPG
    65.6 KB · Views: 67
Well I am getting better at PE anyway. and yes I have since corrected the seat. I noted a commit on John's build I think about the color of the compass, should it be gray? I know I am using to much super glue. that's a hard one and my fingers are stuck to my head trying to figure it out.
 

Attachments

  • L-11.jpg
    L-11.jpg
    38.7 KB · Views: 73
  • L-13.jpg
    L-13.jpg
    38.1 KB · Views: 75
  • L-12.jpg
    L-12.jpg
    41.8 KB · Views: 85
  • L-14.jpg
    L-14.jpg
    43.4 KB · Views: 82
  • L-15.jpg
    L-15.jpg
    36.2 KB · Views: 78
  • L-16.jpg
    L-16.jpg
    64.4 KB · Views: 70
  • L-17.jpg
    L-17.jpg
    48.3 KB · Views: 73
  • L-18.jpg
    L-18.jpg
    37.7 KB · Views: 81
  • L-19.jpg
    L-19.jpg
    38.1 KB · Views: 78
Last edited:
All looking good Don. As regards the super glue, yes, we all tend to use to much but I have learned slowly that just a dab is sufficient and with things like seat belts, if you have a third hand like a bit of secured upside down tape or blue-tak, gently hold the glued seat strap down with a tooth pick and dab it with some accelerator like Zip Kicker.
 
All looking good Don. As regards the super glue, yes, we all tend to use to much but I have learned slowly that just a dab is sufficient and with things like seat belts, if you have a third hand like a bit of secured upside down tape or blue-tak, gently hold the glued seat strap down with a tooth pick and dab it with some accelerator like Zip Kicker.

I have several third hand but they are all glued to my head.
 
Don, here's a tip on how to control your superglue. Get yourself a sewing needle (you might need several as they are brittle) and clip the closed end of the eye so that you're left with a fork. This might take a couple of tries because of the brittleness. Once you have one that looks like the pic below, stick the other end in a pin vice and you have yourself a nice superglue applicator. What I then do is stick a piece of masking tape to my work bench, apply a dot of glue to the tape, and then dip the applicator into the drop of glue and apply a tiny amount to the part I want to glue. The fork in the applicator holds a small amount of glue in it until you touch another surface with it and so controls the amount you apply. Be sure to clean the thing after use as eventually you will get a build up of dried glue and it won't work any more. When this happens, you need to dip the applicator into a CA Debonder solution which you should be able to get at the same place you get your glue. It will also detach your fingers from your head.

EDIT: Yes, the compass body should be grey.

IMG_9622.JPG
 
Last edited:
Grey for the compass body... I missed that and followed the erroneous kit instructions on mine! I'm all glued-together-thumbs when it comes to CA glue myself. The worst is when things refuse to stick despite multiple applications. A spray of clear flat over the excess CA areas can help to mask it.
 
Thaks Andy, your post reminded me I have a set of SG applicators made from pe that fit exato knife handles. I can use the or try you way also. John I was planing on the clear flat to mask it, but as you know, prevention is the best method if possible.
 
Good stuff so far Don. Just check the first book I sent, as the mods to the SD Lysander moved some stuff around inside. A 'shelf' seat was fitted in the rear, facing aft, and I think the radio was moved, but you'd need to check.
The green looks rather like US Interior Green, rather than the lighter RAF Grey-Green, but it may be the lighting in the photo.
 
Yeah Terry, that's the Vallejo British interior f=green, it doesn't look right to me but it matches the Testers pea green.
 

Users who are viewing this thread

Back