1/48 Revell AT-6 Texan (1 Viewer)

Ad: This forum contains affiliate links to products on Amazon and eBay. More information in Terms and rules

Don't do any of these! The canopies are correct! On the real aircraft, when open, the rear cockpit canopy slides forward, under the fixed centre canopy, and the front cockpit canopy slides over the centre section. This means there is a space between the edges of the canopies, and the outer edge of the cockpit sill.
Note that each section of main canopy is slightly tapered towards its trailing edge, which can be seen (just!) when viewed from above.
For the rear, fixed screen, seal the joint with PVA, repeating as required and, when dry, paint over it. This will totally blend-in the rear screen.
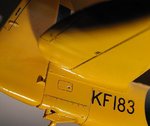
Anyway, here's a pic of where the rudder actuating cable fits. The hole has been drilled in the front of the access panel, with the cable, from stretched sprue, yet to be fitted. The small groove in the panel is the channel the cable sits in, and there is a cable on each side of the fuselage.
Hope this helps.
 

Attachments

  • Harvard Build 138.jpg
    Harvard Build 138.jpg
    49.3 KB · Views: 163
Last edited:
Many thanks Terry and your model looks great. Not much to add on my end I'm afraid. Snowed coming home from work Sunday morning and won't stop until I leave on Friday.(On our way to 15ft of the white crap again it seems) . Did some paint touch up and then went out and shoveled. Cowling has been painted and is just push fit on for the pic. A bit more touching up(the more I stare at it the more I find) and then a gloss coat of future. And now, off to the shovel!!!


Geo
 

Attachments

  • touchups.jpg
    touchups.jpg
    24 KB · Views: 127
Thanks guys. More touch-ups and a clear coat tomorrow. Mounted the clear stuff with puzzle glue. Stuff dries crystal clear and is also kind of a filler. To test it's strength, I picked up a Tamiya 1/48 spitfire by the canopy...gently. Andy, in the backgroumd you can see my attempt at a spiral before I read your great tip(Sigh).
canopy1.jpg


Geo
 
Some of nice work on the model here Geo. Looking forward to the final effect. :D
 
Thanks all. Right now the decal stage is driving me crazy.(Not a long drive according to SWMBO) Down loaded roundels to re-size and re-colors using paint.net. Coloring was no problem but every time I test drive a re-sized sample the copy comes up a different size(Gonna make all 6 the same size), sometimes larger, sometimes miniscule. According to my highly inaccurate measuring the roundels should be 5/8 of an inch minus the white outer ring. That's what I have measured on my laptop screen,but between me, the laptop and the printer, one of us is not doing his job. As stated by my kids many times, "dad should step away from computers" so any advice would be greatly appreciated. :-({|=

Geo
 
Might be easier to insert the image into a 'Word' document, re-size manually, then step and repeat as required.
First, insert the image from your files. Click on the image, and a box will open around it. Put the cursor on the top right hand corner, and drag it diagonally towards the bottom left corner, until the required size is achieved.
Print this onto normal paper as a test, then if needed, re-size accordingly. Not 100% accurate, but close enough, and can be accurate with practice.
Given all is well, now duplicate the image as many times as required, by doing the following. Remember to leave a space between each image.
Highlight the image.
Press Control -C.
Put cursor at right bottom corner of image, then press Control-V. The image will repeat.
Continue as required.
Hope this helps.
 
Sorry about the long delay but that's how long it's taken me to get the roundels sorted out. For 9 days the were ovels.(Take that Mr. Spell-check) Used the paint4models.com site for the colors used in paint.net but the pink is too light for me. Trying to match it to the fin flash. Giving the printed decals the night to dry and then clear coat them tomorrow. Now...trying to remember where I put the code letters that I put away so that I wouldn't forget where I put them.
decals.jpg


Geo
 
Just started the decal process and before I go any further, I would like to share three thoughts with those who haven't used the Testors decal system. #1)Trim the clear portion of the decal as close as possible to the color. It will fold under on itself. Witness the triangular shaped roundel just north of the right landing light, never to be corrected. B)Use lots of water. The decals become limpets when they come in contact with the surface, referring to the triangular shaped roundel.
3rd) Make extras, again pointing to triangular shaped roundel. And lastly, patience,patience,patience. I will now return you to your regular programming schedule.
0031.jpg


Geo

Still looking for the code letters.....
 
Last edited:

Users who are viewing this thread

Back