1/48 Trumpeter MiG 3 (early)

Ad: This forum contains affiliate links to products on Amazon and eBay. More information in Terms and rules

jjp_nl

Staff Sergeant
845
3
Apr 13, 2011
Having posted a few pic's yesterday of some (nearly) completed work and also gearing up for a new build from start to finish, it seemed like an interesting move to cover that build a bit more in detail.

Kit of choice is the Trumpeter MiG 3 (early) kit. In my humble opinion one the better efforts by Trumpeter. Both in terms of kit quality/details and also for the right price (recently I feel Trumpy kits tend to be a little over-priced for what you get)

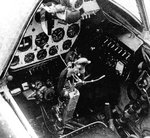
Not exactly the most brilliant plane the Ruski's ever invented, but it sure looks sweet with it's smooth lines and the office way behind that long cowling

Let's kick off with an examination of the contents.

A nice and sturdy top-opening compact box (none of the huge boxes with little plastic in it they use these days) with seperately sealed sprues, clear-parts and decals.
00-doosje.jpg


01-plakkerts.jpg


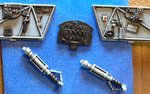
A few overview pic's of the contents of the box.
03-rekje01.jpg


04-rekje02.jpg


05-rekje04.jpg


A close-up pic showing the fine and restrained engraved details on the fuselage
06-surfacedetailfuselage.jpg


A close up pic of the details on the wing near the wing-root. Seems like trumpy's 'mad rivet guy' had his way with the moulds as well, although not nearly as extreme as on some other Trumpy kit's I've seen (anyone seen their Sea Fury to name but one)
07-surfacedetailwings.jpg


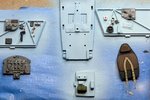
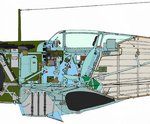
A close-up pic of the interior parts. While by no means comparable to a typical resin cockpit set it's not half bad for OOB kit parts. Plenty of potential to pick out the details with some dry-brushing, and perhaps add a little wire here and there to spice it up a little bit.
08-detailsoffice.jpg


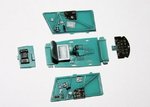
First steps of the build. Cutting the interior parts from the sprues, cleaning 'em up etc.
09-interiorparts.jpg


Hopefully I'll be able to work on this today after work. Dryfitting the interior parts, and then get the airbrush out to give the interior parts their first coats of paint. Perhaps also take care of a few sink-marks I've seen on the prop.

I'm toying around with some idea's regarding the color-scheme I wanna do, but I have to check if I have some decals in the spares box to somewhat match those colors, so you'll know when I've made up my mind about that.

Stay tuned for more updates to come soon

Jelmer
 
Looks like it'll be a nice build. I've never seen a Trumpeter 1/48 in any of my local stores.

If you think you can get this build done within a month, why not enter it in the VVS Group Build which closes end of May?
 
I'm on a bit of time crunch with other things happening in real-life ATM so I tend to shy away a bit from group builds and the like that are on some kind of dead-line (really can't do with yet another dead-line to meet if you know what I mean). It's quite impossible for me to exactly determine how much time I'll have on my hands to work on this build. If all goes according to plan it could go quite fast (within the month that is), but if I run into some kind of trouble I could also easily end up with a half-baked kit in a group build, so I'll pass this one if you don't mind.

Real pity you didn't come across this kit in a LHS near you. Well worth it's 14 euro (for me at least) and beats the ICM offering by miles imho.
 
Last edited:
I'm on a bit of time crunch with other things happening in real-life ATM so I tend to shy away a bit from group builds and the like that are on some kind of dead-line (really can't do with yet another dead-line to meat if you know what I mean). It's quite impossible for me to exactly determine how much time I'll have on my hands to work on this build. If all goes accordig to plan it could go quite fast (within the month that is), but if I run into some kind of trouble I could also easily end up with a half-baked kit in a group build, so I'll pass this one if you don't mind.

Real pity you didn't come across this kit in a LHS near you. Well worth it's 14 euro (for me at least) and beats the ICM offering by miles imho.

No problem! That is a very reasonable price for a decent 1/48 kit.
 
Should be good, seems like a nice kit and, as you say, not as over-priced as most Trumpeter kits.
 
A first minor update for the MiG 3

Work on the interior has commenced

While the side-walls have a fair bit of detail to 'em there were certain area's that were kind of bare. As I like the office to be a bit busy I decided to spice it up a tad by adding some minor wiring leading to the various devices in the office. Not sure if this this could be there or not on the actual thing, but to me ik looks good enough, and besided little can be seen of it anyway once the darn thing is in the fuselage with a canopy on top.
10-interior01.jpg


Next step was giving the interior some color. It seems to me there are quite a few blanks when it comes to how the interior looked like and what the colors were. After all this plane was nowhere near as much dissected as a say a Spitfire or a 109. Sometimes it seems just about every rivet on those can spark a 50 page discussion (no pun intended) Let's just say I felt a little creative freedom was in order when it came to interior colors.

Either way, to cut a long story short, I picked some light greyblue (probably gets fairly close to RLM65 for reference) and sprayed the major parts in their basic colors. Black grey and dark grey were used to pick out the first details with paintbrush. A little flat-aluminium to make a few scratches

The one real let down sofar has been de instument panel with all the gauges. While they are somewhat visible the detail is rather irregular in terms of being raised of just gone. So picking it out is very difficult as it doesn't respond well to dry-brushing. I did attempt to make the gauges black, which wasn't easy being so irregular, and added a drop of Microscale Krysal Klear to somewhat give the impression of glass covered gauges, but that's about as much as you can do. A little PE piece of sorts would have worked very well here. On the brighter side, it's nearly invisible anyway once in the fuselage.

11-Interior02.jpg


I think I'm gonna pick out some more details today, do a few seatbealts, and maybe gloss-coat an odd part so a wash further down the line can pick out yet more details.
 
Last edited:
THX Airframes! I redid the dash BTW. Those things do bug to be honest. While is seems the dash was mostly light coloured (prolly the same shade of grey-blue as other parts) there are a few pic that show a dark (black) coloured dash. So I stripped the paint and redid it in black-grey to be able to better pick out what little detail is present. Works better that way with a dry-brush.
 
According to my info the MiG-3 cockpit was either of steel colour or light grey painted. However I have found on Massimo Tessitori's site the info and pics below :

The real colors of the MiG-3 cockpit are still unclear. On bw photos, one can see that the instrument panel can be either black or light.
Tubes structure is seen both dark (probably dark grey A-14) or light (perhaps light blue-green primer, or light blue as the undersurfaces).
Inner face of fuselage panels appears light; in the Veesiveehma depot there is a panel with a light blue-green painted inner surface.
Green is likely for some boxes, as radio and electric equipment. Some small details were unpainted.
The compressed air bottle should be black, while the oxygen bottle could be blue or green.
The internal surfaces of the wooden rear fuselage could be painted silver or ALG-1 yellow primer.

The example under restoration by Rusavia has different colors: light blue pipe frame, ALG-5 primier floor and lower seat, black seat armor, yellow wooden structure.
I don't know if they have found traces of old paint on the restored wreckages. On most restored Polikarpovs, green and light blue are the dominant colors in the cockpit.

I'm going to agree with him that the light blue and green colours sound more correct.
 

Attachments

  • mig3-14.jpg
    mig3-14.jpg
    91.2 KB · Views: 3,408
  • mig3 cockpit color.jpg
    mig3 cockpit color.jpg
    46.4 KB · Views: 2,389
Last edited:
THX for the photo's Wurger. I've found Massmo's site as well. Lots of interesting photo's and reference material there (I think I've seen a nice profile drawing there for the color scheme I've had in mind), but the the bottom line of it all (at least for me) is that some creative freedom is allowed when it comes down to picking colors for the cockpit (as details seem to be a bit sketchy here and there), so I went with what kind of worked best for me on the parts (hence the black dashboard rather then the ligh blue-ish which was apparently more common and the frame in dark grey colors. Still gonna do a little touching up here and there though.
 
Last edited:
Sofar things are going great with the MiG-3

After the seperate parts of the office were sufficiently detailed (to my taste) the cockpit was build up as a sub-assembly and inserted into a fuselage-half, which in turn was closed up by adding the second half of the fuselage.
12-fuselage01.jpg


A few close-ups to give an idea what it looks like on this inside (I wanted to do some pic's of the parts before they were build up in a sub-assembly but the battery was dead, and I wasn't about to stop building because of an empty battery. All in all it came out quite nice and busy to my eye. I did look through Massimo's page a good bit and touched up and changed a few small odd and ends here and there to liven things up a bit.
12-theoffice01.jpg


Here's the make-shift seatbelts I did (should prolly have used natural-metal coloured wire, but as it's a national holiday here today a lot of shops were closed today. A second set of seatbelts is due to be installed on the back part of the seat.
13-theoffice02.jpg


With the fuselage halfs joined it was on to one of my 'favourite' parts of the build. Aligning that big and long upper cowling. This was a bit of challenge as the front end of the fuselage is rather flimsy with no support or strength whatsoever. It was basically two quarters of a fuselage protruding from the cockpit area. So I first carefully glued and aligned the cowling piece on one side and let the glue set and cure for half an hour or so. With good alignment and suffiecent strength on one side it was on to the other side. Same thing except a little more force was needed to keep everything in place. Ofcourse taking care not to make the whole thing fall apart because of excessive force. Even with the upper cowling installed it remains rather flimsy and without a lot of structural strength. Come to think of it, perhaps a few spacers made of sprue in between the flimsy protruding fulselage parts would have been a good idea (for added strength and easier alignment of the cowling). But all in all it came out all right. Not perfect, but nothing a fine sanding-stick can't fix without sanding away surrounding details.
14-cowlingalingnment.jpg


15-cowlalingnment.jpg


Time to looking into the wings and lower cowling now. Test-fit show a pretty decent fit, but one side an upper-wing part appears to be shot short just a tad near the wingroot (leaving a little gap). But it's nothing a little filler won't fix.
 
Last edited:

Users who are viewing this thread

Back