352nd Fighter Group "Blue Nosed Bastards of Bodney" Build

Ad: This forum contains affiliate links to products on Amazon and eBay. More information in Terms and rules

No its not a problem they are groupbuilds. They are basically a judge compeition where there's a specific subject that people build a model on. The current on is Focke Wulfs and Messerschmitts and for participating you get a badge and if you get 1st, 2nd. or 3rd you get a different one with the place you won. Hope it helps!

If you look at the forum there's a section on it that maybe can explain better!

Thanks David.
 
The brief explanation is fine Harry. Additionally I would like to mention that the participant's icon is added when a model is finished at 75% or more only.
 
If you dip the clear parts in Future, drain and let dry thoroughly, the superglue shouldn't fog it. Any gaps around the edges of the clear screens can be filled with PVA, applied with the tip of a cocktail stick, wiping off the excess with a wet finger tip. This can be repeated until satisfied and, if needed, can be painted once set.
 
Wojtek, no concerns that the superglue will fog the glazing?

The superglue becomes "milky" when you breathe or puff on that. So applying should be done with aspiration. Also Terry's advice is fine and sounds very good. However I would like to remind you that any kind of a varnish might act like a preservation and can cause gluing difficult.
 
I coat all my clear parts with Future, and many times I use the old stand by Testors tube glue applied with a tooth pic to glue them on. It creates a very strong bond and the Future keeps the clear part from fogging. You just have to remember to scrape the Future off the mating surface of the clear part so the glue can bite in(this should be done whatever glue you use). Any excess glue can be trimmed off with a hobby knife after it begins to set but before it hardens. If you want the clear part to blend in more you can do a quick mask of the clear parts to protect them and work the seam with a needle file flowed by wet sanding. It does seem a lot more work than other methods, but in cases with large glassed areas where you need a good bond, or where you want to make the joint appear seamless, it's worth the extra effort. I used this method just today on my Fw189 in the current Group Build.
 
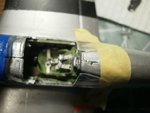
And the tale of the stupid good for nothing P-51B canopy.

Its the revell kit and the back part of the canopy is too long I think......I know this isnt a great dry fit but the lenth past the armor plate/seat has me worried... .
 

Attachments

  • P7220609.jpg
    P7220609.jpg
    42.3 KB · Views: 99
This might sound strange H, but try swapping the windows to the opposite sides - they might be upside down. It's happened to me more than once when building P51B/C variants.
If this doesn't work, then the easiest cure would be to carefully enlarge the rear of the openings, just a touch, to get the windows to 'sit' further back. If this results in a slight gap around the windows, then the PVA trick should cure that.
 

Users who are viewing this thread

Back