Navigation
Install the app
How to install the app on iOS
Follow along with the video below to see how to install our site as a web app on your home screen.
Note: This feature may not be available in some browsers.
More options
You are using an out of date browser. It may not display this or other websites correctly.
You should upgrade or use an alternative browser.
You should upgrade or use an alternative browser.
Airfix 1/24 P-51d
- Thread starter ScanmanDan
- Start date
Ad: This forum contains affiliate links to products on Amazon and eBay. More information in Terms and rules
More options
Who Replied?Airframes
Benevolens Magister
Nice work. The tanks were suspended from two loop lugs, directly under the pylon, which you'd need to fit before fitting the tanks (!).
Are you adding the fuel and pressure hoses?
Are you adding the fuel and pressure hoses?
- Thread starter
- #23
ScanmanDan
Airman
- 60
- Dec 25, 2010
Airframes--Yes I'm planing on fuel lines but that's so far down the track...
Small bits of headway;
I worked a bit on the scoop.

I also wasted heaps of time mucking about with an oil cooler which was way too big, sigh... All in the bin now, must attempt to make a smaller one.
Started working on adding a little texture to the fuselage. The MDC rivet tool is not my friend.

Don't want too much just a little.
Tail got a bit of attention.

I've managed to somehow loose the bottom port side tailpiece. I'll need to scratch up a replacement. lucky it's a pretty simple piece.
Most of my time was spent on knocking together some new main tires. The rubber ones from the kit look way too small and well just wrong to me. Here's the really rough replacements I'm bodging together.

I cast some resin blanks up and I'm now trying, not too well by the looks of these close ups, to cut some tread into the tires. The hubs will need a bit of attention too. But where's the fun in building a kit OOB?
Still sputtering along. Thanks for stopping in for a look.
Dan
Small bits of headway;
I worked a bit on the scoop.
I also wasted heaps of time mucking about with an oil cooler which was way too big, sigh... All in the bin now, must attempt to make a smaller one.
Started working on adding a little texture to the fuselage. The MDC rivet tool is not my friend.
Don't want too much just a little.
Tail got a bit of attention.
I've managed to somehow loose the bottom port side tailpiece. I'll need to scratch up a replacement. lucky it's a pretty simple piece.
Most of my time was spent on knocking together some new main tires. The rubber ones from the kit look way too small and well just wrong to me. Here's the really rough replacements I'm bodging together.
I cast some resin blanks up and I'm now trying, not too well by the looks of these close ups, to cut some tread into the tires. The hubs will need a bit of attention too. But where's the fun in building a kit OOB?
Still sputtering along. Thanks for stopping in for a look.
Dan
Aaron Brooks Wolters
Brigadier General
Wow! Looks like your putting a lot of time and effort into this! Looking great so far Dan!
 Keep up the good work. Oh, and Terry and Wurger know there stuff and are great at helping folks out.
")
Nice work!
Vic Balshaw
Major General
I just love these detailed builds, you're doing good Dan
Airframes
Benevolens Magister
Great stuff, I love those tyres! I wouldn't worry too much about getting the oil cooler and radiator absolutely right, as nothing much can be seen, even with the rear shutter open.
- Thread starter
- #29
ScanmanDan
Airman
- 60
- Dec 25, 2010
Thanks for all the encouragement, guys. The support is really appreciated.
Not much done today as I was back at work. Mostly just cleared off the bench and cleaned up a bit.
Late Santa gifts came in the mail, Yahooooooooo!

Eduard placards and seatbelts plus Hobby decal stencils and Airscale instrument panel decal. Just awaiting some markings from Ebay to add the cherry on top.
Dan
Not much done today as I was back at work. Mostly just cleared off the bench and cleaned up a bit.
Late Santa gifts came in the mail, Yahooooooooo!
Eduard placards and seatbelts plus Hobby decal stencils and Airscale instrument panel decal. Just awaiting some markings from Ebay to add the cherry on top.
Dan
Lucky13
Forum Mascot
Well then.....get cracking!
Crimea_River
Marshal
Airframes
Benevolens Magister
Great hail of bits n pieces there !
- Thread starter
- #35
ScanmanDan
Airman
- 60
- Dec 25, 2010
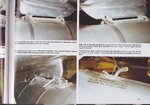
Lucky13--Alright! Here's a little progress;


Came out sortta okay. I found Eduards belts a little hard to use. They are real thin and the buckles tend to bend too easily. The pre-painting does make it quicker but if I had my way to do it again I'd have thicker buckles(Waldron? anybody seen of used them?) and make my own belts from rolled out two part epoxy putty and forgo the fancy stitching. Besides, I couldn't resist tarting up the belts with a touch of paint/shading. Just my two cents worth.
Crimea_River-- Thanks! Picture is a big help.
Javlin, Wurger Airframes-- Thanks for the comments guys.
The IP is next on the chopping block.
Dan
Crimea_River
Marshal
"Came out sorta OK"? Understatement my friend!
Airframes
Benevolens Magister
Looks good enough to me.
If you're making your own belts in the future, try using lead foil from wine bottles (or it can be purchased from Squadron or Hannant's in small sheets, I think from Plus Model). It's much easier than rolling out putty, and gives a scale appearance, and can be posed very, very easily.
The Waldron buckles can be used, but a cheaper alternative is to make them, again from foil, or thick aluminium foil found on some packaging, or very thin metal from drinks cans.
In 1/24th scale especially, this is not too difficult.
Lucky13
Forum Mascot
Awesome!
N4521U
Plastic Pirate
A "little" progress????????????????????????????? You gonna create a pilot for this thing? LMAO
Users who are viewing this thread
Total: 1 (members: 0, guests: 1)