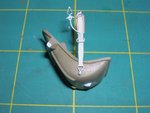
now that looks a bit of alright!!
Navigation
Install the app
How to install the app on iOS
Follow along with the video below to see how to install our site as a web app on your home screen.
Note: This feature may not be available in some browsers.
More options
You are using an out of date browser. It may not display this or other websites correctly.
You should upgrade or use an alternative browser.
You should upgrade or use an alternative browser.
Airfix 1/24 P-51d
- Thread starter ScanmanDan
- Start date
Ad: This forum contains affiliate links to products on Amazon and eBay. More information in Terms and rules
More options
Who Replied?- Thread starter
- #42
ScanmanDan
Airman
- 60
- Dec 25, 2010
Crimea River--Thanks, but you know how it is you are always your own worst critic. So much I'd like to do again...but then if I obsess about it I'd never get anything done.
Airframes Wurger-- Thanks guys. I've tried lead foil before but I can never get paint to stick to it worth a darn. Any advise as to a suitable primer/paint?
Lucky 13, N4521U Wayne Little-- Much appreciate the support gentlemen.
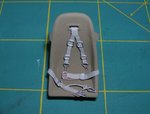
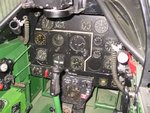
Bit of work done this morning;

Added some spurious details to try and busy up the rather plain kit panel. Had real fun with lots of tiny photoetched screwheads but worked out that if I could get them to sit where I wanted them and then flow a tiny bit of Tamiya extra thin cement around then and then gently press them into the softened plastic with a compass point. They would stick quite nicely. Then a quick prime with Mr. Surfacer thinned with lacquer thinner to seal em in and I was good to paint. I'm waiting for the paint to dry off completely before I add the Eduard placards and work on getting the Airscale instrument decal fitted.
N4521U--Pilots, Hmmm I have been very, very slowly working on the Airfix Stuka. The pilot and gunner figures aren't too bad once you sharpen up all the details with a Dremel.

Dan
Airframes Wurger-- Thanks guys. I've tried lead foil before but I can never get paint to stick to it worth a darn. Any advise as to a suitable primer/paint?
Lucky 13, N4521U Wayne Little-- Much appreciate the support gentlemen.
Bit of work done this morning;
Added some spurious details to try and busy up the rather plain kit panel. Had real fun with lots of tiny photoetched screwheads but worked out that if I could get them to sit where I wanted them and then flow a tiny bit of Tamiya extra thin cement around then and then gently press them into the softened plastic with a compass point. They would stick quite nicely. Then a quick prime with Mr. Surfacer thinned with lacquer thinner to seal em in and I was good to paint. I'm waiting for the paint to dry off completely before I add the Eduard placards and work on getting the Airscale instrument decal fitted.
N4521U--Pilots, Hmmm I have been very, very slowly working on the Airfix Stuka. The pilot and gunner figures aren't too bad once you sharpen up all the details with a Dremel.
Dan
N4521U
Plastic Pirate
Sorry mate, I had to laff, the pilot looks like I feel when I am on the can with this catheter stuck up my *%#@*. Your doing a bang up job tho.
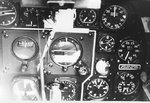
Nice work on the panel....But! think you have overdone the light grey shading/highlighting areas around the dials just a tad...would tonethose areas down just a bit with some dark grey or black pastels....just my 2 cents worth...
Airframes Wurger-- Thanks guys. I've tried lead foil before but I can never get paint to stick to it worth a darn. Any advise as to a suitable primer/paint?
Dan
For what are you going to use the primer/paint?
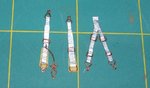
If you meant the aluminium/lead foil... there is no need for using that. It is enough of you'll wash the foil with hot water and soap befor you use this. But if you want you can shape the foil belts ( for instance ) before painting and then attach them. The only tip is to apply a thin coat. A few shots of my belts for the Airfix Bf109E.
Attachments

Airframes
Benevolens Magister
I agree with Wayne re the instrument panel, a bit heavy on the wear and tear! Don't forget the yellow-taped line around the 'basic six', if ETO based, although it's going to be a tad difficult, as the position of the instrument holes are not quite right.
As for painting the lead or aluminium foil, Wojtek is correct, you don't really need a primer, although enamel paint adheres far better than acrylic. I normally just give them a first coat of the basic colour, let it dry, and then repeat, re-touching if any paint flakes off during fitting.
As for painting the lead or aluminium foil, Wojtek is correct, you don't really need a primer, although enamel paint adheres far better than acrylic. I normally just give them a first coat of the basic colour, let it dry, and then repeat, re-touching if any paint flakes off during fitting.
- Thread starter
- #48
ScanmanDan
Airman
- 60
- Dec 25, 2010
As usual I've gone a bit heavy on the wear and tear. And here's me thinking I'm being restrained. Thanks for the feedback.
Airframes-- I'm not game enough to try that yellow line right now I'll have to work up the courage before I dive right in.
Wurger and Co-- I'll have to try a good clean and then use enamels next time on the foil. Thanks for the advise.
Here's where I'm at right now;

I've rounded off the tread on the wheels too as I thought they looked too square.

Next on the list is to rivet the port side...
Thanks for dropping in.
Dan
. Thanks for the feedback.Airframes-- I'm not game enough to try that yellow line right now I'll have to work up the courage before I dive right in.
Wurger and Co-- I'll have to try a good clean and then use enamels next time on the foil. Thanks for the advise.
Here's where I'm at right now;
I've rounded off the tread on the wheels too as I thought they looked too square.
Next on the list is to rivet the port side...
Thanks for dropping in.
Dan
Dan, that is astonishing work considering the size you're working in. Absolutely top marks mate. Are you going to fly in it when its finished ?. I'll be taking notes from your build to help mine !!! 
Quick question, it is a P51-D you're building, isn't it ?. I feel a real b*stid for saying this, but that instrument panel is not for a D model, its for a B / C version. NAA completely revamped the layout when the D came along. Is this something you could replace with plasticard ?
I've got some close-ups of the various panel layouts for the '51, and when I get my external hard drive back with all my software recovered...'hopefully' !!!... I'll get some shots off to you.
Does this kit have the option to instal a small electric motor to power the prop, as the early 1/24 ones, Spitfire / Hurricane etc, did ?.
Looking forward to the next installment
Last edited:
Airframes
Benevolens Magister
Very nice work, and I especially like the tyres. That yellow line is not as hard as you think - especially in this scale.
drgondog
Major
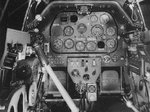
here is one of my father's P-51Ds - 1st two, then a well done model of a D, then a factory P-51B
Attachments
Last edited:
Crimea_River
Marshal
Yup, wrong panel for a D for sure.
- Thread starter
- #55
ScanmanDan
Airman
- 60
- Dec 25, 2010
Rough progress on the main gear;


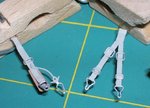
I've been struggling with making molds to cast up replacement tires. Most of the drama was of my own making in that I didn't measure out the right amount of catalyst and then further compounded the mistake by not thoroughly mixing the catalyst into the silicone. I've since lashed out for a nice digital scale to avoid mistakes in the future. ( Trying to guesstimate a ratio of 100 to 1 was always a hit or must likely miss affair.) I finally got two good castings after many failed attempts. They still needed much filling of pin holes and blemishes. While all that was going on I started to make some alterations to the gear legs. Shortened the gear by about 5mm and rebuilt the scissor links. Really rough looking but better than what came with the kit. Now all I have to do is make another set for the other side.
Geedee, drngdog and Crimea_River-- You guys are right in that Airfix got it wrong and put a B style IP in the kit. Don't know how they got it wrong but I'm not going to try and scratch one up for this build, maybe next time.
Airframes-- Thanks! I'm going to give that yellow line a shot before I install the IP.
Thanks for stopping by.
Dan
Crimea_River
Marshal
Beautiful work Dan. The home made links look impressive.
Lucky13
Forum Mascot
Indeed, impressive work mate!
Airframes
Benevolens Magister
Sure is. One small point though - the brake lines I think should loop around outside the torque scissor links. If they were through the links, full compression of the oleos would sever the lines!
Rough progress on the main gear;Dan
Strewth...thats 'rough'...gulp
 !. I am right, you do intend getting in and actually flying this babe !!!
Looks good! 
Users who are viewing this thread
Total: 1 (members: 0, guests: 1)