Airfix 1/72 - BF-110C/D - febr. '41 - Oblt. Egmond Prinz Zur Lippe Weissenfeld. (1 Viewer)

Ad: This forum contains affiliate links to products on Amazon and eBay. More information in Terms and rules

sounds good to me jjp.
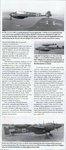
i have a magazine article which might be of some use to you for this build, i'll scan it and post it on tuesday when i'm next off work

That would be awesome! Any extra info is always good!

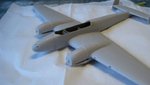
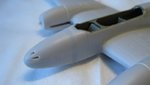
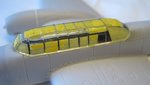
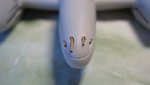
I indeed went with the Milliput option I mentioned earlier, seems like the best way to solve it the way I want it. So, I'll let the miliput set and cure for a bit and hopefully will be able to proceed with glueing the nose in place tomorrow. Some odds and end need looking into as far as the rest of the airframe is concerned, so I'll work on those in the mean time. [takes out masking tape and starts work on masking that big greenhouse on top...whooopie:crazy:]
 
Last edited:
Jelmar, nothing in the article on your subject but lots of profiles.
all from Military aircraft monthly international vol 9 iss 5
 

Attachments

  • Clipboard01.jpg
    Clipboard01.jpg
    169.3 KB · Views: 128
  • Clipboard02.jpg
    Clipboard02.jpg
    164.5 KB · Views: 121
  • Clipboard03.jpg
    Clipboard03.jpg
    164.8 KB · Views: 126
  • Clipboard04.jpg
    Clipboard04.jpg
    156 KB · Views: 124
Thanks a lot Rochie! These will be helpful for sure! Kinda drawn to the deviations of the standard overall RLM22 black scheme. Some odd white and yellow ID-bands/theater bands of sorts and the 'haifisch' on the nose and things
 
cheers guys i'll try and post the actual article but the writng might be too small to read, i'll give it a go on tuesday if you dont mind me cluttering up your thread Jelmar ?
 
Not at all, I'd like to read the article that goes with the profiles :)
 
So, did some more work on the 110.

I put a chuck of milliput in the nose section and let that cure for a day or so. As far as installing the turned brass barrels is concerned I fear I'm going to have to orde me a set of small drill bits since the ones I have availble now are not small enough, but that should only be a minor hold up.

Next the nose section was glued in place. Since the join, while pretty much flush with the rest of the fuselage, looked a little ragged in places a ran a bead of Mr. Surfacer 500 along it and sanded it smooth. I think I'll need to restore a panel line or two, but that too shouldn't be too much of a problem. I'll look it up on the scale drawings from the REVI BF-110 book and act accordingly.

Last, I started masking up the big one piece clear part. Not entirely done yet, but I'm well under way. BTW, the clearparts is not glued in place yet, just sits on the fuselage for good measure.

Since I have to wait until the small drill bits arrive there should be enough time to adress the things mentioned above, mainly restoring the panel lines around the nose section.
 

Attachments

  • 06 - nose section 01.JPG
    06 - nose section 01.JPG
    42.7 KB · Views: 107
  • 07 - nose section 02.JPG
    07 - nose section 02.JPG
    35 KB · Views: 105
  • 08 - hood.JPG
    08 - hood.JPG
    43.2 KB · Views: 100
THX guys! While I'm at it here's a little question regarding the color of the spinners. While I haven't fount any pics showing this actual aircraft I did find many pic's (mainly from the Meyer/Stipdonk series of books) that show some variations in the spinner colors of NJG.1 a/c. Some appear to have the same color as the fuselage (RLM22 black), some appear to have a white band on the tip of the spinner, some seem to have the spinner 1/3rd white or very light greyish and 2/3rds of a light color (maybe red or green?)

Does anyone of you happen to know if there were any rules/regulations as to spinner colors of the NJG.1 Nightfighter? Perhaps in regard to the staffeln they were part of? Ofcourse since no pics exist of the a/c I want to do a little creative freedom to make it look nice is allowed, so perhaps I'll do what works best for the overall finish, but I was kinda curious anyway.
 
Last edited:
Look like an interesting article, good stuff! thx for taking the time to scan and upload it.
 
Last edited:
Not much to report on this 110 in terms of photographs, but it doesn't hurt to drop a line or two...if only to let you guys know something is happening, not much but still. I've been very busy @ work (everybody is gone for the summer vacation and your truly has to pretty much keep the show on the road (since I won't go on vacation until october, I do look forward to my 10-day stay on Malta though) In addition I've been negotiating a permanent contract with my employer (rather then temporary contracts all the time) So a lot of good things are happening, just little time left to focus on sniffing some glue and working on my kits.

I'm still waiting on a set of small drill bits I ordered. The thing with the turned brass barrels I want to use it the instructions don't mention the size of the drill bit to use to make the appropriate size mounting hole. I ordered a few 0.5mm bits first, but it turned out to be too small, so I needed to order a few more. Figured I might as well get a complete set ranging from 0.5mm to 1mm. They'll come in handy from time to time. I want to wait with the paintjob to make sure the barrels will fit, doing it afterward might damage the paint work.

A for the rest, I did some checking up on the joins I did some filling and sanding on. I do this by brush painting some water soluble paint on (the ones little kids usually play with). The thing I like about it is the fact that they can be brush painted on in a very thin and very even layer, so with that on it's easy to see if irregularities remain that still need some work. Once checked...a damp tissue will remove the paint easily. I also did a few small sub assemblies, mainly the landing gear which constists of a few fiddly bits that take some time to glue in place and make sure everything aligns correctly as the same time.
 
Last edited:
It took a little while, but today my set of small size drill bits arrived, so finally I can take the step of making sure the turned brass barrels fit before going into painting mode. 0.7mm turned out to be the right size. Drilled out the mounting holes to the appropriate depth and test fit the barrels. I'm pretty pleased with the effect, a big improvement over the airfix parts without a doubt. Perhaps the right of the two central MG's needs to be drilled out a tad further to make it sit a little bit deeper in it's mounting holes. I'll look it up in the books this evening to check.

So with only some final checking up on the barrels and some masking of the hood remaining I'm getting close to finally starting the paintwork
 

Attachments

  • 09 - turned brass guns.JPG
    09 - turned brass guns.JPG
    31.9 KB · Views: 99

Users who are viewing this thread

Back