Airfix 1/72 - BF-110C/D - febr. '41 - Oblt. Egmond Prinz Zur Lippe Weissenfeld.

Ad: This forum contains affiliate links to products on Amazon and eBay. More information in Terms and rules

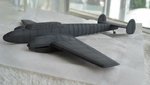
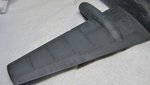
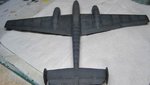
Nice work Jelmer. Shiver when I think of scratch building mass balances for 1/72.

As a matter of fact...so do I, but can't hurt to try it. I'll be installing them way towards the end of the build any way. Clumsy as I am I'd break 'em off anyway during painting and such. If it doesn't work out...well pity, then I'll have to do without. So, it won't hold up the painting.
 
Well, it took a while to get to the painting stage, but sure enough....I made a start with it, and given the basic scheme is fairly easy, laying down the basic color coats went down pretty quick. First an initial coat of overall black-grey. 2nd step was to highlight the panel lines with a darker shade of black-grey, and the 3rd step was to mist coat fine layers of the the initial lighter shade of black grey to kind blend it all together.

I need to think about what I want to do next. Given the lack of actual photographic reference or any actual data (apart from fuselage code G9+CM) A little creative freedom might work to my advantage as far as making it a little bit more lively. Maybe some fading in certain areas into other colors showing a history as a Zerstorer aircraft prior to being reorganized into a night fighter unit could work out nice. Or maybe just some (sun)fading using lighter shades of black grey/grey.
 

Attachments

  • 15 - paint 01.JPG
    15 - paint 01.JPG
    61.9 KB · Views: 100
  • 16 - paint 02.JPG
    16 - paint 02.JPG
    43.9 KB · Views: 103
i love this aircraft, i love you job, is simply very fine job and very good result that painting
 
Thanks guys. I need to think hard about making it a bit more lively. I think I've seen a nice Eduard 1/48 110E in a kind of night fighter scheme somewhere that might serve as a bit of inspiration for that part of the project
 
There was an article in a modelling magazine I have somewhere on the Eduard 110 done in night camo. If you can wait till tonight, I'll see if I can scan it for you.
 
There was an article in a modelling magazine I have somewhere on the Eduard 110 done in night camo. If you can wait till tonight, I'll see if I can scan it for you.

Sure, I'm in no hurry. Would be great If you manage to post/mail the article
 
OK, here you go. Not the whole article, just the part about the painting. This comes from Model Airplane International Sept 2009 edition and actually covers two different build and paint schemes, one being a 110D night fighter with Dackelbauch and the other a 110C in BoB livery. Sorry the images didn't come out too well but the text may help.
 
Last edited by a moderator:
THX! Excellent piece of extra information! I have a pretty similar approach in mind as the one pointed out by the step-by-step paint guide from the article. I'm in the process of adding chipps and scratches which will be toned down a tad by post shading.
 
Last edited:
Just a quick word of caution. This magazine recently published a note regarding copyright, and specifically the posting of the magazine material on the 'net. Given that Jelmer now has the info 'logged', it might be worthwhile removing the pics Andy !
 
I've been working on the first step of seriously weathering this crate. Looking at many night fighter BF-110's show many rather ragged paint jobs and lots of wear and tear (perhaps it shows extra because of the black paint) So the idea is to replicate that effect.

I did this with artist oils. A little speck of titanium white and a stroke with a cotton bud over it gives the following effect. At present the contrast isn't quite to my liking, but I intend to tone it down quite a bit (some areas more then others) by post shading a little bit with a thin mix of black-grey paint to kind of blend it together a bit more. All in all a tedious and time consuming process, but I think this is a pretty decent start to turn it into a worn a/c.
 

Attachments

  • 19 - chipping 01.JPG
    19 - chipping 01.JPG
    54.7 KB · Views: 72
  • 20 - chipping 02.JPG
    20 - chipping 02.JPG
    63.9 KB · Views: 77
  • 21 - chipping 03.JPG
    21 - chipping 03.JPG
    61.3 KB · Views: 74
Just a quick word of caution. This magazine recently published a note regarding copyright, and specifically the posting of the magazine material on the 'net. Given that Jelmer now has the info 'logged', it might be worthwhile removing the pics Andy !

I agree with Terry entirely. Therefore I deleted these pictures. Mates, please be careful of posting a such references .

BTW. A very nice work so far, Jelmer. :thumbright:
 
Last edited:
[...]
BTW. A very nice work so far, Jelmer. :thumbright:

Thanks! Took me 4 days. Thought I was about to go crazy at times :crazy:...doing mini-specks of paint and wiping it down with a q-tip a 'scratch' at a time
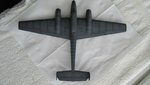
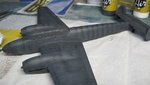
 
Nobody says.... modelling is easy. :lol: But you have really achieved a very nice effect. I remember when was building a card model of the HMS Rodney. I was thinking these AAA guns and ammo boxes on all decks would never be finished. :lol: How not to go crazy.
 
true, seems to pay off though, and that's what matters :) Although I tend to think it's only as easy or difficult as the person building the model ;)
 
Sorry about the scans guys. Have always been concerned about copyrights so no more from me.

Jelmer, the paint treatment looks fantastic. Just the right amount and noit overdone.
 

Users who are viewing this thread

Back