Airfix 1/72 - BF-110C/D - febr. '41 - Oblt. Egmond Prinz Zur Lippe Weissenfeld.

Ad: This forum contains affiliate links to products on Amazon and eBay. More information in Terms and rules

Sorry about the scans guys. Have always been concerned about copyrights so no more from me.

Jelmer, the paint treatment looks fantastic. Just the right amount and noit overdone.


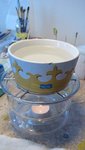
THX Andy, I think I'm gonna do a few very thin mist coats to tone it down a tad in intensity and kind of blend it in with the rest just a little bit, but overall I'm rather happy with the result sofar. Just need to let it dry for a few days since it's oil paints.

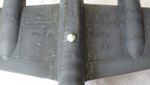
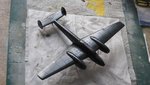
Perhaps a good time to start with some of the remaining small bits and pieces.
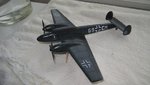
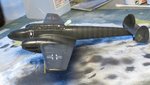
 
Not normally a problem with scans Andy, as long as a credit is posted, but this magazine group have become a bit 'tight' on copyright lately, to the point of publishing the 'warning'.
That's why I've been e-mailing similar material, rather than post it on the forum.
 
Thanks guys. I did give credit but I fully understand their point and will respect this. Moving on...
 
I did a little work on my 110. As far as weathering goes I looked into the wingroots. Many photo's show these to be rather heavily chipped and scratched, I worked on that. Some Tamiya flat aluminium paint, a little dry drybrushing with RLM02 and black-grey to add a little variation and tone the metalic effect down a tad. I also mist coated the entire model with black-grey again to slightly tone down the scratches/chipped paint effect I did earlier with oil paint. So, now I'm pretty happy with that effect all in all.

Right now I think I´m at the point where I want to gloss coat the model in preparation for decals. Any further work as far as painting, dust, dirt and stains go will be done after the decals are on.
 

Attachments

  • 22 - wingroots.JPG
    22 - wingroots.JPG
    58.6 KB · Views: 84
Last edited:
Not a whole lot to see on this next pic, other then the fact that I gloss-coated the 110 yesterday evening. I used Vallejo gloss coat this time around. Dries into a pretty darn tough protective glossy coat as well and I've found it handles better in the airbrush then future/klear. I wanna give the Gunze gloss coat a try as well one of these days and according to the Alclad II website they also started doing an acrylic gloss coat, which I hope to give a try sometime soon as well. But for now, the Vallejo gloss coat worked well for me.

I hope to start putting on some decals today. I'm wondering though if the stencils need to be put on given the black finish. Come to think of it, did the Luftwaffe big-brains take this into account anyway? I mean the service markings on an overall black a/c? Maybe a different color for the text or something?
 

Attachments

  • 23 - gloss coat.JPG
    23 - gloss coat.JPG
    88.2 KB · Views: 69
Last edited:
So, indeed I managed to make start with the decals, so out comes my 'high-tech' decalling setup ;) Decalling was rather a nightmare, well partly anyway. The OWL-decals sets I have reserved for my night fighter projects are nicely thin and glossy and once in place respond well to setting solutions. Sofar so good.

However once they come of the sheet and placed on the model, they are VERY difficult to move around. No wet brush gets these things loose again once they're on the model, so especially the lager decals are very difficult to 'micro-move' in that one sweet spot. I must have messed up about 5 fuselage crosses trying to get them in to place (thank god I have a little stash of OWL decals sets, including doubles so I had replacements on hand, but it took me all afternoon to get it somewhat right). One fuselage cross is still somewhat off and the fuselage code looks crooked in spots, but I fear I have to do with it. The smaller decals are OK to work with. With a little care they can be placed in the right spot without tearing them in half.

I tad disappointed this didn't turn out as I'd hoped I must say, but oh well....better luck next time :)
 

Attachments

  • 25 - decal construction.JPG
    25 - decal construction.JPG
    57.9 KB · Views: 115
  • 24 - decals 01.JPG
    24 - decals 01.JPG
    72.2 KB · Views: 115
Last edited:
Looks good despite the problems. I must admit, I've had a number of problems with decals from various sources recently - except old decals, which have performed well. I wonder if some companies use a different substrate to what 'used to be used' ?
 
Well...I let it sit on the shelf for a few hour and decided to get rid of the fuselage cross and codes anyway. I polished them off with a polishing stick. Need to patch up the paint work a bit, but I have some spare letters and crosses that could replace the ones removed just now. Having these crosses and letters sit all wrong of the fuselage just didn't seem right. The rest of the decals are left in place. They settled down nicely and are aligned OK and such, so no need to remove those.
 
Last edited:
Yeah well, I guess I have the advantage of it being a one-color scheme. No complicated camo-patterns, mottle or whatever to repair. Should be fairly easy to fix. I'm thinking it will be wordt the effort down the line. Those thing bug me you know, when I know I could have made it right by maybe reworking a few things and then I didn't.
 
So, after a great afternoon yesterday talking to fellow modellers about all things plastic, BBQ-ing away, having a few pints, and snooping around in this guys 'for sale' selection of his 1700+ kit stash I was all inspired to get my BF-110 back on track after the decalling disaster.

Earlier on I removed the decals but in the process damaged the underlying paintwork, so that needed pachting up. So, fired up the airbrush and set out to do that first. I'll let it dry and cure overnight and hope to be able to redo the chipped off paint and scratches with oil paint on the fuselage tomorrow. Then it's on to redoing the gloss coat and working towards redoing the decals.
 

Attachments

  • 26 - patched up paint work 01.JPG
    26 - patched up paint work 01.JPG
    80.2 KB · Views: 94
  • 27 - patched up paint work 02.JPG
    27 - patched up paint work 02.JPG
    71.9 KB · Views: 96
Last edited:

Users who are viewing this thread

Back