Despite the fact that I've shelved my 1/48 CyberHobby BF-110D for the moment and started a different build already for the FW-ME groupbuild, the idea of somehow doing an early 'Dutch based' NJG.1 nightfighter wasn't quite shelved with the 1/48 BF-110D.
A few months ago I started on an Airfix BF-110C 1/72 kit, but I wasn't sure what I wanted to do with it in terms of unit/colorscheme etc, so I put it aside, however by now I've settled on a nightfighter, so time to pick this one up again. To my mind, these Airfix kits are lovely little kits with lots and lots of possibilities to take into pretty much any direction you'd like, from Zerstorer, to JaBo to nightfighter and whatever is in between. Also depending on which variation of the kit you buy you can build either a 'C' 'D' or 'E' version that is pretty decent in outline at least. A bit simplified perhaps in certain areas (typical Airfix interior for example) but I've seen people turning it into wonderful builds nonetheless. An excellent kit with a very high value-for-money factor to it. With enough BF-110 already on the go in the ME-FW group build I'll skip the general history and technical section of the a/c as enough can be found on the 110 by reading through the various builds. I'll start with letting you guys in on the a/c I want to build.
Some of you might have heard/read about my fascination for the Leeuwarden nightfighters. This project too will cover an a/c flown by a pilot with very strong ties to the Leeuwarden nightfighters. Subject of choice for this build will be a BF-110C/D (G9+CM) flown by Egmond Prinz Zur Lippe-Weissenfeld during the night of 15-16 January 1941. The nightfighter nutters out there prolly know about him, but for those who don't, he was of Austrian nobility, and among the first pilots to achieve success in the dunkelnachtjagd. He also was among the first crews to be based at Leeuwarden when it became operational as a base for nightfighters in the late summer/early fall of 1940. He went on to score some 50 victories until he was killed when he crashed his BF-110G in March 1944 over the Belgium Ardennes when he served as Geschwaderkommodore of NJG.5. Circumstances under which the accident took place were never quite clear, but presumably he ended up in a bad weather front (low clouds and a dense snowstorm) which caused ice to form on his BF-110 leading to Weissenfeld crashing his 110 into the hilly Ardennes terrain.
Lippe-Weissenfeld was among the first pilots to be parts of the NJG.1 detachment to be based on Leeuwarden AFB during the late summer/early fall of 1940 and as early as October 1940 he took command of what was then know as Sonderkommando/Dunkelnachtjagdkommando Schiphol, later to be renamed into Bergen (aan Zee) Having read up on this subject it seems Schiphol and later on Bergen aan Zee (as the Bergen aan Zee base became operational) served as some sort of outpost/satellite base for the Leeuwarden nightfighters of 4./NJG.1. With thee or four crews and a their a/c from Leeuwarden being based there. Not only was Lippe-Weissenfeld the commander of the Bergen aan Zee detachment, he also was the very first to score a kill while operating from Bergen aan Zee. This possibly also was his very first (nocturnal?) kill altogether (a Wellington P9286, KO-K of 115 Sqn on 16-17 november) The aircraft I want to do however was flown by Lippe-Weissenfeld on 15-16 January 1941. During this night he scored his second victory while flying a BF-110C or D, G9+CM. He shot down Whitley N1521, GE-J of 58th Sqn. The entire crew was KIA. The Whitley crashed near Callantsoog, The Netherlands.
I haven't been able to establish Werk.nr of G9+CM nor do I know if it was a 'C' or 'D' version of the 110 (both versions were based at Bergen aan Zee at various point is time). I did find multiple accounts that put him at the helm of many different planes (G9+CM, G9+EM and G9+KM being among them, and some others being mentioned only by werk.nr) Also during the first half of 1941 Lippe Weissenfeld crashed a bf-110 after a mid-air collision during a training mission with Rudolf Schoenert, and had an a/c damaged in combat in combat leading to an emergency landing. In short werk.nr of G9+CM is to be left in middle amidst all the different planes he flew during this time (unless maybe some of you guys know more about it), . The more I read about it (nachtjagd in general), the more I get the general impression that getting scoring crews into action was more important them letting them fly in what was perhaps officially 'their own' plane all the time. Paired with the small size of the Bergen aan Zee detachment, I think it very likely that, depending on which a/c was combat ready or in maintenance, a crew on standby was assigned to fly whatever a/c was available.
The man himself

The kit

Owl-Decals set: This obviously covers a totally different plane at a totally different time ('42), but this makes it no less usable to do a BF-110 C/D G9+CM as it could have flown in early '41

A while ago I was able to cheaply buy a handful of these master turned-brass BF-109E gun barrel sets (including MG-FF and MF-17 barrels) I hope to use some of the MG-17 turned brass barrels to replace the Airfix kit parts to spice up the overall result a tad.

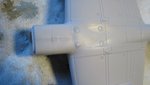
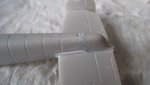
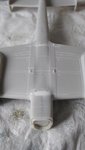
Last but not least...here's the kit as it sit on the workbench now. I started it some months ago (prior even to joining WW2AC) so some work has been done on it already. Work to be done now it cleaning up some of the joins and work toward installing the nose and nacelles. Also some extra panel-lines need to be scribed in. Airfix missed a few on the ailerons in particular. And some panel-lines appear to be a little soft compared to others, so these might need a little restoring.
Given it's overall RLM22 black colorscheme the real challenge with this build will most likely be turning the overall black scheme into something that looks 'natural' and 'interesting' if you know what I mean. The build in itself should be pretty staight forward (although I need to figure out a way to install the turned brass barrels in the nose) You'll notice I've settled on a 'C' variant. I don't know if this is correct or not, but I did it on purpose to make sure it stands out as being a different a/c compared to the 'D' version with Spanner anlage originally covered by the Owl-Decals sheet.

Jelmer
A few months ago I started on an Airfix BF-110C 1/72 kit, but I wasn't sure what I wanted to do with it in terms of unit/colorscheme etc, so I put it aside, however by now I've settled on a nightfighter, so time to pick this one up again. To my mind, these Airfix kits are lovely little kits with lots and lots of possibilities to take into pretty much any direction you'd like, from Zerstorer, to JaBo to nightfighter and whatever is in between. Also depending on which variation of the kit you buy you can build either a 'C' 'D' or 'E' version that is pretty decent in outline at least. A bit simplified perhaps in certain areas (typical Airfix interior for example) but I've seen people turning it into wonderful builds nonetheless. An excellent kit with a very high value-for-money factor to it. With enough BF-110 already on the go in the ME-FW group build I'll skip the general history and technical section of the a/c as enough can be found on the 110 by reading through the various builds. I'll start with letting you guys in on the a/c I want to build.
Some of you might have heard/read about my fascination for the Leeuwarden nightfighters. This project too will cover an a/c flown by a pilot with very strong ties to the Leeuwarden nightfighters. Subject of choice for this build will be a BF-110C/D (G9+CM) flown by Egmond Prinz Zur Lippe-Weissenfeld during the night of 15-16 January 1941. The nightfighter nutters out there prolly know about him, but for those who don't, he was of Austrian nobility, and among the first pilots to achieve success in the dunkelnachtjagd. He also was among the first crews to be based at Leeuwarden when it became operational as a base for nightfighters in the late summer/early fall of 1940. He went on to score some 50 victories until he was killed when he crashed his BF-110G in March 1944 over the Belgium Ardennes when he served as Geschwaderkommodore of NJG.5. Circumstances under which the accident took place were never quite clear, but presumably he ended up in a bad weather front (low clouds and a dense snowstorm) which caused ice to form on his BF-110 leading to Weissenfeld crashing his 110 into the hilly Ardennes terrain.
Lippe-Weissenfeld was among the first pilots to be parts of the NJG.1 detachment to be based on Leeuwarden AFB during the late summer/early fall of 1940 and as early as October 1940 he took command of what was then know as Sonderkommando/Dunkelnachtjagdkommando Schiphol, later to be renamed into Bergen (aan Zee) Having read up on this subject it seems Schiphol and later on Bergen aan Zee (as the Bergen aan Zee base became operational) served as some sort of outpost/satellite base for the Leeuwarden nightfighters of 4./NJG.1. With thee or four crews and a their a/c from Leeuwarden being based there. Not only was Lippe-Weissenfeld the commander of the Bergen aan Zee detachment, he also was the very first to score a kill while operating from Bergen aan Zee. This possibly also was his very first (nocturnal?) kill altogether (a Wellington P9286, KO-K of 115 Sqn on 16-17 november) The aircraft I want to do however was flown by Lippe-Weissenfeld on 15-16 January 1941. During this night he scored his second victory while flying a BF-110C or D, G9+CM. He shot down Whitley N1521, GE-J of 58th Sqn. The entire crew was KIA. The Whitley crashed near Callantsoog, The Netherlands.
I haven't been able to establish Werk.nr of G9+CM nor do I know if it was a 'C' or 'D' version of the 110 (both versions were based at Bergen aan Zee at various point is time). I did find multiple accounts that put him at the helm of many different planes (G9+CM, G9+EM and G9+KM being among them, and some others being mentioned only by werk.nr) Also during the first half of 1941 Lippe Weissenfeld crashed a bf-110 after a mid-air collision during a training mission with Rudolf Schoenert, and had an a/c damaged in combat in combat leading to an emergency landing. In short werk.nr of G9+CM is to be left in middle amidst all the different planes he flew during this time (unless maybe some of you guys know more about it), . The more I read about it (nachtjagd in general), the more I get the general impression that getting scoring crews into action was more important them letting them fly in what was perhaps officially 'their own' plane all the time. Paired with the small size of the Bergen aan Zee detachment, I think it very likely that, depending on which a/c was combat ready or in maintenance, a crew on standby was assigned to fly whatever a/c was available.
The man himself
The kit
Owl-Decals set: This obviously covers a totally different plane at a totally different time ('42), but this makes it no less usable to do a BF-110 C/D G9+CM as it could have flown in early '41
A while ago I was able to cheaply buy a handful of these master turned-brass BF-109E gun barrel sets (including MG-FF and MF-17 barrels) I hope to use some of the MG-17 turned brass barrels to replace the Airfix kit parts to spice up the overall result a tad.
Last but not least...here's the kit as it sit on the workbench now. I started it some months ago (prior even to joining WW2AC) so some work has been done on it already. Work to be done now it cleaning up some of the joins and work toward installing the nose and nacelles. Also some extra panel-lines need to be scribed in. Airfix missed a few on the ailerons in particular. And some panel-lines appear to be a little soft compared to others, so these might need a little restoring.
Given it's overall RLM22 black colorscheme the real challenge with this build will most likely be turning the overall black scheme into something that looks 'natural' and 'interesting' if you know what I mean. The build in itself should be pretty staight forward (although I need to figure out a way to install the turned brass barrels in the nose) You'll notice I've settled on a 'C' variant. I don't know if this is correct or not, but I did it on purpose to make sure it stands out as being a different a/c compared to the 'D' version with Spanner anlage originally covered by the Owl-Decals sheet.
Jelmer
Last edited:
")