Nicely done!
Navigation
Install the app
How to install the app on iOS
Follow along with the video below to see how to install our site as a web app on your home screen.
Note: This feature may not be available in some browsers.
More options
You are using an out of date browser. It may not display this or other websites correctly.
You should upgrade or use an alternative browser.
You should upgrade or use an alternative browser.
Airfix 1/72 - BF-110C/D - febr. '41 - Oblt. Egmond Prinz Zur Lippe Weissenfeld.
- Thread starter jjp_nl
- Start date
Ad: This forum contains affiliate links to products on Amazon and eBay. More information in Terms and rules
More options
Who Replied?")
- Thread starter
- #103
- Thread starter
- #104
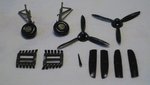
It's been a little silent here since a few days, but I just wasn't feeling like working on this one, or any model for that matter. The last two days however I managed to get some work done.
First, with the major paintjob done it was on to get some of the smaller bits and pieces out of the way. Secondly, after the decalling distaster of about two weeks ago I already managed to get the patching up of the paint on the fuselage out of the way. I still needed to re-apply the scratches and chipped paint effect I did earlier with oil-paint. So, First got that out of the way, and after that had sufficiently dried I re-applied the gloss-coat on the fuselage (and sealed decals already in place with some leftover clear gloss to prevent them from being damaged in any way through handling)
So, I guess I'm at the point now where I can give the fuselage decals another go. I'm gonna let the gloss coats dry for a day or so and hope to get to some decalling tomorrow evening. Lets see if I can get the major fuselage decals out of the way in an orderly fashion.
Attachments
Crimea_River
Marshal
Good to see you back on it Jelmer.
- Thread starter
- #106
Thanks Andy! Countless times I've made the mistake of working on a project when I didn't quite feel like it (for whatever reason) which lead to extra-not-so-great results all the time (even when I started a new simple project to get away from it) I guess it's best to not do anything if you don't feel like it. After all it's supposed to be fun. (I guess this is why I'm such a 'bad' group-builder, I need to take a break from it quite often...and before you know it the deadline for a certain group build is near, and my project is nowhere near finished  )
)
Crimea_River
Marshal
Yup. Same happened to me on my Me 410 and missed the deadline.
- Thread starter
- #108
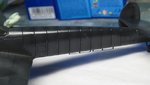
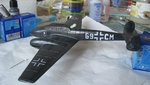
So, a little update on the 110 today. I made a start with getting the remaining decals in place. I was dreading the prospect of having to work those OWL decals again, but I figured I had the advantage of knowing what I was up against. What can I say, I found the decals again very hard to work with, but with a little extra care I managed to get them in place somewhat OK without ripping them in 5 pieces. The fuselage crosses on both sides have been placed, as well as a single victory marking on the rudders. Fuselage code has been placed on one side. Not entirely satisfied, but from a distance they look right, better then at my previous attempt.
So, on to getting the fuselage code on the other side in place. And some of the stencils Airfix provided. I will leave out a lot of them since they can't be seen on the black background color, but the ones visible will be used.
One thing I'm still considering is getting a 'II' marking of the 2nd Gruppe in place next to the England Blitz emblem (The remains of multiple OWL sets could provinde 4 seperate 'I' markings which can be put together in a single 'II' marking). Looking through the Meier Stipdonk books clearly shows some a/c to have it, but some only have the England Blitz emblem. Again, no photographic evidence exists of this actual plane around early '41, so if I do it, it will be a choice based on how some other planes looked around that time.
Attachments

Last edited:
Airframes
Benevolens Magister
It's starting to come to life - nice work Jelmer.
Crimea_River
Marshal
Lovely!
- Thread starter
- #112
Thanks guys! I hope to wrap this one up soon. I'm just about done with it and want to work on something else, but I decided I can't start something new before I finish something first. Just too many half-baked kits sitting on the shelf for no apparent reason.
Last edited:
looks great
- Thread starter
- #115
Tony Hill
Tech Sergeant
Looking good..the black is striking!
Hope those Owl decals don't give me any grief when I come to use mine....
- Thread starter
- #118
Hope those Owl decals don't give me any grief when I come to use mine....
@ Wayne
I've found during my second attempt at using them that, while they pratically come of the sheet as soon as they hit the water, holding them in the water a little longer helps quite a bit in leaving you more time to 'micro-move' them around into that desired sweet spot (perhaps some of the decal adhesive dissolves/washes away a tad more making then less sticky and stuck in the place where the 'land'). In the end I also ended up using quite a big broad brush so I could move the entire decal around rather then touch small areas with a tiny brush at a time with the risk of ripping them to pieces.
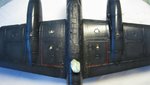
As for an update, with the OWL decals in place it was time to move on to the service markings. This is also a decalling distaster waiting to happen. As opposed to the OWL decals, the airfix decals are extremely thick and tough and out of register here and there. If it wasn't for a fellow modeller, who was working on the same kit, I talked to during the GB BBQ two weeks ago this, could have gone south very easily. But he told me about his experience with the Airfix decals and how he managed to get it done.
The decals all have an excess of carrier film to them, so a lot of trimming involved to get rid of most of it. Due to their thickness they don't settle down naetly in the panel lines and are VERY prone to silvering. They barely respond to setting solutions, even the strongest stuff I have (Daco Extra Strong setting solution) didn't do the trick (and I know it's strong as I've seen it dissolve decals completely in a matter of minutes)
What I basically did was use future to get them in place. Dip the decal in water, slide in onto the model and then brush some future over it and making sure some future 'creeps' underneath the decal. This works wonders, as I've seen no silvering sofar (even though the combination of a black background and excess carrier film easily reveals any silvering as soon as it's happening) It's rather time consuming job, but sofar it's the only way to get them on somewhat decent. Due to the fact that future slightly shrinks as it's curing/drying decals are pulled into panel lines also.
It's a rather ragged look with the future used in certain places only, but a final gloss coat to seal up the decals should blend it all together again nicely.
Attachments
Last edited:
Crimea_River
Marshal
Getting there Jelmer. Lookign forward to the finish.
Airframes
Benevolens Magister
Good, patient work there Jelmer.
Users who are viewing this thread
Total: 1 (members: 0, guests: 1)