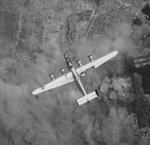
Remarkable pictures. Amazing to hear that some of the crew got out of that B-25.
Navigation
Install the app
How to install the app on iOS
Follow along with the video below to see how to install our site as a web app on your home screen.
Note: This feature may not be available in some browsers.
More options
You are using an out of date browser. It may not display this or other websites correctly.
You should upgrade or use an alternative browser.
You should upgrade or use an alternative browser.
Battle Damaged Aircraft of WW2 (1 Viewer)
- Thread starter beaupower32
- Start date
Ad: This forum contains affiliate links to products on Amazon and eBay. More information in Terms and rules
More options
Who Replied?Some amazing shots.....
B-17engineer
Colonel
A few... not sure if they were posted
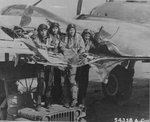
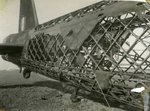
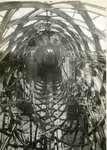
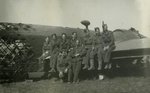
Picture 1: Flak damage in the wing of a B-17 after returning from a mission to Ludwigshaven,Germany
L to R
Pilot ,1st Lt. Roy J. Murphy
Co-pilot ,2nd Lt. Norman M. Tesch
Navigator, 1st Lt. John S. McComb
Bombadier, 1st Lt. Donald L. McKenna
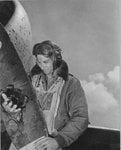
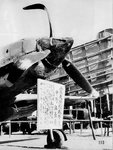
Picture 2: Lt. Ellis Wallenberg, a 73rd Fighter Squadron, 318th Fighter Group, 7th Air Force P-47 pilot, examines the prop of his plane after returning to Ryuku Retto. A 20mm cannon shell from a Japanese fighter pierced the prop blade but didn't damage anything else.Wallenberg was KIA Ryukyus, 15 July 1945.
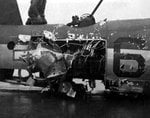
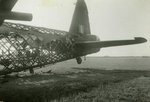
Picture 3: Martin B-26G-1-MA Marauder,s/n 43-34165
573rd BS, 391st BG, 9th AF.
Hit twice by AAA over the target on the December 2,1944 mission to Saarlauten,Germany causing the pilot to belly-land back at the base in France. Three were wounded, including the pilot, and one man was killed.
2ndLt. Edmund B. Dunn - pilot (wounded)
2ndLt. Edwin H. Armstrong - copilot
S/Sgt. Oliver W. Hartwell - bombardier
S/Sgt. Jesse M. Elerbee - flight engineer/gunner (KIA)
S/Sgt. James B. Sims - radio operator/gunner (wounded)
Sgt. John J. Wagner - armorer/gunner (wounded)
S/Sgt. Elerbee was a substitute flight engineer, replacing Sgt. Clarence B. Altic,Jr.
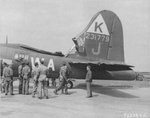
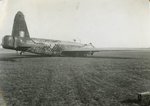
Picture 4: "This Is It" a B-17G-30-BO Flying Fortress s/n 42-31779 of the
524th BS, 379th BG, 8th AF
Picture 5: Battle damaged B-24 Liberator of the 376th Bomb Group, 15th Air Force.June 8,1944 over Toulon,France.
Picture 1: Flak damage in the wing of a B-17 after returning from a mission to Ludwigshaven,Germany
L to R
Pilot ,1st Lt. Roy J. Murphy
Co-pilot ,2nd Lt. Norman M. Tesch
Navigator, 1st Lt. John S. McComb
Bombadier, 1st Lt. Donald L. McKenna
Picture 2: Lt. Ellis Wallenberg, a 73rd Fighter Squadron, 318th Fighter Group, 7th Air Force P-47 pilot, examines the prop of his plane after returning to Ryuku Retto. A 20mm cannon shell from a Japanese fighter pierced the prop blade but didn't damage anything else.Wallenberg was KIA Ryukyus, 15 July 1945.
Picture 3: Martin B-26G-1-MA Marauder,s/n 43-34165
573rd BS, 391st BG, 9th AF.
Hit twice by AAA over the target on the December 2,1944 mission to Saarlauten,Germany causing the pilot to belly-land back at the base in France. Three were wounded, including the pilot, and one man was killed.
2ndLt. Edmund B. Dunn - pilot (wounded)
2ndLt. Edwin H. Armstrong - copilot
S/Sgt. Oliver W. Hartwell - bombardier
S/Sgt. Jesse M. Elerbee - flight engineer/gunner (KIA)
S/Sgt. James B. Sims - radio operator/gunner (wounded)
Sgt. John J. Wagner - armorer/gunner (wounded)
S/Sgt. Elerbee was a substitute flight engineer, replacing Sgt. Clarence B. Altic,Jr.
Picture 4: "This Is It" a B-17G-30-BO Flying Fortress s/n 42-31779 of the
524th BS, 379th BG, 8th AF
Picture 5: Battle damaged B-24 Liberator of the 376th Bomb Group, 15th Air Force.June 8,1944 over Toulon,France.
Attachments
Njaco
The Pop-Tart Whisperer
Harrison, did you get a scanner?
B-17engineer
Colonel
I've had one for a while just never knew how to use it..
these are from the website ww2incolor
these are from the website ww2incolor
vikingBerserker
Lieutenant General
Great shots!
B-17engineer
Colonel
GrauGeist
Generalfeldmarschall zur Luftschiff Abteilung
Impressive job of getting her down in one piece...well, the piece that was left, at least!
Nice find, H!
Nice find, H!
Njaco
The Pop-Tart Whisperer
Image landing with that section ablaze? whoaaah!
vikingBerserker
Lieutenant General
FinishForty
Airman
- 27
- Jun 26, 2011
Here are three photos from my new book (more photos on the book's Facebook page)


 All are from the 11th Bomb Group. The first is Daisy Mae down on the beach at Midway after a harrowing raid against Wake Island. Landed with no brakes- you can see hydraulic fluid blown back on the fuselage. They drained a total of 13 gallons of gas from the tanks after this crash landing, during which they luckily missed mines laid in the beach. Two men were killed and were buried at sea off Midway. You can see the open tail gun position on this plane, typical in the Pacific. I like the motorcycle with the utility sidecar visible in the picture. The second photo is Thumper, crashed on take-off from Kualoa overloaded for a photo-recon mission. #2 propeller slashed through the cockpit before cartwheeling over the plane and broke the pilot's wrist. You can see the pilot's seat through the gash in the side of the plane. The third shows Lt. Bob Strong's B-24 on Saipan after a low-altitude mine-laying mission against Chichi Jima. Passed under another B-24 as a mine was released, and it smashed into the fuselage and pinned the elevator cables. Waist gunners pried the mine out with their gun barrels as the plane was going down, finally freeing the control cables before they hit the water. When I interviewed former Squadron Commander Jesse Stay for my book, he said he stood under the plane's tail after it landed and could move it up and down and side to side with one hand. No fatalities in either of these last two incidents, but the pilot of Thumper, who could have gone home with his injury but insisted on staying with his crew, went down with another plane in late '43.
As an Amazon Associate we earn from qualifying purchases.
vikingBerserker
Lieutenant General
WOW!
vikingBerserker
Lieutenant General
Wow, that's pretty cool.
Just had a major input of "At War" books with a number of interesting BD pictures.
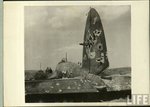
No.3 is a first: Jap a/c which survived a ramming attack on a B-29 (some of the B-29 wreckage was reportedly displayed alongside it)
Comments welcomed.
BC
No.3 is a first: Jap a/c which survived a ramming attack on a B-29 (some of the B-29 wreckage was reportedly displayed alongside it)
Comments welcomed.
BC
Attachments
Aaron Brooks Wolters
Brigadier General
The last shot looks like a Tony. Interesting shots. 
Matt308
Glock Perfection
That last pic is hard to fathom being a "ramming" attack. Looks more like a controlled landing and the plane spun at the end bending one prop blade slightly in reverse.
Armchair crash investigation expert conclusion - Matt308
Armchair crash investigation expert conclusion - Matt308
I go with Matt. Looks like a belly landing. I believe I have see a picture of the other side of that 2-D B-29 in the background.
Users who are viewing this thread
Total: 2 (members: 0, guests: 2)